# Authentication and Proctoring

Guidance on Proctoring Remote Exams and Checking Assignments for Plagiarism and AI.

# Authentication and Proctoring Index

This page provides an overview of tools and strategies used to verify student identity, maintain academic integrity, and support secure online assessments. Each entry includes a brief description and a link to the relevant Knowledge Base page or external resource. Some tools listed here may be maintained by other campus offices or appear in other Books on our Shelf. Links are provided to ensure easy navigation and to support sustainability by referencing official sources when appropriate.

---

### **Identity Verification Tools**

- **BioSig** – Biometric identity verification system used in online courses to confirm student identity.
- **Canvas Login and SSO** – Secure login system using A-State credentials to access Canvas and integrated tools.

---

### **Secure Exam Tools**

- **Respondus LockDown Browser** – Custom browser that locks down the testing environment within Canvas to prevent cheating.
- **Respondus Monitor** – Webcam-based proctoring tool that works with LockDown Browser to record students during exams.

---

### **Academic Integrity Tools**

- **Turnitin** – Plagiarism detection and writing feedback tool integrated into Canvas Assignments.
- **GPTZero** – AI-generated content detection tool used to evaluate originality in student writing.

---

### **Related Tools in Other Books**

- **Canvas** – Learning management system where most authentication and proctoring tools are deployed.
- **Kaltura** – Video platform used for student submissions and instructor feedback, sometimes relevant for oral assessments.
- **VoiceThread** – Multimedia discussion tool that allows students to record video, audio, or text responses tied to their Canvas identity; useful for authenticating participation and assessing oral communication.

# Faculty Guidance: Student Authentication

<main class="content-wrap card" id="bkmrk-certain-online-progr">**Biometric Signature ID** (**BioSig-ID**™) is a third-party tool available within Canvas classes. It is a biometric gesture‑based authentication tool that verifies the student completing coursework is the same person who enrolled by requiring a short biometric password drawn with a mouse, finger, or stylus. BioSig‑ID can be used to gate quizzes, exams, and other graded activities to support federal, accreditation, and academic integrity requirements.

<iframe allow="accelerometer; autoplay; clipboard-write; encrypted-media; gyroscope; picture-in-picture; web-share" allowfullscreen="allowfullscreen" frameborder="0" height="315" src="https://www.youtube.com/embed/RUFR4mujMXs?si=Ixd0JVDca8K93rEA" title="YouTube video player" width="560"></iframe>

<details><summary>About Biometric Signature ID (BioSig-ID™)</summary>

BioSig ID uses biometric gesture software to measure the unique way every user moves their mouse, finger, or stylus when they authenticate with their biometric password. Biometric identifiers such as the length, speed, direction, angle, and height of each stroke are collected by the software to create the user's unique biometric profile. In seconds, after drawing only 3-4 characters, BioSig-ID software establishes whether the user who registered is the same person trying to access the account.

The password will only need to be created one time and will be used each time they are asked to authenticate in a Canvas course. The input password is instantly compared against the previously created enrollment profile, and access is only granted if they match.

Students can create their biometric password with a mouse, stylus, or their finger on a variety of computers and devices. The biometric password cannot be replicated by someone else. Students will be required to authenticate their identity with BioSig ID prior to completing quizzes, tests, assignments, and discussion boards. All authentications take place within Canvas.

</details><details><summary>Required use at A-State</summary>

Arkansas State University is required by federal law and regional accreditors to confirm the identity of all students who take online courses. Authenticating students’ identities throughout their coursework ensures the institution's academic integrity while preserving the quality of the online degree you earn. To meet the requirements of federal law and regional accreditation, Arkansas State University requires online students to authenticate their identity through BioSig ID.

</details>## Setting Up BioSig‑ID in Canvas

If you are required or would like to enable BioSig-ID in your Canvas course, please review the following sections for guidance on what you need to enable, configure, and monitor BioSig‑ID in your courses. Student enrollment and validation steps are not documented here and should be accessed via the **[student support page](https://kb.astate.edu/books/authentication-and-proctoring/page/student-help-biometric-signature-id-biosig-id).**

### The BioSig‑ID Admin App

BioSig‑ID is enabled and managed through the BioSig‑ID™ Admin item in the Course Navigation menu.

Key actions instructors take:

- Authorize BioSig‑ID access to the course (one‑time).
- Decide what activities require authentication (quizzes, exams, selected assignments).
- Use the BioSig‑ID Admin App to apply authentication to selected activities.
- Monitor activity and exceptions using the BioSig‑ID Reporting Dashboard
- Review and update guarded items after course copies.

➡ Official step‑by‑step guidance:

- **[Canvas BioSig‑ID Admin App – Getting Started ](https://setup.biosig-id.com/portal/en/kb/articles/canvas-biosig-id-admin-app)**

<iframe allow="autoplay; fullscreen; picture-in-picture; clipboard-write; encrypted-media; web-share" allowfullscreen="allowfullscreen" frameborder="0" height="360" src="https://player.vimeo.com/video/893891531?h=d9c29e39ca" title="vimeo-player" width="640"></iframe>

---

### Course Setup Best Practices

BioSig‑ID works best when authentication is introduced early and used consistently.

Recommended practices:

- Add one low‑stakes BioSig‑ID‑protected activity early in the term so students can enroll and practice.
- Use BioSig‑ID periodically, rather than only once at the end of the course.
- Avoid deleting BioSig‑ID‑linked quizzes or modules after setup, as this can break the LTI connection.
- After copying a course to a new term, re‑authorize and reconvert guarded quizzes.

➡ Official course setup guidance:

- **[BioSig‑ID Canvas Course Setup &amp; Best Practices](https://setup.biosig-id.com/portal/en/kb/articles/course-set-up#Best_Practices)**

---

### Common Problems and Solutions

This section outlines common problems instructors encounter when using BioSig‑ID, along with likely causes and specific Canvas settings to check before escalating the issue.

#### **Common scenarios:**

<details><summary>Students report that content is locked or they cannot access an activity</summary>

Likely causes:

- The student has not completed the required BioSig‑ID verification activity in the module that releases content.
- The student completed BioSig‑ID enrollment or verification in a different course, but not in the current one.
- The BioSig‑ID‑protected activity was copied from a previous term, but intercepts were not updated after the course copy.

What faculty should check:

- Student progress in the module to verify which required items have been completed.
- Module prerequisites and requirements to confirm the correct activity controls release.
- The BioSig‑ID Admin App to confirm guarded guarded activities (quizzes or assignments) are properly updated and configured.
- Instructions provided to students clearly state what BioSig‑ID activity must be completed and what it unlocks.

</details><details><summary>Students say they completed the BioSig‑ID but it is not working</summary>

 Likely causes:

- BioSig‑ID enrollment and verification are course‑specific; enrollments and required activities must be completed in each course.
- The student completed initial enrollment but did not complete the verification activity tied to the current module or assessment.

What faculty should check:

- Module progress for the student in the current course.
- Whether the BioSig‑ID activity tied to content release was completed.
- Course instructions clarify that BioSig‑ID steps must be completed within each course.

</details><details><summary>Content releases too early or out of sequence</summary>

 Likely causes:

- The same BioSig‑ID activity was reused across multiple modules.
- Module requirements were not set to enforce sequential completion.
- The BioSig‑ID activity was added to a module but not set as a required item.

What faculty should check:

- That each BioSig‑ID verification activity is used only once and not reused across modules.
- Module settings to confirm sequential order is enabled when appropriate.
- Module requirements to ensure the BioSig‑ID activity is marked as required for completion.

</details><details><summary>Faculty receive frequent BioSig‑ID support requests early in the term</summary>

 Likely causes:

- Students are encountering BioSig‑ID for the first time during a high‑stakes assessment.
- Instructions for enrollment and verification are embedded late or not explicitly tied to module release.

What faculty should check:

- Whether a low‑stakes BioSig‑ID activity is included early in the course.
- That instructions explain why the activity is required and what it unlocks.
- That students are directed to the official student support page for enrollment help.

</details>#### Diagnostic Check: Is this a BioSig-ID issue or a Canvas issue?

Faculty should verify:

1. The BioSig‑ID Admin App is authorized, and the correct quizzes or activities are guarded.
2. Module prerequisites and requirements are correctly configured.  
    
    - See: **[How do I add requirements to a module?](https://community.instructure.com/en/kb/articles/660897-how-do-i-add-requirements-to-a-module) and [How do I add prerequisites to a module?](https://community.instructure.com/en/kb/articles/660896-how-do-i-add-prerequisites-to-a-module)**
3. The student’s module progress matches expectations. 
    - See: **[How do I use modules to view the progress of students in a course?](https://community.instructure.com/en/kb/articles/660912-how-do-i-use-modules-to-view-the-progress-of-students-in-a-course)**

If

- BioSig‑ID is configured correctly **and**
- Module logic is correct **and**
- The student still cannot access the content

➡ **[Contact A‑State Online Faculty Support](https://kb.astate.edu/books/authentication-and-proctoring/page/student-authentication#bkmrk-technical-support)** for further assistance.

---

### Monitoring Student Authentication (Reporting Dashboard)

Faculty and coordinators can review authentication events, validation history, and exceptions using the BioSig‑ID Reporting Dashboard.

What you can see:

- Validation and attempt history
- Irregular or failed authentications
- Time‑stamped activity associated with protected assessments

➡ Reporting documentation:

- **[BioSig‑ID Reporting Dashboard (Technical Documentation)](https://setup.biosig-id.com/portal/en/kb/technical-documentation/biosig-id-reporting-dashboard)**

---

## Where to Get Help

For questions about using **BioSig-ID**™ in your courses, please contact **A-State Online Faculty Support.**

**Phone:** (870) 680-8464

**Email: <facultysupport@astate.edu>**

Monday-Friday 8:00 AM- 5:00 PM *(Hours vary during holidays)*

### Technical Support

Technical support for **BioSig-ID** is provided by BSI Software Support and is available online.

- **[Open a Ticket with BioSig-ID Support](https://help.biosig-id.com/portal/newticket?departmentId=384156000000006907 "BioSig-ID Ticket")**
- **[BioSig-ID™ Help Site](https://help.biosig-id.com/portal/kb/biosigid "BioSig-ID Help Site")**

### General BioSig‑ID Reference Information

<div>- **[BioSig-ID™ Technical Requirements](https://help.biosig-id.com/portal/kb/articles/technical-requirements-for-users-6-8-2019)**
- **[BioSig-ID™ FAQ](https://help.biosig-id.com/portal/kb/biosigid/faqs)**
- **[Technical Support Contact and Ticket Response Times](https://help.biosig-id.com/portal/kb/articles/technical-support-contact-and-ticket-response-times)**
- **[Technical Requirements for Users](https://help.biosig-id.com/portal/kb/articles/technical-requirements-for-users-6-8-2019)**

</div>### Student setup and troubleshooting resources

<div>For enrollment steps, device setup, password resets, and input troubleshooting, faculty should direct students to the [**BioSig‑ID Student Help page**](https://kb.astate.edu/books/authentication-and-proctoring/page/student-help-biometric-signature-id-biosig-id)</div><p class="callout success">***Note:** To avoid any issues, students are **strongly encouraged to complete the initial enrollment process on a full computer with a mouse.**  After they have completed their initial enrollment, they can then add additional devices, such as a tablet or mobile phone.*</p>

</main>

# Exam Proctoring

How to use Respondus LockDown Browser and Monitor to Proctor exams

# Lockdown Browser vs. Test Manager

Respondus 4.0 Campus-wide (Test Manager) is a test management software used by faculty to create tests, quizzes, exams, and surveys to administer to students. Respondus Lockdown Browser is a web browser used by students to access and take Canvas quizzes, tests, or exams.

## How do they work?

Respondus 4.0 and Canvas both allow the instructor to create/originate tests within their respective applications. Where Respondus 4.0 excels is in its ability to automatically convert **properly formatted** Word documents into an online exam format. The Canvas quiz system is better when creating new individual questions. Mostly because using the Respondus test manager requires the additional step of uploading the exam into the Canvas course shell. Once uploaded to Canvas, the exam is indistinguishable from ones created in Canvas. If not done when uploading from Respondus 4.0, the exams can then be deployed in the course for students to take.

Regardless of where a test originates, when it is deployed in a course, it can have Respondus Lockdown Browser enabled to work with it. You can set or reset enablement by selecting the Lockdown Browser option in the Course menu. On your first visit, you will be presented with some information on how the Browser works. You can then select Continue to LockDown Browser to see the list of all deployed exams in your class. You can then modify the setting of the test selected to require the LockDown Browser or not. This process will automatically add "MUST BE TAKEN WITH RESPONDUS LOCKDOWN BROWSER" to the test title.

**Note**: This name will carry over if a course is copied, but the setting to require Respondus doesn't always. You will either need to go through the process to enable the LockDown Browser for the exam again in the new class or click the Fix It button in the Course Tool for the exam to be properly registered in the new class.

When Respondus LockDown Browser is enabled, a student will not be allowed to take the test without it. New Quizzes in Canvas will force the LockDown Browser program to launch when starting an exam. For Classic Quizzes, the students will need to log into Canvas from the LockDown Browser before they can begin.

## How do they work together?

In summary, the steps are as follows:

- Create the test. Either in Canvas or Respondus 4.0 Campus-wide (Test Manager) and upload it to Canvas.
- Deploy the exam to a content area and set the test availability. Either in Canvas or when uploading the test from Respondus 4.0.
- The student then takes the test on the chosen day through the Respondus Lockdown browser.

# Respondus Lockdown Browser

---

Respondus LockDown Browser is required for online exams in some courses. Your instructor will tell you if it is required for the course.

**Respondus Lockdown Browser™** is a custom browser that locks down the testing environment within Canvas. When students use Respondus Lockdown Browser they are unable to print, copy, go to another URL, or access other applications. When an assessment is started, students are locked into the exam until they submit it for grading. Respondus Lockdown Browser is available from the **[ITS Software Downloads page.](https://kb.astate.edu/books/applicationssoftware/page/a-state-software-downloads "ITS Software Downloads")**

## System Requirements

<div id="bkmrk-windows%3A-11-and-10-d">- - **Windows:** 11 and 10 [**Details**](https://respondus.com/lockdown-system-requirements)
        - 75 MB permanent space on the hard drive
    - **Mac:** macOS 11 to 15.0+ 
        - 120 MB permanent space on the hard drive
    - **iOS:** 12.0+ (iPad only). Must have a compatible LMS integration. **[Details](http://respondus.com/can-an-ipad-be-used-with-lockdown-browser-instructions-for-faculty)**
    - **Chromebook: [Details](https://respondus.com/can-a-chromebook-be-used-with-lockdown-browser-and-respondus-monitor-higher-ed)**
- ### Respondus Monitor Requirements 
    
    
    - Web camera (internal or external) &amp; microphone
    - A broadband internet connection 
        - **[How much bandwith is required for Respondus Monitor to run?](https://support.respondus.com/hc/en-us/articles/4409604111515-How-much-bandwidth-is-required-for-Respondus-Monitor-to-run)**

</div>## Quick Links for Faculty

<div id="bkmrk-quick-start-guide-fo"><div>- **[Quick Start Guide for Classic Quizzes](https://web.respondus.com/qsg-canvas-instructor)[ ](https://community.canvaslms.com/t5/Instructor-Guide/What-options-can-I-set-in-a-quiz/ta-p/683)PDF**[ ](https://community.canvaslms.com/t5/Instructor-Guide/What-options-can-I-set-in-a-quiz/ta-p/683)
- **[Quick Start Guid for New Quizzes](https://web.respondus.com/qsg-canvas-new-instructor) PDF**
- **[Instrutions to enable iPad app for Responuds Monitor exams. ](https://support.respondus.com/hc/en-us/articles/28053131252251-Can-an-iPad-be-used-with-Respondus-Monitor-instructions-for-faculty)**
- **[Respondus Webinar Series](https://web.respondus.com/webinars/ "Respondus Webinars")**

</div></div>## Quick Links for Students

<div id="bkmrk-general-video-about-">- **[General Video about Respondus for Students](https://web.respondus.com/lockdownbrowser-student-video/)**
- **[Student Quick Start Guide for Classic Quizzes](https://web.respondus.com/student-help/rldb-quickstartguide-instructure-student/) PDF**
- **[Canvas Overview Video for Classic Quizzes](https://www.youtube-nocookie.com/embed/KDGE2AjhZ5I?rel=0&amp;autoplay=1)**
- **[Student Quick Start Guide for New Quizzes](https://web.respondus.com/rldb-quickstartguide-canvas-new-student/) PDF**
- **[Canvas Overview Video for New Quizzes](https://www.youtube-nocookie.com/embed/do01E4qnkw4?rel=0&amp;autoplay=1)**
- **[iPad Instructions for Students](https://support.respondus.com/hc/en-us/articles/4409607211163-Can-an-iPad-be-used-to-take-a-LockDown-Browser-exam-instructions-for-students "Instructions for Students")**
- **[How to update the Respondus Lockdown Browser](https://support.respondus.com/hc/en-us/articles/4409607243035-How-to-update-LockDown-Browser)**

</div>## Frequently Asked Questions

Q. I am using Respondus LockDown Browser for a test and I am being asked to choose a server. Which one do I choose?

A. Please select "AState Canvas" from the Available System drop down list.

Q. I am trying to take a Respondus Test and it is asking me for a password?

A. Please check which browser you are using. If the test requires Respondus LockDown Browser, you must use that browser to access Canvas to take your test. The Respondus LockDown Browser will enter the password for you.

Q. Can an iPad be used with LockDown Browser?

A. The iPad Edition of "LockDown Browser" (available from Apple App Store) enables a student to use an iPad to take exams that require LockDown Browser. However, the instructor must select the appropriate setting for each exam to permit students to use an iPad.

<div id="bkmrk-instrutions-to-enabl">- **[Instrutions to enable iPad app for Responuds Monitor exams. ](https://support.respondus.com/hc/en-us/articles/28053131252251-Can-an-iPad-be-used-with-Respondus-Monitor-instructions-for-faculty)**
- **[iPad Instructions for Students](https://support.respondus.com/hc/en-us/articles/4409607211163-Can-an-iPad-be-used-to-take-a-LockDown-Browser-exam-instructions-for-students "Instructions for Students")**

</div>### Common Error Messages/Issues and their related Articles

<div id="bkmrk-%22there-is-a-problem-">- **["There is a problem with the settings for this exam"](https://support.respondus.com/hc/en-us/articles/4409604162843--There-is-a-problem-with-the-settings-for-this-exam)**
- **[macOS 11.0 (and newer) Camera and Microphone Permissions ](https://support.respondus.com/hc/en-us/articles/4409595659931-macOS-11-0-and-newer-Camera-and-Microphone-Permissions)**
- **[Cannot detect or configure the webcam](https://support.respondus.com/hc/en-us/articles/4409607200923-Cannot-detect-or-configure-the-webcam)**
- **[Mac: Webcam not Detected](https://support.respondus.com/hc/en-us/articles/4409607283739-Mac-Webcam-Not-Detected)**
- **[Spinning wheel during webcam check](https://support.respondus.com/hc/en-us/articles/4409595685019-Spinning-Wheel-During-Webcam-Check)**
- **[AWS - Unable to connect](https://support.respondus.com/hc/en-us/articles/4409607363611-0x-AWS-xxx-Unable-to-connect-to-Respondus-Server-AWS)**

</div>## General Troubleshooting Steps

Follow these general troubleshooting steps for Respondus LockDown Browser:

<div id="bkmrk-check-that-the%C2%A0compu"><div>1. Check that the **[computer is supported](https://support.respondus.com/hc/en-us/articles/4409607170459-What-are-the-computer-requirements-for-installations-of-Respondus-LockDown-Browser)**
2. Check that the **[Respondus Lockdown Browser is up to date](https://support.respondus.com/hc/en-us/articles/4409607243035-How-to-update-LockDown-Browser)**
3. Uninstall and then **[reinstall the LockDown Browser](http://www.astate.edu/a/its/software-downloads/ "Download Respondus")**
4. Open a **[Ticket with Respondus](https://support.respondus.com/hc/en-us/requests/new)**

</div></div>## Technical Support

Technical support for Respondus Lockdown Browser is provided by Respondus and is available online using the following links

- **[Knowledge Base](http://www.respondus.com/esupport/?_a=knowledgebase "Respondus Knowledge Base")**
- **[Respondus eSupport](http://www.respondus.com/esupport/ "Respondus eSupport")**
- **[Open a Support Ticket with Respondus](https://support.respondus.com/hc/en-us/requests/new)**

<div id="bkmrk--0"></div>

# LockDown Browser Setup Guide for Instructors

This guide provides instructors with the steps and best practices for using **Respondus LockDown Browser** in Canvas, including how to enable it, configure exam settings, inform students via the syllabus, and ensure a smooth testing experience.

---

## What is LockDown Browser?

Respondus LockDown Browser is a customized browser that increases the security of online testing in Canvas. When students use LockDown Browser to access an assessment, they are unable to print, copy, go to another URL, or access other applications. Students are locked into the assessment until it is submitted for grading.

<iframe allowfullscreen="allowfullscreen" frameborder="0" height="315" src="//www.youtube.com/embed/WcHuYw488nM?si=pSnYS6DXMblL8uAx" title="YouTube video player" width="560"></iframe>

**[10 Reasons to use LockDown Browser](https://web.respondus.com/wp-content/uploads/2019/09/LDB_10Reasons_HE_web.pdf)**

**[Download LockDown Broswer for the ASU System](https://download.respondus.com/lockdown/download.php?id=957936032)**

---

## Enabling LockDown Browser in Canvas

To enable LockDown Browser for a quiz:

1. Navigate to your Canvas course. 
    - Skip to step 4 if you have a quiz already created and set up.
2. Select **Quizzes** from the course navigation.
3. Create or edit a quiz. 
    - **[Create a Classic Quiz](https://community.canvaslms.com/t5/Instructor-Guide/What-options-can-I-set-in-a-quiz/ta-p/683)**
    - **[Create a New Quiz ](https://community.canvaslms.com/t5/Instructor-Guide/How-do-I-create-a-quiz-using-New-Quizzes/ta-p/1173)**[ ](https://community.canvaslms.com/t5/Instructor-Guide/How-do-I-create-a-quiz-using-New-Quizzes/ta-p/1173)
4. After saving the quiz, go to **LockDown Browser** in the course navigation. 
    - You may need to **[edit the Course Navigation](https://community.canvaslms.com/t5/Instructor-Guide/How-do-I-manage-Course-Navigation-links/ta-p/1020)** if you do not see this option.
5. In the LockDown Browser Dashboard, locate your quiz and click the arrow to select **Settings**.
6. Choose **Require LockDown Browser for this exam**.

### Instructor Quick Start Guides for Respondus LockDown Browser and Monitor

- **[Classic Quizzes](https://web.respondus.com/qsg-canvas-instructor)[ ](https://community.canvaslms.com/t5/Instructor-Guide/What-options-can-I-set-in-a-quiz/ta-p/683)PDF**[ ](https://community.canvaslms.com/t5/Instructor-Guide/What-options-can-I-set-in-a-quiz/ta-p/683)
- **[New Quizzes](https://web.respondus.com/qsg-canvas-new-instructor) PDF**[ ](https://community.canvaslms.com/t5/Instructor-Guide/What-options-can-I-set-in-a-quiz/ta-p/683)

> #### **Copied Course Reminder:**
> 
> When you copy a Canvas course, external tools like Respondus do not necessarilly copy their settings to the new course. Please remember to check that all your Responus Exams show the LockDown Browser as Required in the new course.

---

### Additional Configuration Options

After enabling LockDown Browser, instructors can customize exam settings to meet their needs:

- **Enable Respondus Monitor**
    - Respondus Monitor™ is a companion product for LockDown Browser that enables institutions to protect the integrity of non-proctored, online exams. Students use their own computer and a webcam to record assessment sessions, all without leaving the institution's learning management system.
        
        <iframe allowfullscreen="allowfullscreen" frameborder="0" height="315" src="https://www.youtube.com/embed/7J1K8-R20ao" width="560"></iframe>
        
        **[More information about Respondus Monitor](https://www.respondus.com/products/monitor/)**
- **Allow iPad use**
    - Exams that also require the use of a webcam (Respondus Monitor) the instructor must enable an optional iPad setting.
    - **[Instrutions to enable iPad app for Responuds Monitor exams. ](https://support.respondus.com/hc/en-us/articles/28053131252251-Can-an-iPad-be-used-with-Respondus-Monitor-instructions-for-faculty)**
- **Use Instructor Live Proctoring**
    - Institutions that license LockDown Browser and Respondus Monitor have an additional remote proctoring option that works with Zoom, Microsoft Teams, Google Meet and other video systems. The new “Instructor Live Proctoring” option uses LockDown Browser to prevent cheating on the computer itself, while the instructor watches students via video conferencing. This method is only recommended for small class sizes where instructors can effectively observe and track students during the exam. <iframe allowfullscreen="allowfullscreen" frameborder="0" height="315" src="https://www.youtube.com/embed/cqp77AHvmBA" width="560"></iframe>
        
        **[? More information](https://web.respondus.com/instructor-proctoring/)**

---

## Add LockDown Browser Info to Your Syllabus

To ensure students are prepared before the first exam, include the following sample text in your syllabus or course introduction:

> ### **Using LockDown Browser for Online Exams**
> 
> This course requires the use of LockDown Browser for online exams. Watch this short video to get a basic understanding of LockDown Browser and the optional webcam feature (which may be required for some exams).  
> Then download and install LockDown Browser from this link:  
> **[https://download.respondus.com/lockdown/download.php?id=957936032 ](https://download.respondus.com/lockdown/download.php?id=957936032)**
> 
> Canvas has two different quiz types. For more information, see:
> 
> - **[How do I view Quizzes as a student](https://community.canvaslms.com/t5/Student-Guide/How-do-I-view-Quizzes-as-a-student/ta-p/472)**
> - **[How do I take a Classic Quiz?](https://community.canvaslms.com/t5/Student-Guide/How-do-I-take-a-quiz/ta-p/507)**
> - **[How do I take a quiz in New Quizzes?](https://community.canvaslms.com/t5/Student-Guide/How-do-I-take-a-quiz-in-New-Quizzes/ta-p/291)**
> 
> For additional details on using LockDown Browser, review the Student Quick Start Guide (PDF) for the quiz type that is being used:
> 
> - **[Classic Quizzes](https://web.respondus.com/student-help/rldb-quickstartguide-instructure-student/) PDF**
> - **[New Quizzes](https://web.respondus.com/rldb-quickstartguide-canvas-new-student/) PDF**
> 
> ### **System Requirements:**
> 
> - **Windows:** 10, 8, 7 (75 MB of storage required)
> - **Mac:** macOS 10.12 or higher (120 MB or storage required)
> - **iOS:** 11.0+ (iPad only; must be enabled by instructor)
> - **Internet:** Use a wired high-speed connection. Wireless is not recommended.
> 
> ### **Environment Requirements:**
> 
> Before taking an exam, students should:
> 
> - Choose a quiet, interruption-free location
> - Rerun the Webcam and System Checks if using a different setup
> - Ensure sufficient time is available to complete the exam
> - Turn off mobile devices and remove unauthorized materials
> - Remain at their workstation for the duration of the test

If you will be using Responus Monitor, consider adding the following

> #### Additional Webcam Requirements:
> 
> - Select a location where you are comfortable having a video recording taken of yourself and your workspace environment.
> - To produce a good webcam video, do the following: 
>     - Avoid wearing baseball caps or hats with brims.
>     - Ensure your computer or tablet is on a firm surface (a desk or table). Do NOT have the computer on your lap, a bed, or any other surface where the device (or you) is likely to move.
>     - If using a built-in webcam, avoid tilting the screen after the webcam setup is complete.
>     - Take the exam in a well-lit room and avoid backlighting, such as sitting with your back to a window.

---

## Set Up a Practice Exam to Prevent Issues Before Test Day

We strongly encourage instructors to create a **practice exam** early in the course—especially if using LockDown Browser or Respondus Monitor. A low-stakes or ungraded practice exam helps students:

- Confirm their device, browser, and internet connection are compatible
- Resolve login or access issues
- Understand the exam interface and expectations

If you're using Respondus Monitor, a practice exam also allows you to **evaluate the student's testing environment**:

- Is the lighting sufficient to clearly see the student?
- Is the camera positioned correctly?
- Is there any glare or backlighting that obscures the video?

Students should also use the **Help Center** in LockDown Browser to run the **Webcam Check** and **System Check**, and **[perform an internet speed test](https://www.speedtest.net/)** to ensure a stable connection.

**[How much bandwith is required for Respondus Monitor to run?](https://support.respondus.com/hc/en-us/articles/4409604111515-How-much-bandwidth-is-required-for-Respondus-Monitor-to-run)**

If issues arise, they can consult the **[Knowledge Base](https://support.respondus.com/hc/en-us/categories/4409595254811-LockDown-Browser-Respondus-Monitor)** or contact the ITS Help Desk.

Leave the practice quiz available for the duration of the course with unlimited attempts so students can retest if they switch devices.

---

## Support Resources

### For Creating and Deploying Exams

These offices can assist instructors with designing, setting up, and deploying LockDown Browser exams, including practice exams and syllabus integration.

#### Center for Excellence in Teaching and Learning (CETL)

Email: **<CETL@AState.edu>**  
Phone: **870-972-2334**  
Location: *Dean B. Ellis Library, Suite 301*

#### A-State Online Faculty Support

Email: **<aos@astate.edu>**  
Phone: **870-680-8464**  
Location: *International Programs Building*

---

### For Technical Support with the LockDown Browser or Canvas

These resources are available to help with installation issues, login problems, and troubleshooting during exams.

#### [ITS Help Desk](https://kb.astate.edu/books/respondus-lockdown-browser)

For general technical issues and Canvas login support:  
Email: **<itshelpdesk@AState.edu>**  
Phone: **870-972-3933**  
Location: *Dean B. Ellis Library, Room 149*  
**[Submit a Canvas Support Ticket](https://services.asusystem.edu/TDClient/35/astate/Requests/ServiceDet?ID=275)**

#### Respondus Technical Support

For issues specific to LockDown Browser and Respondus Monitor:

- **[Knowledge Base](http://www.respondus.com/esupport/?_a=knowledgebase "Respondus Knowledge Base")**
- **[Respondus eSupport](http://www.respondus.com/esupport/ "Respondus eSupport")**
- **[Open a Support Ticket with Respondus](https://support.respondus.com/hc/en-us/requests/new)**

##### Training Webinars

**[Register](https://web.respondus.com/support/webinars/)** for free training webinars on LockDown Browser and Respondus Monitor.

# Download and How to Use Instructions

## How to Download Respondus Lockdown Browser

1. <span style="color: #000000;">Go to the A-State [Software Downloads](https://pack.astate.edu/pages/software-downloads) page</span><span style="color: #993300;">  
    </span>
2. Click on the Download link under header for **Respondus LockDown Browser**
3. On the page, click on the **Install Now** or **Download** button to begin downloading the software onto your device.  
      
    [![R3.png](https://kb.astate.edu/uploads/images/gallery/2021-09/scaled-1680-/8Rzr3.png)](https://kb.astate.edu/uploads/images/gallery/2021-09/8Rzr3.png)
4. Once the download is complete, you should be able to see the application on your computer (either in your Launchpad for Mac or by searching for it on Windows). The application could like either of the two images below. See below the images for instructions on how to use Respondus Lockdown Browser!

![1*RoUM0ntUeQG7ZRU4DQ4hOw.png](https://kb.astate.edu/uploads/images/gallery/2021-09/scaled-1680-/1roum0ntueqg7zru4dq4how.png) ![LockdownBrowser-Icon-MAC.jpeg](https://kb.astate.edu/uploads/images/gallery/2021-09/scaled-1680-/lockdownbrowser-icon-mac.jpeg)

---

## How to take a **Classic Quiz** with Respondus Lockdown Browser: 

1. Open **Respondus Lockdown Browser** on your device.
2. Make sure **AState-Canvas** is selected and then click **Continue**.
3. You will be asked to close out of applications that you have open in order to launch the application. This is what it will look like if you are being asked to close currently open applications. You will need to click Close Applications in order to completely open **Respondus Lockdown Browser**.  
      
    [![IMG_5485.jpg](https://kb.astate.edu/uploads/images/gallery/2021-09/scaled-1680-/img-5485.jpg)](https://kb.astate.edu/uploads/images/gallery/2021-09/img-5485.jpg)
4. Click **Login to Canvas** so you can be taken to the pack portal.
5. Enter your A-State email address and password and click **Login**.  
      
    [![image-1756913126967.png](https://kb.astate.edu/uploads/images/gallery/2025-09/scaled-1680-/image-1756913126967.png)](https://kb.astate.edu/uploads/images/gallery/2025-09/image-1756913126967.png)
6. Authenticate using **Duo Mobile**.  
    [![duopush.png](https://kb.astate.edu/uploads/images/gallery/2023-04/scaled-1680-/duopush.png)](https://kb.astate.edu/uploads/images/gallery/2023-04/duopush.png)
7. Once you complete Steps 1-6, you will be logged into Canvas through Respondus Lockdown Browser. You will need to navigate to the course you have an exam in and go through the instructions provided by your professor.

---

## How to take a **New Quiz** with Respondus Lockdown Browser: 

1. Close all programs, unless one is used to connect you to the Internet.
2. Log into Canvas with a regular browser, select the course and navigate to the quiz.
3. If LockDown Browser has not previously been installed, you will be prompted to download and install the browser.
4. Return to the quiz and open it to launch LockDown Browser.
5. If prompted to close a blocked program (e.g. screen capture, instant messaging), choose **Yes**.

---

<p class="callout info">For further assistance, contact the ITS Help Desk at 870-972-3933 or stop by IT Support Services (<itsupportservices@astate.edu>). It is located on the bottom floor of the Dean B. Ellis Library, Room 149.</p>

# Respondus FAQ

- If a Canvas test taken in Respondus Lockdown Browser gets locked and the student cannot finish the test, the student should reboot the machine to regain control of their computer. However, this method may or may not allow students to regain control of their computer.
- If rebooting does not work, the student can click the globe icon, click on Proctor exit, and type the password *escape.* This will completely shut down Respondus Lockdown Browser. The Canvas test, however, will still be locked and the instructor will need to be contacted by the student.  
    <p class="callout warning">**The ITS Helpdesk or Ellucian After Hours staff cannot contact professors on a student's behalf and cannot reset exams.** </p>
- Respondus LockDown Browser requires Windows 8 or above and Mac OS 10.12 or above. Anything older than these stated operating systems are not supported for Respondus.

<p class="callout info">For further assistance, contact the ITS Help Desk at 870-972-3933 or stop by IT Support Services (<itsupportservices@astate.edu>). It is located on the bottom floor of the Dean B. Ellis Library, Room 149.</p>

# Honorlock Exam Proctoring - Introduction

Honorlock is an online proctoring tool that allows students to complete secure exams on-demand under proctor guidance without the need to schedule them. They use a combination of artificial intelligence technology, website/multi-tab blocking BrowserGuard, and live proctoring to safeguard academic integrity. AI monitors test sessions for suspicious activity and notifies the proctor about any problematic or unsanctioned behavior. The proctor reviews flagged behavior in real time and may "pop-in" to speak to students directly.

Please see the short video below to learn how Honorlock works in more detail.

<div data-ratio-h="0.02" data-ratio-w="45.83" id="bkmrk-"><iframe allowfullscreen="allowfullscreen" class="youtube-video dp-embed-refreshed" data-mce-fragment="1" data-ratio-h="0.56" data-ratio-w="1.78" height="315" src="https://www.youtube.com/embed/sZOuIfYpsyI?si=Kb8qiw4LuZh4cSy2&enablejsapi=1&version=3&playerapiid=ytplayer" title="YouTube video player" width="560"></iframe>

</div>*Honorlock (2024, May 13). How Does Honorlock Work? \[Video File\]. Retrieved from $WIKI\_REFERENCE$/pages/gf660445eeed7f5203300b110d2745696*

# Instructor Guide to Using Honorlock with Canvas

# Using Honorlock with Canvas

<span style="font-weight: 400;">(pulled from the Honorlock Knowledge Base: [https://honorlock.kb.help/using-honorlock-with-canvas/](https://honorlock.kb.help/using-honorlock-with-canvas/))</span>

<span style="font-weight: 400;">7 min. read </span>

<span style="font-weight: 400;">last update: 07.08.2025</span>

<iframe data-mce-fragment="1" height="408px" src="https://www.youtube.com/embed/7YhWL961KRY" width="727px"></iframe>

*Honorlock now provides native support for both Canvas Classic Quizzes and Canvas New Quizzes. Please follow the same process below for either quiz option.* Additionally, please refrain from adding emojis to your exam name, as Honorlock cannot currently support these characters and will not allow test takers to begin the assessment.

## Overview

1\) Navigate to Honorlock in your Learning Management System. If you have questions on how to access this, please contact your institution or organization for the specific location.

2\) It’s time to enable Honorlock in your exams. All exams for your course will be listed here. Click the blue '**Enable**' button.

3\) Once the exam has been enabled, you can enable the Proctoring Settings of your choice. To enable a setting, simply click on the box for that setting. The blue checkbox will indicate that the option is enabled. Clicking on it again will deselect this option and turn it off. Depending on the options your administrator determines, you may or may not see all of these settings. Some options may include a lock icon indicating that your administrator doesn't allow this setting to be edited for all assessments. For additional explanations about these settings, please scroll to Section Two of this article.

4\) Next, select the Test Taker Guidelines you deem applicable to this assessment. You’ll notice that we now have a list of items you can select to tell your test takers what they can or cannot do during the assessment. We strongly encourage you to clarify or expand upon any or all of the items you choose to enable in the **Additional Instructions** section below. These guidelines and Additional Instructions will be visible to test takers when starting their exam and will be utilized by our proctors to determine what is and isn’t allowed during the assessment.

5\) The next section is the Accommodations section. These will only be visible to the Honorlock proctors. Whatever the accommodation may be, please include the test taker's name and the accommodation details in this section. For more information, please visit [Accommodations with Honorlock](https://honorlock.kb.help/accommodations-with-honorlock/).

6\) Last but not least, you have the Assessment Visibility toggle. We always suggest you leave this to the “no” option as default, which would respect the assessment availability dates and times you set up within your LMS itself. Selecting “yes” here would allow the test takers to see the assessment listed outside the preset window you had previously selected.

## Proctoring Settings

- **Record Webcam** - Records HD video of the test taker’s face and testing environment using the webcam built into their device or external webcam.
- **Record Screen** - Records HD video of the test taker’s laptop or desktop screen.
- **Record Web Traffic-** Logs and monitors the browser activity in Google Chrome during the exam.
- **Test Taker Photo -** Requires the test taker to take a still picture before beginning their assessment.
- **Test Taker ID** - Requires the test taker to take a picture with their webcam of their government-issued photo ID, or their test taker photo ID. Honorlock will ensure the name on the ID matches the name within the LMS.
- **Room Scan:** This requires the test taker to show a 360-degree view of their testing environment, and there will be onscreen messaging informing them of this. If you are requesting your test takers show certain items - blank scratch paper, their cell phone being placed out of reach, etc.- use the Additional Instructions Section below to detail what you’d like your test takers to do for the Room scan.
- **Calculators** - Allows[ basic or scientific calculators](https://honorlock.kb.help/honorlock-calculator/) during the assessment. Turning one calculator on will turn off the other.
- **Disable Copy/paste** - Prevents test takers from copying exam content and pasting it outside the assessment.
- **Disable Printing** - Prevents access to the browser print function to print or export exam content.
- **BrowserGuard<sup>TM</sup>** - Honorlock's secure browser solution that prevents test takers from accessing additional applications outside of Google Chrome. Any attempt to access external applications will generate an automated flag to be reviewed when reviewing test taker results. For more information on BrowserGuard<sup>TM</sup>, please see [BrowserGuard<sup>TM</sup> and Allowed Site URLs FAQ](https://honorlock.kb.help/browser-guard-and-allowed-site-urls-faq/)
- **Allowed Site URLs** - Grants access via another Chrome tab to any sites you add below. That could be a link to the e-textbook, DESMOS for an online graphing calculator, or a link to any other web page your test takers will need to complete the assessment. When adding your URLs in the box below, please make sure you click “Add Site” for each page you’re granting access to. Please include the link to that site or resources within the question stem itself, or the exam instructions so test takers can click on it. These will be available before the exam, before they launch proctoring, and during the exam in the test taker toolbar.
- **Simulated - Not proctored** - This should only be used for low-stakes assessments, as it will simulate the proctoring experience, but there will be no recording or flagging to review after the session is complete.

## Test Taker Guidelines 

These ten preset instructions will let your test takers and Honorlock Proctors and Support staff know, what is and what is not, allowed on the assessment.

- **Open Book Allowed—**This option allows test takers to utilize a physical book or e-book during their assessment. If you allow test takers to use an e-book, you’ll need to include a link to that book in the "Allowed Site URLs" section.
- **Notes Allowed** - Permits test takers to reference any physical or digital notes.
- **Scratch Paper Allowed—**During the assessment, test takers can use multiple sheets of blank paper and a writing utensil.

Test takers who are partially out of view will not be flagged or have their exam paused if Scratch Paper Allowed, Notes Allowed, or Open Book Allowed is toggled on. Test takers who are completely out of view will be flagged. For institutions or organizations that utilize our Live Proctoring level of service, proctors will not perform Live Pop-Ins on test takers who are partially out of view if the Scratch Paper Allowed, Notes Allowed, or Open Book Allowed toggles are on.

- **Restroom Breaks Allowed** - Permits test takers to leave the webcam view for a short period of time. We encourage you to add additional instructions around the duration or frequency test takers can use the restroom so that our proctors can provide specific instructions to test takers if you’d like to limit those breaks. When Restroom Breaks Allowed is active, test takers can leave the testing area for up to five minutes without their exam being paused or flagged.
- **Handheld Calculator** - Indicates test takers can use a handheld calculator but not the calculator on their cell phone.
- **Hats Allowed—**Honorlock permits test takers to wear baseball hats or hoodies during the assessment. It will always allow test takers to wear religious head coverings.
- **Headphones Allowed—**When this is toggled on, test takers can wear any headphones during their assessment. When this is toggled off, faculty or exam administrators can expect to see a high flag in the session results if a test taker wears headphones during an exam. A Live Pop-In will also occur for LPI customers when test takers are wearing headphones (if headphones are not allowed).
- **Take Exam in a Public Area -** This indicates that test takers can complete their assessment in a coffee shop, library, etc., where other people are around them and noise is present. Test takers cannot interact with other people in the testing environment. When Take Exam in Public Area is active, Honorlock will not flag exams with multiple faces visible in the webcam.
- **Background Noise Allowed** - Permits test takers to be in an environment where other people are talking, there’s excessive background noise, etc
- **Mobile Phone Use Allowed—**When this is toggled on, test takers are permitted to use a mobile phone during the assessment.

# Checking for Plagiarism and Artificial Intelligence

Guidance on AI use in classrooms, and how to use Turnitin and GPTZero

# Artificial Intelligence Guidance

<section id="bkmrk-as-ai-continues-to-r"><article>As AI continues to revolutionize education, it is crucial to understand its application in the classroom. This page aims to equip you with the knowledge and resources needed to effectively navigate the evolving landscape of AI in education by providing suggestions and best practices for integrating these tools responsibly and ethically into your teaching practices.

To accomplish this goal, you will find links on this page to the university's Guidelines and Considerations for the Ethical Use of Artificial Intelligence (AI), sample syllabus statements, and information about the services we currently have to help detect AI-generated content.

</article></section>---

## University Guidelines

The Office of Academic Affairs &amp; Research has put forward ***Guidelines and Considerations for the Ethical Use of Artificial Intelligence (AI)*** for the university. These were developed in the Spring and Summer of 2024 by the campus Artificial Intelligence Policy Committee, which consisted of a group of faculty and administrators from across campus. These guidelines recognize the diverse spectrum of opinions regarding the use of AI and acknowledge that faculty retain the authority to set the scope of acceptable use of AI in their courses.

Faculty are advised to include their AI policies in their syllabi. To assist you in determining what those policies are, and how to state them clearly, please review the guidelines listed on the **[Ethical Use of Artificial Intelligence](https://kb.astate.edu/books/ethical-use-of-artificial-intelligence/page/guidelines-and-considerations-for-the-ethical-use-of-artificial-intelligence)** page.

---

## Sample Syllabus Statements

Below you will find a brief description of each of the four basic approaches to the use of generative AI, followed by a statement you can include in your syllabus to describe that approach to your students.

### Use Prohibited

In this approach, students cannot use AI tools for any aspect of their coursework. This policy emphasizes original student work and academic integrity. Being clear about this stance will prevent misunderstandings and ensure that students do not inadvertently violate academic rules.

> "AI tools, including chatbots, writing assistants, and content generators, are not permitted for any assignments, exams, or other coursework in this class. All work must be your own, and the use of AI will be considered a violation of academic integrity policies. Please contact me if you have any questions about this policy."

### Use with Permission

AI use is allowed only when students receive explicit permission from the instructor, typically on a case-by-case basis. This approach allows for flexibility while maintaining control over how AI is used. Clear communication ensures students know when AI is acceptable and when it is not.

> "The use of AI tools for assignments in this class is permitted only with prior approval. If you wish to use AI for any part of your work, please consult with me first to discuss appropriate guidelines. Unauthorized use of AI will be treated as an academic integrity violation."

### Use with Acknowledgement

Students may use AI tools, but they must clearly indicate when and how these tools were used in their assignments. This approach encourages transparency and ethical use of AI. Clear guidelines help students understand how to integrate AI responsibly while avoiding academic dishonesty.

> "Students may use AI tools (e.g., Grammarly, ChatGPT) to assist with their coursework, but any use must be clearly acknowledged. In your assignments, please indicate where and how AI was used. Failure to disclose the use of AI will be considered a violation of academic integrity. Please contact me if you have any questions about this policy."

### Use Freely Permitted

Students are encouraged to use AI tools as part of their learning and assignments without restrictions. This approach views AI as a valuable resource for enhancing creativity and productivity. However, clear expectations are necessary to guide students on appropriate and effective use, ensuring it enhances rather than replaces their learning.

> "Students are encouraged to use AI tools as part of their learning and assignments in this class. AI can be a valuable resource for enhancing creativity, improving writing, or generating ideas. However, it is essential that AI use complements your learning, rather than replacing it. Please use these tools ethically and responsibly to support your own understanding and skills development."

---

## Academic Integrity Process for Suspected AI Misuse

When an instructor suspects a student has misused artificial intelligence in a way that violates course policies or the university’s academic integrity standards, the situation is handled through the **Academic Misconduct process** overseen by the **Office of the Provost and Academic Affairs and Research**.

### Initial Steps

- Faculty should submit reports using the **Academic Misconduct Reporting Form** tile in their **[Pack Portal](https://pack.astate.edu/)** account. This initiates the formal process and allows Academic Affairs to track cases and outcomes.
- Academic Affairs will send a letter of notification within **ten (10) business days** of the report being submitted. This letter informs the student of the allegation and provides **five (5) business days** to schedule a meeting with Academic Affairs.

### Student Options

- During the meeting, students may choose to **accept responsibility** or **dispute the allegation**.
- If the student accepts responsibility, they will be enrolled in the **Principles of Academic Integrity course in Canvas,** which must be completed within five business days, in addition to any faculty-imposed sanctions.
- If the student disputes the allegation, they may request a **University Academic Integrity Committee (UAIC) hearing** within five business days.

### Evidence Considerations

- While evidence is not required to submit a report, it is strongly encouraged.
- Submitted evidence is shared with the student during their meeting with Academic Affairs and may be used if the case escalates to a hearing.
- Because AI detectors can produce conflicting results, instructors should avoid relying solely on one tool’s output. Instead, they should combine it with contextual evidence (e.g., writing style inconsistencies, assignment history, or student admission).

### UAIC Composition

- <span data-olk-copy-source="MessageBody">The UAIC consists of **three faculty members, two undergraduate students,** and **one graduate student from each academic college**. The convening committee consists of **three faculty members** and **one student**. The **Assistant Vice Provost for Academic Student Services** and the **Graduate Dean** serve as **ex-officio members**.</span>

### End-of-Semester Guidance

- If a report is submitted at the end of the semester, faculty should proceed with grading as usual.
- If the student is later found not responsible, a **grade change form** may be submitted.

### Administrative Support

For guidance on how a case may proceed or to discuss a specific situation, faculty and students may contact:

**Provost’s Office**  
**<Provost@AState.edu>**  
870-972-2030  
Administration Building, Room 202  
**[Academic Integrity Website](https://kb.astate.edu/books/academic-integrity)**

# Limitations of AI Detection Algorithms

AI detection tools are increasingly used to identify potential use of large language models (LLMs) in student writing. However, these tools come with significant limitations that educators should understand before relying on them for academic integrity decisions.

---

## **Key Limitations of AI Detection Tools**

### **False Positives**

Human-written content—especially when supported by tools like Grammarly or writing centers—can be misclassified as AI-generated. This can unfairly penalize students who have not used AI tools.

### **Rapid Evolution of AI**

LLMs are advancing quickly, producing text that closely mimics human writing. Detection tools often lag behind these developments, reducing their reliability.

### **Bias and Fairness Concerns**

Detection algorithms may misinterpret writing styles of non-native English speakers or students from diverse linguistic backgrounds, leading to inaccurate assessments.

### **Over-Reliance on Algorithms**

Excessive dependence on detection scores can shift the focus from fostering learning to policing students, potentially eroding trust between faculty and students.

### **Legal and Reputational Risks**

False accusations based on algorithmic scores can harm students’ academic records and reputations, and may lead to legal disputes.

---

## **Understanding the Nature of AI Detection Scores**

AI detection tools do not provide proof of misconduct. They offer probabilistic assessments—essentially one algorithm estimating the likelihood that another algorithm was used. These scores are not definitive and should not be used as the sole basis for disciplinary action.

> **Turnitin Statement:**  
> “Our AI writing detection model may not always be accurate (it may misidentify both human and AI-generated text), so it should not be used as the sole basis for adverse actions against a student.”

**Sources:**

- **[Washington Post: ChatGPT cheating detection](https://www.washingtonpost.com/technology/2023/04/01/chatgpt-cheating-detection-turnitin/)**
- **[MIT Technology Review: AI detection tools are easy to fool](https://www.technologyreview.com/2023/07/07/1075982/ai-text-detection-tools-are-really-easy-to-fool/)**
- **[Turnitin: AI Detection FAQ](https://www.turnitin.com/products/features/ai-writing-detection/faq)**
- **[Turnitin Help Center: AI Writing Detection](https://help.turnitin.com/ai-writing-detection.htm)**

---

## **Recommended Best Practices**

### **1. Use Detection Tools as Indicators, Not Proof**

AI scores should prompt closer review of a student’s work, not automatic penalties. Consider changes in writing style, tone, or clarity, and use your professional judgment.

### **2. Encourage Ethical Use of AI**

Use flagged submissions as opportunities to discuss responsible AI use. Feedback should guide students toward improving their writing and understanding the ethical boundaries of AI assistance.

### **3. Adapt Writing Assignments**

Revise prompts to require personal reflection, course-specific content, or unique perspectives. Include process-oriented tasks like outlines, drafts, or revision notes.

**Resources:**

- **[Critical AI: Adapting College Writing](https://criticalai.org/2023/01/17/critical-ai-adapting-college-writing-for-the-age-of-large-language-models-such-as-chatgpt-some-next-steps-for-educators/)**
- **[Mark Marino: GPT Writing Assignments](https://markcmarino.medium.com/gpt-this-a-writing-assignment-in-the-age-of-gpt-3-other-large-language-models-a47d2913b81)**

### **4. Design Rubrics That Emphasize Human-Centric Writing Skills**

Include criteria that LLMs typically struggle with, such as:

- Nuanced argumentation
- Integration of course-specific concepts
- Original insights or personal experiences

This allows instructors to fairly penalize weak writing while encouraging improvement, regardless of the student's writing process.

### **5. Use Document History and Quiz Logs for Contextual Evidence**

Instead of relying solely on AI detection scores, consider using platform features that provide insight into the student's writing process:

- **Google Docs / Microsoft 365**: Ask students to submit document links to review version history and editing timelines.
- **Canvas Quiz Logs**: Enable quiz logs for Classic Quizzes to view time spent per question. Note that logs are not definitive proof and should be interpreted cautiously.

**Resources:**

- **[Canvas: Enable Feature Options](https://community.canvaslms.com/t5/Instructor-Guide/How-do-I-manage-feature-options-for-a-course/ta-p/710)**
- **[Canvas: View Quiz Logs](https://community.canvaslms.com/t5/Instructor-Guide/How-do-I-view-a-quiz-log-for-a-student/ta-p/580)**
- **[Google: Find what's changed in a file](https://support.google.com/docs/answer/190843?hl=en&co=GENIE.Platform%3DDesktop)**
- **[Microsoft: View Previous Versions](https://support.microsoft.com/en-us/office/view-previous-versions-of-office-files-5c1e076f-a9c9-41b8-8ace-f77b9642e2c2)**

### **6. Conduct Oral Examinations or Interviews**

When AI use is suspected, consider asking students to:

- Explain key concepts from their work
- Describe their writing or research process
- Elaborate on specific claims or sources

This can help verify authorship and promote deeper learning.

### **7. Compare with Other In-Class and Canvas-Submitted Writing Samples**

Maintaining a portfolio of student writing completed in class can help identify inconsistencies in style, tone, or complexity. If you have students submit all their writing digitally, you can also leverage GPTZero—integrated into Canvas via K16’s Scaffold AI-Detection system—to compare writing samples across all submissions, including quizzes, assignments, and discussions.

This system works best when students consistently submit their work through Canvas, allowing instructors to identify shifts in writing style or voice over time. For in-class writing to be included in these comparisons, it must also be submitted digitally (e.g., uploaded as a file or entered into a Canvas assignment or discussion).

### **8. Require Student Reflection**

Ask students to submit short reflections with assignments that explain:

- Their approach to the task
- How they selected sources
- What challenges they faced

These reflections promote metacognition and make AI misuse more difficult. When submitted through Canvas, reflections can also be analyzed by K16's Scaffold AI-Detection system alongside other writing samples, helping identify inconsistencies or shifts in writing style that may warrant further review.

### **9. Use Social Annotation and Concept Mapping**

Encourage students to engage with texts collaboratively using tools like Hypothesis or concept maps. These activities foster critical thinking and are difficult to replicate with AI tools.

### **10. Scaffold Assignments**

Break large writing tasks into smaller steps:

- Topic proposal
- Annotated bibliography
- Draft outline
- Peer review
- Final submission

This makes it easier to track student progress and harder to substitute AI-generated work.

# TurnItIn

---

<span class="TextRun SCXW36214791 BCX0" data-contrast="none" lang="EN-US" xml:lang="EN-US"><span class="NormalTextRun SCXW36214791 BCX0">A-State has a contract with [**Turnitin**](https://www.turnitin.com/) </span></span><span class="TextRun SCXW36214791 BCX0" data-contrast="none" lang="EN-US" xml:lang="EN-US"><span class="NormalTextRun SCXW36214791 BCX0">to provide plagiarism checking for assignments in Canvas. In addition to checking papers for plagiarism, TurnItIn can also check student submissions for AI content. See the links below for help with using TurnItIn with your courses.</span></span><span class="EOP SCXW36214791 BCX0" data-ccp-props="{"134233117":false,"134233118":false,"335551550":1,"335551620":1,"335557856":16777215,"335559738":0,"335559739":300}"> </span>

<p class="callout info"><span class="EOP SCXW36214791 BCX0" data-ccp-props="{"134233117":false,"134233118":false,"335551550":1,"335551620":1,"335557856":16777215,"335559738":0,"335559739":300}">TurnItIn, its features and information are for instructor use only.</span></p>

---

## **About the Canvas Plagiarism Framework** 

[**<span data-contrast="none">Creating an assignment in Feedback Studio using Canvas Plagiarism Framework</span>**](https://guides.turnitin.com/hc/en-us/articles/22949591436045-Creating-an-assignment-in-Feedback-Studio-using-Canvas-Plagiarism-Framework)<span data-ccp-props="{"134233117":false,"134233118":false,"335551550":1,"335551620":1,"335557856":16777215,"335559738":0,"335559739":300}"> </span>

[**<span data-contrast="none">Accessing the Similarity Report with Canvas Plagiarism Framework</span>**](https://guides.turnitin.com/hc/en-us/articles/22058715390605-Accessing-the-Similarity-Report-with-Canvas-Plagiarism-Framework)<span data-ccp-props="{"134233117":false,"134233118":false,"335551550":1,"335551620":1,"335557856":16777215,"335559738":0,"335559739":300}"> </span>

[**<span data-contrast="none">Navigating the Similarity Report</span>**](https://guides.turnitin.com/hc/en-us/articles/23438306524173-Navigating-the-Similarity-Report)<span data-ccp-props="{"134233117":false,"134233118":false,"335551550":1,"335551620":1,"335557856":16777215,"335559738":0,"335559739":300}"> </span>

[**<span data-contrast="none">Canvas Plagiarism Framework FAQ for Feedback Studio instructors</span>**](https://guides.turnitin.com/hc/en-us/articles/21424735374733-Canvas-Plagiarism-Framework-FAQ-for-Feedback-Studio-instructors)<span data-ccp-props="{"134233117":false,"134233118":false,"335551550":1,"335551620":1,"335557856":16777215,"335559738":0,"335559739":300}"> </span>

---

## **About the AI writing report** 

[**<span data-contrast="none">AI writing detection in the classic report view</span>**](https://guides.turnitin.com/hc/en-us/articles/28457596598925-AI-writing-detection-in-the-classic-report-view)<span data-ccp-props="{"134233117":false,"134233118":false,"335551550":1,"335551620":1,"335557856":16777215,"335559738":0,"335559739":300}"> </span>

**[How to interpret TurnItIn’s AI writing score and dialogue with students](https://www.turnitin.com/infographics/academic-interity-in-the-age-of-ai-how-to-interpret-turnitin-ai-score)**

**[What questions do I ask my student if AI is detected?](https://guides.turnitin.com/hc/en-us/articles/27139105513229-What-questions-do-I-ask-my-student-if-AI-is-detected)**

**[TurnItIn's AI writing detection capabilities FAQs](https://guides.turnitin.com/hc/en-us/articles/28477544839821-Turnitin-s-AI-writing-detection-capabilities-FAQs)**

---

## **TurnItIn Support**

**[Turnitin Help Center](https://helpcenter.turnitin.com/hc/en-us)**

**[Create a Ticket](https://helpcenter.turnitin.com/hc/en-us/requests/new)**

# K16 Scaffold AI-Detection

The university has an account with K16 Solutions that gives us access to their Scaffold AI-Detection system powered by [**GPTZero**](https://gptzero.me/technology). The benefit of this system over Turnitin is that it can compare all the writing a student submits to Canvas, i.e. Quizzes, Assignments, Discussions, etc., not just individual assignments. To learn more about this system, see the links below.

---

## About GPTZero

[**Does GPTZero Integrate with Canvas**](https://support.gptzero.me/hc/en-us/articles/16097465426327-Does-GPTZero-Integrate-with-Canvas)

[**How Does AI Detection Work for Universities?**](https://www.k16solutions.com/resources/k16-blog/how-does-ai-detection-work-for-universities/)

[**AI Course Probability Reports**](https://help.k16solutions.com/en/articles/9859346-ai-course-probability-reports)

[**I'm an educator who has found AI-generated text by my students. What do I do?**](https://support.gptzero.me/hc/en-us/articles/15129664366103-I-m-an-educator-who-has-found-AI-generated-text-by-my-students-What-do-I-do)

[**What can I do as an educator to reduce the risk of AI misuse?**](https://support.gptzero.me/hc/en-us/articles/15129666189207-What-can-I-do-as-an-educator-to-reduce-the-risk-of-AI-misuse)

---

## Request Access

To add K16 Solutions' Scaffold AI-Detection system to your course, please contact your faculty support office.

### Center for Excellence in Teaching and Learning (CETL)

Email: **<CETL@AState.edu>**  
Phone: **870-972-2334**  
Location: *Dean B. Ellis Library, Suite 301*

### A-State Online Faculty Support

Email: **<aos@astate.edu>**  
Phone: **870-680-8464**  
Location: *International Programs Building*

# Student Help: Biometric Signature ID (BioSig-ID™)

****Biometric Signature ID**<span style="color: rgb(68, 68, 68); font-family: -apple-system, BlinkMacSystemFont, 'Segoe UI', Oxygen, Ubuntu, Roboto, Cantarell, 'Fira Sans', 'Droid Sans', 'Helvetica Neue', sans-serif; font-size: 14px; font-style: normal; font-variant-ligatures: normal; font-variant-caps: normal; font-weight: 400; letter-spacing: normal; orphans: 2; text-align: start; text-indent: 0px; text-transform: none; widows: 2; word-spacing: 0px; -webkit-text-stroke-width: 0px; white-space: normal; background-color: rgb(255, 255, 255); text-decoration-thickness: initial; text-decoration-style: initial; text-decoration-color: initial; display: inline !important; float: none;"> (</span>**BioSig-ID**<span style="color: rgb(68, 68, 68); font-family: -apple-system, BlinkMacSystemFont, 'Segoe UI', Oxygen, Ubuntu, Roboto, Cantarell, 'Fira Sans', 'Droid Sans', 'Helvetica Neue', sans-serif; font-size: 14px; font-style: normal; font-variant-ligatures: normal; font-variant-caps: normal; font-weight: 400; letter-spacing: normal; orphans: 2; text-align: start; text-indent: 0px; text-transform: none; widows: 2; word-spacing: 0px; -webkit-text-stroke-width: 0px; white-space: normal; background-color: rgb(255, 255, 255); text-decoration-thickness: initial; text-decoration-style: initial; text-decoration-color: initial; display: inline !important; float: none;">™) is a third-party tool available within Canvas classes. It is a biometric gesture‑based authentication tool that verifies the student completing coursework is the same person who enrolled by requiring a short biometric password drawn with a mouse, finger, or stylus. BioSig‑ID can be used to gate quizzes, exams, and other graded activities to support federal, accreditation, and academic integrity requirements.</span>**

<details id="bkmrk-about-biometric-sign"><summary>About Biometric Signature ID (BioSig-ID™)</summary>

BioSig ID uses biometric gesture software to measure the unique way every user moves their mouse, finger, or stylus when they authenticate with their biometric password. Biometric identifiers such as the length, speed, direction, angle, and height of each stroke are collected by the software to create the user's unique biometric profile. In seconds, after drawing only 3-4 characters, BioSig-ID software establishes whether the user who registered is the same person trying to access the account.

The password will only need to be created one time and will be used each time they are asked to authenticate in a Canvas course. The input password is instantly compared against the previously created enrollment profile, and access is only granted if they match.

Students can create their biometric password with a mouse, stylus, or their finger on a variety of computers and devices. The biometric password cannot be replicated by someone else. Students will be required to authenticate their identity with BioSig ID prior to completing quizzes, tests, assignments, and discussion boards. All authentications take place within Canvas.

</details><details id="bkmrk-required-use-at-a-st"><summary>Required use at A-State</summary>

Arkansas State University is required by federal law and regional accreditors to confirm the identity of all students who take online courses. Authenticating students’ identities throughout their coursework ensures the institution's academic integrity while preserving the quality of the online degree you earn. To meet the requirements of federal law and regional accreditation, Arkansas State University requires online students to authenticate their identity through BioSig ID.

</details>## **Getting Started with BioSig-ID**

<div id="bkmrk-if-this-is-your-firs" style="font-family: 'Segoe UI'; font-size: 14px; font-style: normal; font-weight: 400; line-height: 20px;">If this is your first time using BioSig‑ID, start with the enrollment video below. Additional help topics are available further down the page.</div><p class="callout success">***Note:*** *To avoid any issues, students are <span style="box-sizing: border-box; outline-color: rgb(204, 9, 47); outline-width: 1px; margin: 0px; padding: 0px; border: 0px; font-style: inherit; font-variant: inherit; font-weight: bold; font-stretch: inherit; font-size: inherit; line-height: inherit; font-family: inherit; font-optical-sizing: inherit; font-size-adjust: inherit; font-kerning: inherit; font-feature-settings: inherit; font-variation-settings: inherit; font-language-override: inherit; vertical-align: baseline;">strongly encouraged to complete the initial enrollment process on a full computer with a mouse. </span> After completing your initial enrollment, you can then add additional devices, such as a tablet or mobile phone.*</p>

##### <iframe allow="autoplay; fullscreen; picture-in-picture; clipboard-write; encrypted-media; web-share" allowfullscreen="allowfullscreen" frameborder="0" height="360" src="https://player.vimeo.com/video/631170512?h=0519b70ffe" title="vimeo-player" width="640"></iframe>


BioSig-ID (2025). *BioSig-ID™ Enrollment*. Retrieved from [Biometric Signature ID Knowledge Base](https://help.biosig-id.com/portal/en/kb/articles/step-by-step-enrollment-instructions "Biometric Signature ID Knowledge Base")

## **Support Guides**

<details id="bkmrk-step-by-step-enrollm"><summary>### Enrollment Instructions

</summary>

<div>The steps to go through a BioSig-ID™ enrollment, are as follows:  
</div><div>  
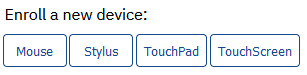
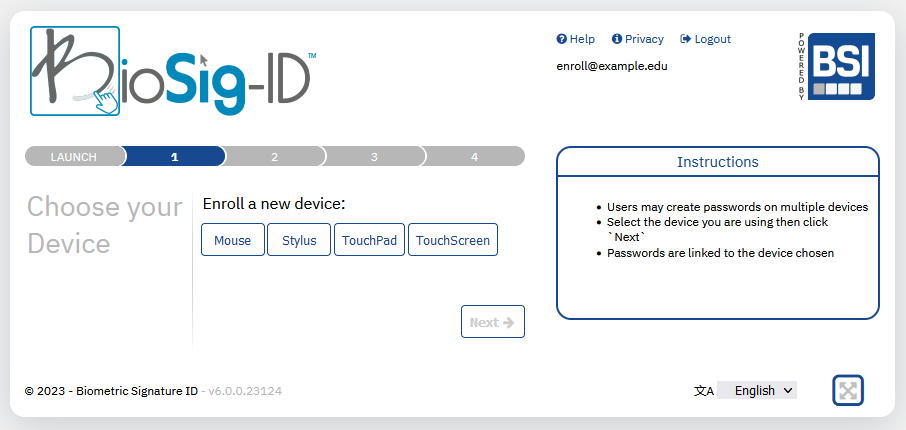
</div>1. <div>Inside your course, launch the enrollment process for BioSig-ID™ to get to this screen  
    </div>![enroll device](https://help.biosig-id.com/galleryDocuments/edbsnd3e44319f436a761c17cb08bf8fa42474913aa50c33d321782b3f3bf0f582f5a3b5f9e8258bdb85f01484ee5df47c543?inline=true)
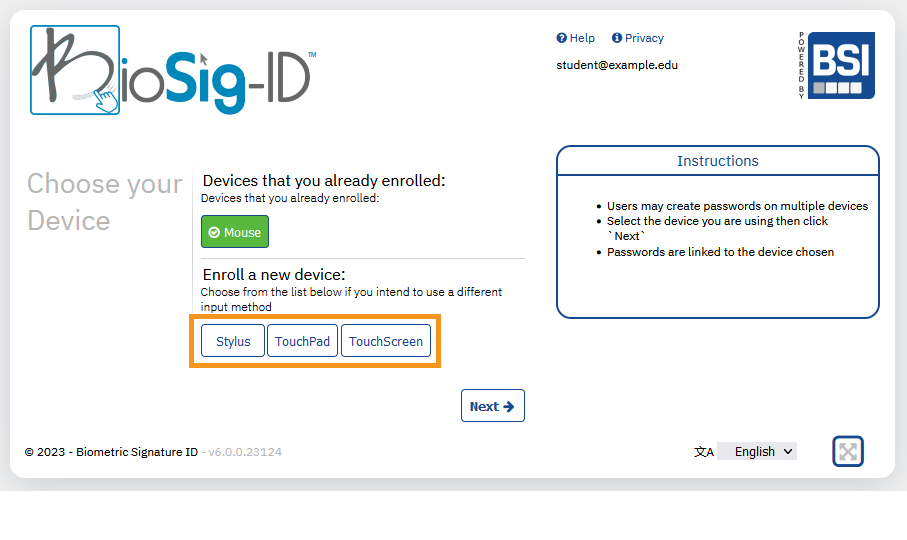
2. <div>Select the device that will be used  
    </div>![device selection](https://help.biosig-id.com/galleryDocuments/edbsn689ca2dbfd777d775149b0f2065b4d0c10857c905330665ed2f4685c800beedff1a71297c89346c82516c7d867901629?inline=true)
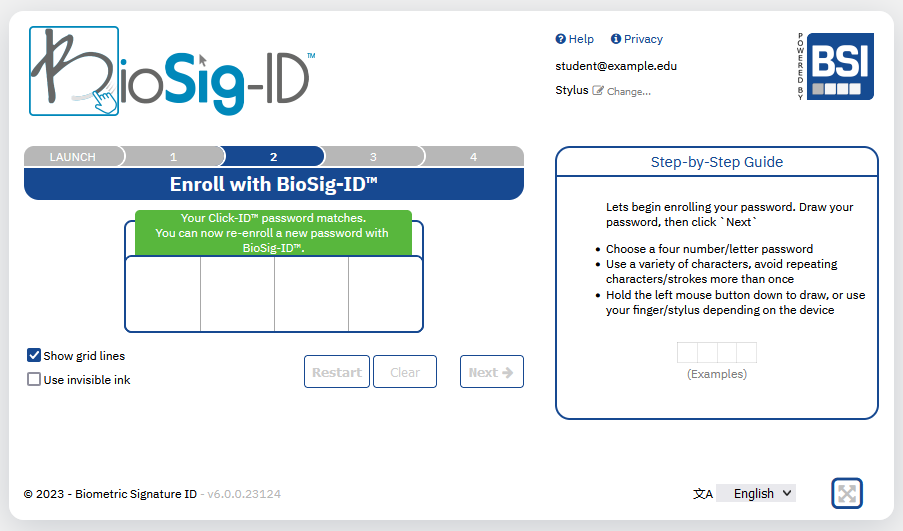
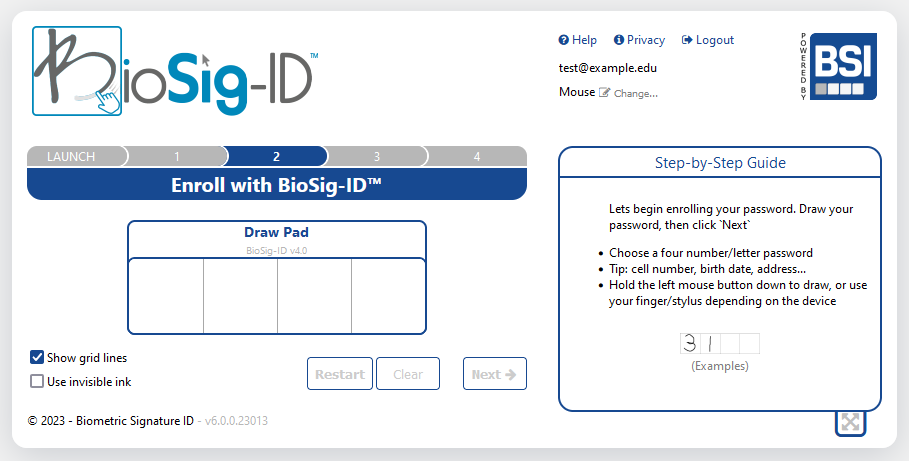
3. <div>Follow the step-by-step guide, and write your four-character password for BioSig-ID™  
    </div>![draw password](https://help.biosig-id.com/galleryDocuments/edbsnb5f48f459ba5eb3a0fb9e8843c5cd41e9620dfb0bdac411e8f76b3d515696867047c5345367c2b42cd9568af68dde82b?inline=true)
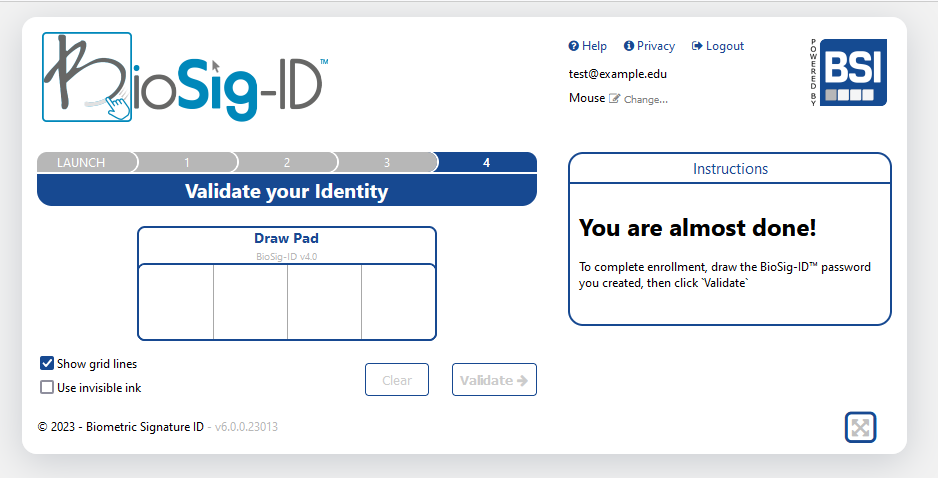
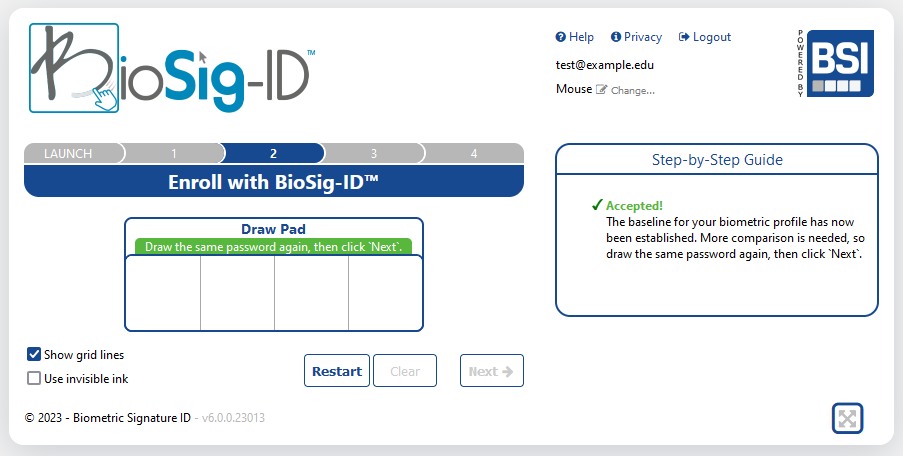
4. <div>The first password is always accepted. Now write your password again as close as possible. Remember. It's not what your password looks like that matters, but how you write it.  
    </div>![draw same password again](https://help.biosig-id.com/galleryDocuments/edbsn4586af19e2eea38c696cbcbd611f41bc1d59bde25eeaac9a3fa7dd58f3c5e0ce19d2f726a695f57c46370f75f153798f?inline=true)
    
    <p class="callout info">  
    **IMPORTANT:** It is natural to fail the next step if you are having a difficult time drawing the same characters again close enough to your first password. Try using the `Restart` button otherwise to start fresh and draw something else. For example, use an `X` or `7` instead of a `0` as lines are easier than circular motions for some users. Another option is to draw smaller and/or slower. Everything you draw will be used to verify, so if you already know that something went wrong use the `Clear` button to redo the step you are at. Touch-pad users might want to consider using both hands to allow more control in drawing while holding down the `left` button.  
      
    </p>
5. <div>To get a proper biometric profile you must draw it a third time  
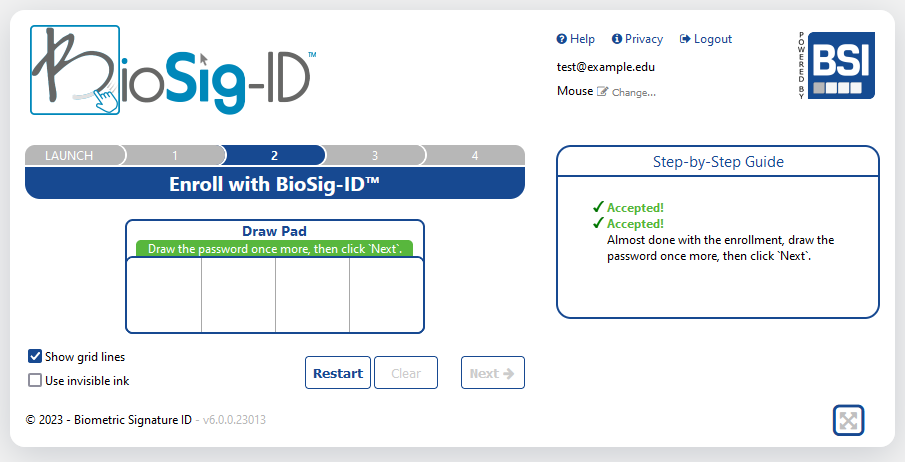
    </div><div class="target_moving" id="bkmrk--2">![draw same password 3rd time](https://help.biosig-id.com/galleryDocuments/edbsn31b03daad0917d42747478df142de60ca9aa8baf2442861674679a7cd62733a0421adb5f20087f5699be6c24bce9e19c?inline=true)</div>
6. <div>Your primary password for BioSig-ID™ is now enrolled. It is time to create a secondary profile with Click-ID™  
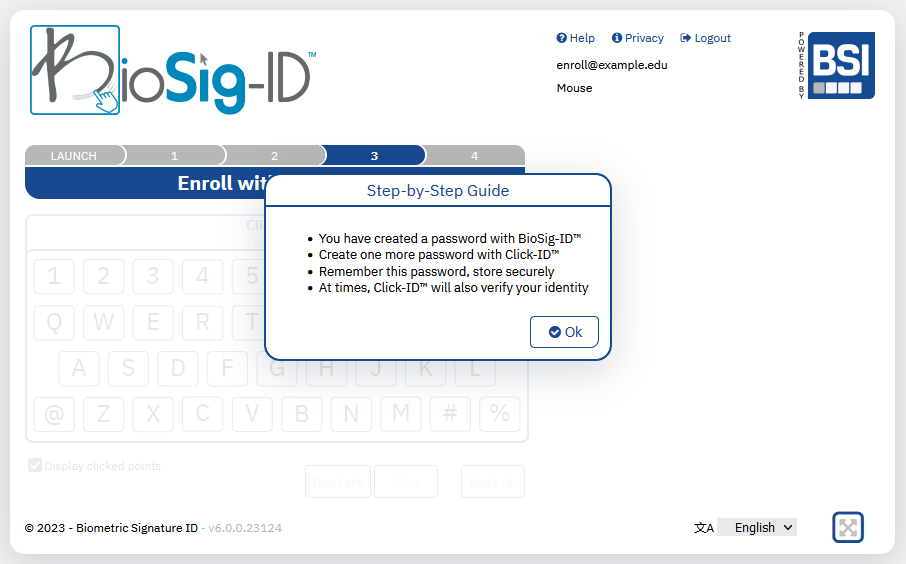
    </div><div class="target_moving" id="bkmrk--3">![accepted and next step](https://help.biosig-id.com/galleryDocuments/edbsn4586af19e2eea38c696cbcbd611f41bce7da614b50ac0ffa263e683e87e0864c4380141a8b09cdb25250d941f543c57e?inline=true)</div>
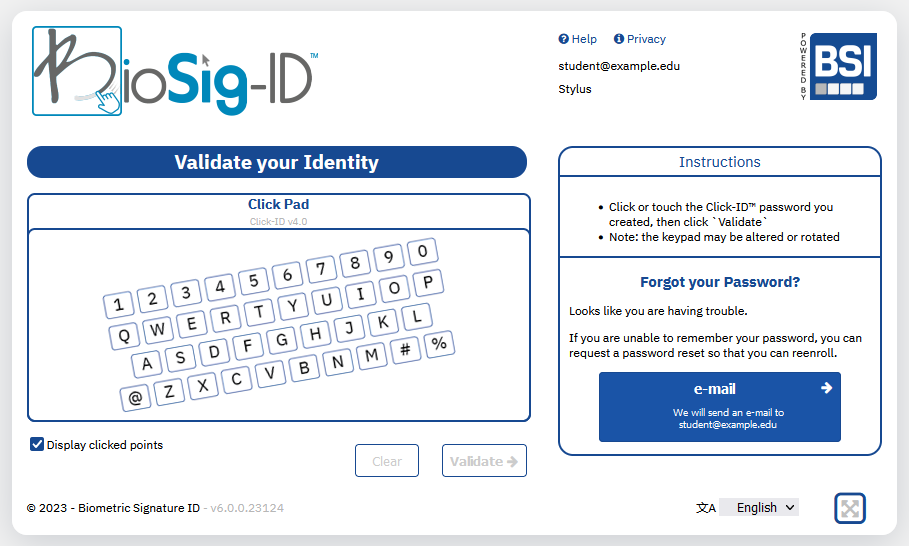
7. <div>This is not an actual keyboard, but an image of one to make it easier to remember what points you click on. You may use the same password that was used for the BioSig-ID™ profile or pick something new. (Black dots will appear after your selection)  
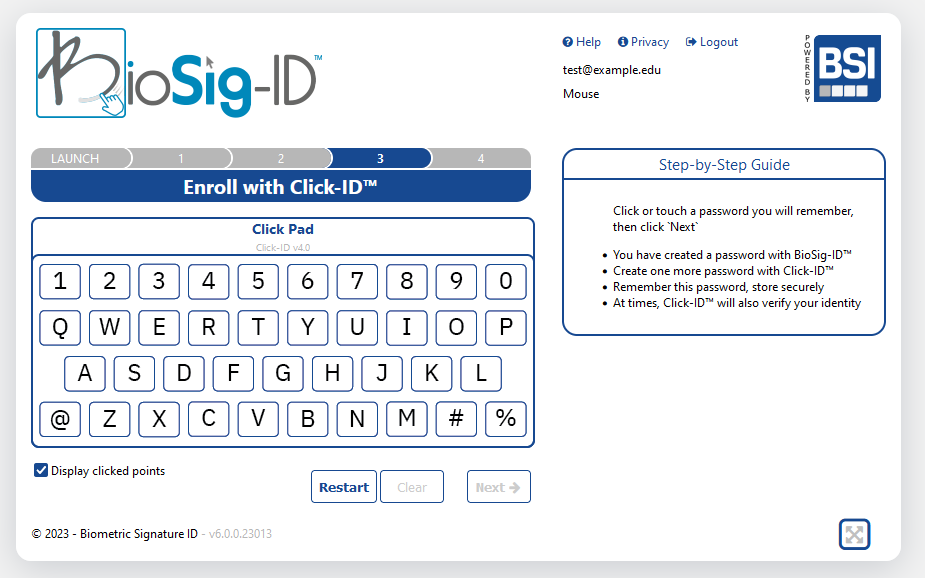
    </div>![create click-id back up password](https://help.biosig-id.com/galleryDocuments/edbsn850bf6466ad9483c5d541a070fa5a7f4797ef087ea5867ac06a165bee0b20e0a6a9c4d1b284c8c3eeaffb3fd5654b1b0?inline=true)
8. <div>The first step is always accepted and now it is important to create it again as close as possible  
    </div>![re-enter click id](https://help.biosig-id.com/galleryDocuments/edbsn23f4d349f67d402b6c03f49cd637cd28468478cd27f8b77653c20ce0f9c51b4782bb66a2cc2c92f3515e6cbac7867008?inline=true)
9. <div>Now just once more to finish the Click-ID™ enrollment  
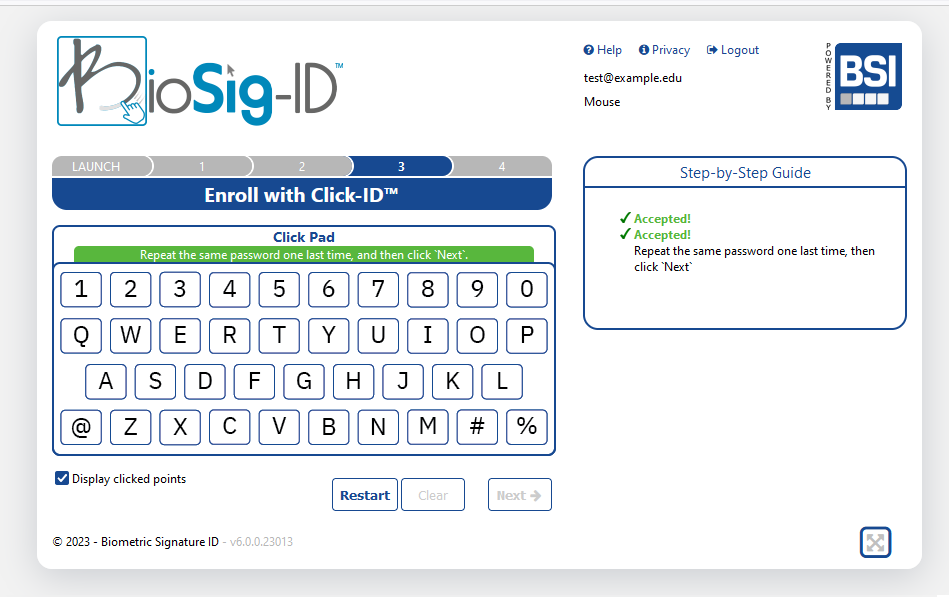
    </div>![enter click-id for 3rd time](https://help.biosig-id.com/galleryDocuments/edbsn850bf6466ad9483c5d541a070fa5a7f4bc3f34f12da22720c668930fcf60d879fd5ed9941675bbce216ef466877cab33?inline=true)
10. <div>This last step will lock everything in place with a final validation of BioSig-ID™. Draw the password you created one final time and click the `Validate` button to continue</div>![re-draw biosig password final time](https://help.biosig-id.com/galleryDocuments/edbsn850bf6466ad9483c5d541a070fa5a7f4c6b4fe510218f4c1c7e17dfadba13374099fe0fc8e88f7dc3937d9188e8cb642?inline=true)

This ends the process. You may be presented with a button to return to Canvas.

Retrieved from [BioSig-ID Step-by-Step Enrollment (Article)](https://help.biosig-id.com/portal/en/kb/articles/step-by-step-enrollment-article "BioSig-ID Step-by-Step Enrollment (Article)")

</details><details id="bkmrk-validation-instructi"><summary>### Validation Instructions

</summary>

To successfully validate your BioSig-ID password:

1. Draw the password you created when enrolling this device.  
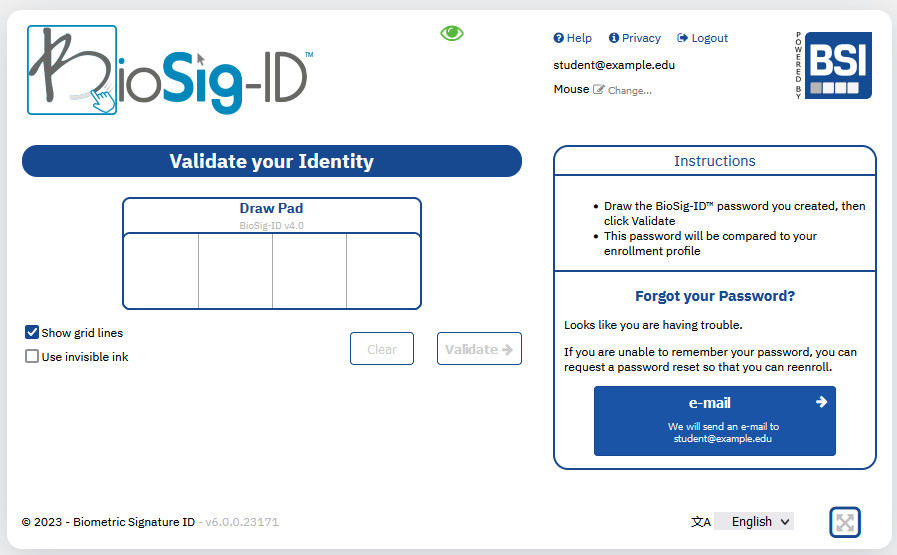
    ![Validate your Identity screen](https://help.biosig-id.com/galleryDocuments/edbsnd8a331d8690c1a1302d6a80182d1faed64978c44663632589510b89e6f156bb650b03208e01833bff7c8d2644c7e9f71?inline=true)
2. Click Validate to continue.

After validation, you will see a button to return to Canvas.

Depending on how BioSig-ID is used in your course:

- Access to the next item (such as a quiz) may unlock immediately, or
- The next item (such as a discussion) may become visible below the current item.

</details><details id="bkmrk-changing-or-adding-d"><summary>### Changing or Adding Devices

</summary>

From time to time you may need to enroll a new device. For example, if you use a mouse at work and a touch-pad at home you may need to set up two device profiles. This article will walk you through the steps to set up a second device.

**Step 1** - From the BioSig-ID™ Drawing Pad click Change Device.  
![Section of the Validation screen that lists the device being used to draw the password](https://help.biosig-id.com/galleryDocuments/edbsn5ff1fcb2362a59608ff1d65d6fe512047739b42262bf85c0bf5e54e0ab26a03f71ebb3adae4da5f4f642dabf7fcf0292?inline=true)

**Step 2** - Choose a new device in the Enroll New Device Area

<p class="callout info">**Note:** If you use a mouse at work and want to enroll a mouse for home, you may select any of the profiles such as a Stylus to use for the second mouse.</p>

![First Enrollment Screen with the options for new devices highlighted](https://help.biosig-id.com/galleryDocuments/edbsn0b53d2c7cfe1065c3c23d4bda01e7d42cf765aed513d4790ee3b30bf7ecc968804201f4fb1acb4bf3a18e500fa806c01?inline=true)

**Step 3** - Click or touch the Click-ID™ password you created, then click Validate

<p class="callout info">**Note:** See below if you cannot recall your Click-ID™ password</p>

![Click ID screen to vaildate the user before a new device can be enrolled](https://help.biosig-id.com/galleryDocuments/edbsn23f4d349f67d402b6c03f49cd637cd28aa1568431479e130a6fa6ddfa3d19d7bc492481c8ed1270539dc8ae45c950cd7?inline=true)

**Step 4** - After entering your Click-ID™ you will then be able to enroll a new device

<p class="callout success">**Tip:** Use the same password and Click-ID™ across all devices so that it is easy to remember.</p>

![First screen to draw the password to be assoicated with the new device](https://help.biosig-id.com/galleryDocuments/edbsn41e915aa34059f90d18135920873f5c57facee9257c2a83bf90a73adb05e5a8f32230af8b6a41de58ad7814d5f5296ce?inline=true)

#### **What if I cannot recall my Click-ID?**   


If you do not recall your Click-ID™ password, please follow the **[Reset instructions](https://help.biosig-id.com/portal/en/kb/articles/reset-biosig-id-password)**.

Return to **Step 1** to add a new device.

Retrieved from [**BioSig-ID: Changing or Adding Devices (Article)**](https://help.biosig-id.com/portal/en/kb/articles/how-to-add-a-new-device#Step_1_-_From_the_BioSig-ID_Drawing_Pad_click_Change_Device "BioSig-ID: Changing or Adding Devices (Article)")

</details><details id="bkmrk-input-method-or-draw"><summary>### Input Method or Drawing Issues

</summary>

<details><summary>#### Trouble using a mouse – checkout your pointer speed option

</summary>

##### PC - Changing your Mouse Pointer Speed  


Open Mouse Properties by clicking the Start Button and then clicking Control Panel. In the search box, type mouse, and then click Mouse.

- Click the Pointer Options tab, and then do any of the following:  
    
    - To change the speed at which the mouse pointer moves, under Motion, move the Select a pointer speed slider toward Slow or Fast.
    - To make the pointer work more accurately when you're moving the mouse slowly, under Motion, select the Enhance pointer precision check box.
- Click OK.

##### MAC - Changing your Mouse Pointer Speed  


How to change the scroll direction, right-click, and tracking speed of your mouse on a Mac

1. Click the Apple icon in the upper-left corner of your screen.
2. Select System Preferences.
3. Click on Mouse in the System Preferences window.
4. Click on Point &amp; Click.
5. Drag the Tracking Speed slider left or right to increase or decrease the speed at which your mouse pointer moves across the screen.

##### If you still are struggling:

we recommend trying a different input method or device and seeing if the problem persists, If it does not persist there may be an fault with your input device.

If you are using a wireless mouse we recommend battery replacement as failing batteries do not maintain consistant wireless connection to the computer.

</details><details><summary>#### Using a Touchpad

</summary>

When using a touch pad to enroll your BioSig-ID password you will use one hand to hold down the corner (left button) while using a finger on the other hand to draw each character.

It is important that you keep the corner of the touch pad held down for the entire stroke. If you let up on the corner (left button) it will create an additional stroke and expect to you draw it with the extra stroke each time. Be sure that your "drawing" finger maintains contact with the Touch pad throughout the entire stroke as well.

If this does not solve the problem you may submit a support ticket for additional assistance.
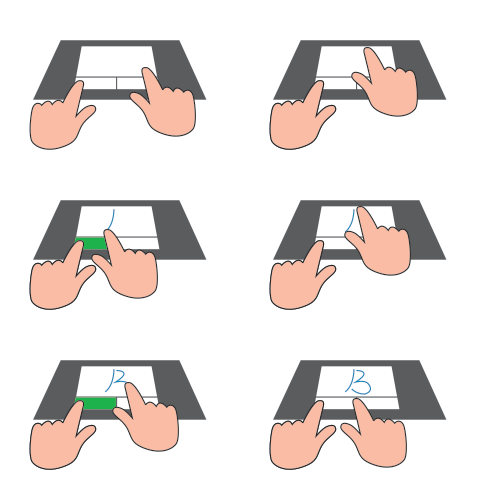
<div class="target_moving" id="bkmrk--4">![biosig with touchpad ](https://biosig-id.com/shared/biosig/biosig_touchpad.gif)</div></details><div class="target_moving" id="bkmrk--5"></div><details><summary>#### Delayed Drawings or Only Straight Lines

</summary>

##### **Step 1: Identify the Symptoms**

Are your drawings showing up as **perfectly straight lines**?

###### **Example 1:** Straight Lines Only

- You draw characters like “E 7 W 7,” but only perfectly straight lines are recorded:  
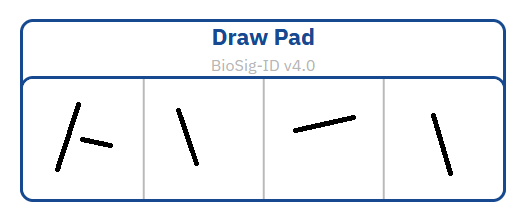
      
    ![inaccurate drawing example](https://kb.astate.edu/uploads/images/gallery/2026-04/scaled-1680-/ox9image.png)
- Is there a **delay** between drawing and seeing the lines appear?

###### Example 2: Delayed Rendering

- <span class="size sty__m7jvo0__cls">Your drawn lines don’t appear until after you’ve completed them, indicating significant lag.  
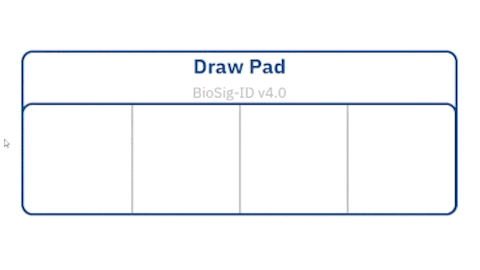
    </span>![delayed rendering](https://kb.astate.edu/uploads/images/gallery/2026-04/scaled-1680-/gaPimage.png)

##### Step 2: Basic System Checks

- Update your browser to the latest version
- Disable browser extensions
- Close unnecessary tabs and applications
- Try using another computer if available

##### Step 3: Hardware Acceleration &amp; WebGL

1. Enable Hardware Acceleration 
    - In Chrome/Edge: Settings → System → Toggle “**Use hardware acceleration when available”**
2. Check WebGL Status 
    - Visit [Get WebGL](https://get.webgl.org/) → Look for the spinning cube
    - Visit BioSig-ID’s WebGL Check tool → Confirm values for Render, Vendor, Version, and Shading Language
    - Go to chrome://gpu → Look for: 
        - ✔️ WebGL: Hardware accelerated
        - ❌ WebGL: Software only

If WebGL is not hardware accelerated, continue to Step 4.

##### Step 4: Update Drivers

 Outdated drivers can cause rendering issues—even if they appear **“up-to-date".**

- Update video card drivers directly from the manufacturer: 
    - Intel: Use Intel Driver &amp; Support Assistant
    - AMD / NVIDIA / Matrox: Visit official support sites

<p class="callout warning">Drivers should be dated 2020 or later for full compatibility.  
Example: Intel WHQL driver from 2015 may appear current but will not work properly.</p>

##### Step 5: Scan for Malware 

 Malware can interfere with system performance and input rendering.

If you're unsure how to proceed, seek in-person IT support.

<p class="callout danger">This issue may be caused by malware. If you suspect malware is present, use reputable anti-malware software to clean your device. While we don’t control third-party tools, users have reported success with <span class="size sty__6zoruc__cls"><span class="KB_New_Editor_Highlights sty__40wqn7__cls">[MalwareBytes AdWareCleaner](https://www.malwarebytes.com/adwcleaner/) or [Norton Power Eraser](https://support.norton.com/sp/static/external/tools/npe.html) to remove unwanted malware.</span></span></p>

##### <span class="size sty__6zoruc__cls"><span class="KB_New_Editor_Highlights sty__40wqn7__cls">Step 6: Submit a Support Ticket</span></span>

 If the issue continues try from a different device, or gather the following and contact support:

**Include screenshots of:**

- The spinning box from Get WebGL
- WebGL Render, Vendor, Version, and Shading Language
- chrome://gpu results showing WebGL status


</details>Retrieved from [Biometric Signature ID Knowledge Base](https://help.biosig-id.com/portal/en/kb/articles/step-by-step-enrollment-instructions "Biometric Signature ID Knowledge Base")

</details><details id="bkmrk-reset-biosig-id-pass"><summary>### Reset BioSig-ID Password

</summary>

<div><span class="size sty__pm16o3__cls">**<iframe allow="autoplay; fullscreen; picture-in-picture; clipboard-write; encrypted-media; web-share" allowfullscreen="allowfullscreen" class="" frameborder="0" height="360" src="https://player.vimeo.com/video/636450011?h=b79688546e" title="vimeo-player" width="640"></iframe>** </span></div><div>  
</div><div>  
</div><div><span class="size sty__pm16o3__cls">**Step 1.** If you fail to validate your BioSig-ID™ Password 3 times in a row, and cannot recall your Click-ID™, you can click on the **@email** button on the BioSig-ID page within your course.</span><span class="size sty__doda21__cls">  
</span></div><div>  
</div><p class="callout danger">**<span class="size sty__eg46ib__cls"><span class="colour sty__o38173__cls"><span class="size sty__e873ss__cls">IMPORTANT : If your email address is not listed on the button you must reach out directly to your institution.</span></span></span>**<span class="size sty__4bi09u__cls">  
</span></p>

<div class=" align-center sty__2ad29u__cls"><div align="center" class="target_moving" id="bkmrk--6">![Instructions](https://help.biosig-id.com/galleryDocuments/edbsn83bd88179041ff2300f12b63c870d26dccbfe7a0295be30fa8f9e9f427e61810d36b810bedad43000c23edc9a27f4109?inline=true)</div><div><span class="size sty__3fw84d__cls">  
</span></div></div><div class=" align-left sty__n68z79__cls"><span class="size sty__mt4zia__cls">**Step 2.** BioSig-ID will then send a security code to your email address. **You must keep this window open**. </span><span class="size sty__sehd15__cls">Your security code will only be valid for 60 minutes. Make sure you check your junk/spam folder.  
</span></div><div class=" align-left sty__dtsuam__cls">  
</div><p class="callout danger">**<span class="size sty__yt168p__cls"><span class="colour sty__o7y5vp__cls"><span class="size sty__v5uehl__cls">IMPORTANT : DO NOT close the BioSig-ID page.</span></span></span>**<span class="size sty__fcpzsg__cls">  
</span></p>

<div class=" align-center sty__e7akqh__cls"><div align="center" class="target_moving" id="bkmrk--7">![Security code](https://help.biosig-id.com/galleryDocuments/edbsnc7cbb2197eef21f2f91399f45275e0e08b44228baba38432e1020b9e367da9d4b55e66b056b0031ef0ad0581956fbf6e?inline=true)</div><div><span class="size sty__lpme6l__cls">  
</span></div></div><div class=" align-left sty__55ikm8__cls"><span class="size sty__eodg5q__cls">**Step 3.** Go check your email for a message from </span>[<span class="size sty__yjk2s2__cls">no-reply@biosig-id.com </span>](mailto:no-reply@biosig-id.com)<span class="size sty__uo6ept__cls">. Copy the security code.</span><span class="size sty__f08h2w__cls">  
</span></div><div class=" align-left sty__2gzvz3__cls"><span class="size sty__ww0nrm__cls">  
</span></div><div class=" align-center sty__tdn2s3__cls">![BioSig-ID Email Code](https://help.biosig-id.com/galleryDocuments/edbsna0198cb7c19000abc5f4e4df22002285cd00af3cf1525b1de683e2cadc303c6ada3e1048637d8d952128822625552213?inline=true)<span class="size sty__d0nsxg__cls">  
</span></div><div class=" align-left sty__3xez1f__cls"><span class="size sty__rf19z3__cls">  
</span>**Step 4.** <span class="size sty__e5zw0w__cls">Return to the BioSig-ID page and enter your security code. Be sure not to include any extra spaces or characters.  
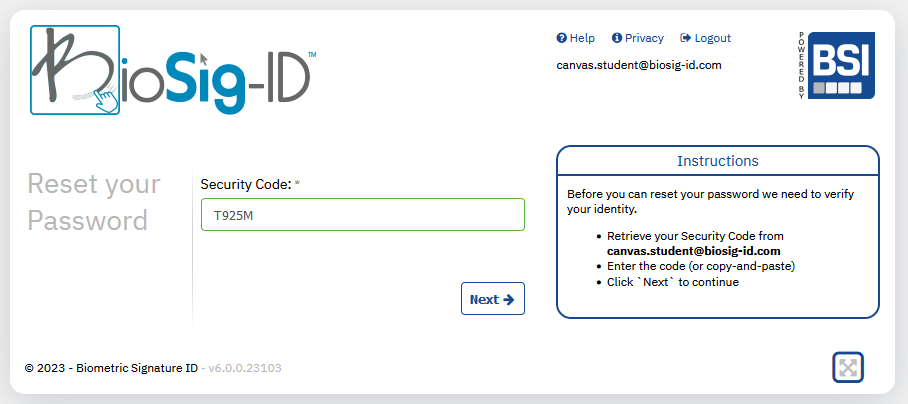
</span><span class="size sty__tzpv0b__cls">  
</span></div><div class=" align-center sty__2jx3sa__cls">![Return to BioSig-ID Security Code ](https://help.biosig-id.com/galleryDocuments/edbsnc7cbb2197eef21f2f91399f45275e0e00f0a75297116c8fbd489460426fc6b62a4ec2ad2d818c884f8e0c11b38a63abf?inline=true)<span class="size sty__fcfyc0__cls">  
</span></div><div class=" align-center sty__y15tl1__cls"><span class="size sty__vbp5wr__cls">  
</span></div><div class=" align-left sty__91mguw__cls"><span class="size sty__af9c1o__cls">  
</span></div><div class=" align-left sty__q9vzht__cls"><span class="size sty__qstyh6__cls">**Step 5.** When your security code is entered you will be permitted to enroll a new BioSig-ID password. If you struggle to enroll your new password please visit the </span>[<span class="size sty__aaeqlb__cls">Step by Step enrollment article.</span>](https://help.biosig-id.com/portal/en/kb/articles/step-by-step-enrollment-article)<span class="size sty__buvej1__cls">  
</span></div><div class=" align-center sty__yoovxj__cls"><span class="size sty__96bviy__cls">  
</span></div><div class=" align-center sty__q0hwte__cls">![new password creation](https://help.biosig-id.com/galleryDocuments/edbsncb4551506853c8a231fd929ab8bdbc4865f2fffaaff40af341ee5f0f76937f5b10b3672fe223ab1b13d62f9b05d9635b?inline=true)<span class="size sty__h5jnbp__cls">  
</span></div><div class=" align-center sty__q0hwte__cls">  
</div><div class="sty__q0hwte__cls align-left"><span class="size sty__h5jnbp__cls">Retrieved from [Biometric Signature ID Knowledge Base](https://help.biosig-id.com/portal/en/kb/articles/step-by-step-enrollment-instructions "Biometric Signature ID Knowledge Base")</span></div></details>## **Still Need Help?**

If you're still having difficulties after troubleshooting with the common issues addressed above, you can visit the [Biometric Signature ID Knowledge Base](https://help.biosig-id.com/portal/en/kb/biosigid/biosig-id "BioSig-ID Knowledge Base") directly for more guides, articles, and suggestions, or [Submit a BioSig-ID Ticket](https://help.biosig-id.com/portal/en/newticket?departmentId=384156000000006907&layoutId=384156000000074011 "BioSig-ID Ticket") for direct assistance from their support staff. Please provide the following in your submission:

- **Contact Name:** First and Last Name as it is listed in A-State records.
- **Subject:** Brief summary of the problem.
- **Description:** Give specific details about the error you're encountering. For best results, include a picture, screenshot, and/or video.
- **Email Address:** Please use your A-State student email address in case the support team needs to reach out to our Help Desk.
- **School:** Arkansas State University

Users can expect a response from BioSig-ID's support staff about their ticket request within 4-6 hours if submitted between 8 AM and 9 PM CST.

### General BioSig‑ID Reference Information

<div id="bkmrk-biosig-id%E2%84%A2-technical" style="box-sizing: border-box; outline-color: rgb(204, 9, 47); outline-width: 1px; margin: 0px; padding: 0px; border: 0px; font-style: normal; font-variant-ligatures: normal; font-variant-caps: normal; font-variant-numeric: inherit; font-variant-east-asian: inherit; font-variant-alternates: inherit; font-variant-position: inherit; font-variant-emoji: inherit; font-weight: 400; font-stretch: inherit; font-size: 14px; line-height: inherit; font-family: -apple-system, BlinkMacSystemFont, 'Segoe UI', Oxygen, Ubuntu, Roboto, Cantarell, 'Fira Sans', 'Droid Sans', 'Helvetica Neue', sans-serif; font-optical-sizing: inherit; font-size-adjust: inherit; font-kerning: inherit; font-feature-settings: inherit; font-variation-settings: inherit; font-language-override: inherit; vertical-align: baseline; color: rgb(68, 68, 68); letter-spacing: normal; orphans: 2; text-align: start; text-indent: 0px; text-transform: none; widows: 2; word-spacing: 0px; -webkit-text-stroke-width: 0px; white-space: normal; text-decoration-thickness: initial; text-decoration-style: initial; text-decoration-color: initial;">- **[BioSig-ID™ Technical Requirements](https://help.biosig-id.com/portal/kb/articles/technical-requirements-for-users-6-8-2019)**
- **[BioSig-ID™ FAQ](https://help.biosig-id.com/portal/kb/biosigid/faqs)**
- **[Technical Support Contact and Ticket Response Times](https://help.biosig-id.com/portal/kb/articles/technical-support-contact-and-ticket-response-times)**
- **[Technical Requirements for Users](https://help.biosig-id.com/portal/kb/articles/technical-requirements-for-users-6-8-2019)**

</div>