Student Help: Biometric Signature ID (BioSig-ID™)
Biometric Signature ID (BioSig-ID™) is a third-party tool available within Canvas classes. It is a biometric gesture‑based authentication tool that verifies the student completing coursework is the same person who enrolled by requiring a short biometric password drawn with a mouse, finger, or stylus. BioSig‑ID can be used to gate quizzes, exams, and other graded activities to support federal, accreditation, and academic integrity requirements.
About Biometric Signature ID (BioSig-ID™)
BioSig ID uses biometric gesture software to measure the unique way every user moves their mouse, finger, or stylus when they authenticate with their biometric password. Biometric identifiers such as the length, speed, direction, angle, and height of each stroke are collected by the software to create the user's unique biometric profile. In seconds, after drawing only 3-4 characters, BioSig-ID software establishes whether the user who registered is the same person trying to access the account.
The password will only need to be created one time and will be used each time they are asked to authenticate in a Canvas course. The input password is instantly compared against the previously created enrollment profile, and access is only granted if they match.
Students can create their biometric password with a mouse, stylus, or their finger on a variety of computers and devices. The biometric password cannot be replicated by someone else. Students will be required to authenticate their identity with BioSig ID prior to completing quizzes, tests, assignments, and discussion boards. All authentications take place within Canvas.
Required use at A-State
Arkansas State University is required by federal law and regional accreditors to confirm the identity of all students who take online courses. Authenticating students’ identities throughout their coursework ensures the institution's academic integrity while preserving the quality of the online degree you earn. To meet the requirements of federal law and regional accreditation, Arkansas State University requires online students to authenticate their identity through BioSig ID.
Getting Started with BioSig-ID
Note: To avoid any issues, students are strongly encouraged to complete the initial enrollment process on a full computer with a mouse. After completing your initial enrollment, you can then add additional devices, such as a tablet or mobile phone.
BioSig-ID (2025). BioSig-ID™ Enrollment. Retrieved from Biometric Signature ID Knowledge Base
Support Guides
Enrollment Instructions
-
Inside your course, launch the enrollment process for BioSig-ID™ to get to this screen
-
Select the device that will be used
-
Follow the step-by-step guide, and write your four-character password for BioSig-ID™
-
The first password is always accepted. Now write your password again as close as possible. Remember. It's not what your password looks like that matters, but how you write it.
IMPORTANT: It is natural to fail the next step if you are having a difficult time drawing the same characters again close enough to your first password. Try using the `Restart` button otherwise to start fresh and draw something else. For example, use an `X` or `7` instead of a `0` as lines are easier than circular motions for some users. Another option is to draw smaller and/or slower. Everything you draw will be used to verify, so if you already know that something went wrong use the `Clear` button to redo the step you are at. Touch-pad users might want to consider using both hands to allow more control in drawing while holding down the `left` button. -
To get a proper biometric profile you must draw it a third time
-
Your primary password for BioSig-ID™ is now enrolled. It is time to create a secondary profile with Click-ID™
-
This is not an actual keyboard, but an image of one to make it easier to remember what points you click on. You may use the same password that was used for the BioSig-ID™ profile or pick something new. (Black dots will appear after your selection)
-
The first step is always accepted and now it is important to create it again as close as possible
-
Now just once more to finish the Click-ID™ enrollment
-
This last step will lock everything in place with a final validation of BioSig-ID™. Draw the password you created one final time and click the `Validate` button to continue
This ends the process. You may be presented with a button to return to Canvas.
Retrieved from BioSig-ID Step-by-Step Enrollment (Article)
Validation Instructions
To successfully validate your BioSig-ID password:
- Draw the password you created when enrolling this device.
- Click Validate to continue.
After validation, you will see a button to return to Canvas.
Depending on how BioSig-ID is used in your course:
- Access to the next item (such as a quiz) may unlock immediately, or
- The next item (such as a discussion) may become visible below the current item.
Changing or Adding Devices
From time to time you may need to enroll a new device. For example, if you use a mouse at work and a touch-pad at home you may need to set up two device profiles. This article will walk you through the steps to set up a second device.
Step 1 - From the BioSig-ID™ Drawing Pad click Change Device.
Step 2 - Choose a new device in the Enroll New Device Area
Note: If you use a mouse at work and want to enroll a mouse for home, you may select any of the profiles such as a Stylus to use for the second mouse.
Step 3 - Click or touch the Click-ID™ password you created, then click Validate
Note: See below if you cannot recall your Click-ID™ password
Step 4 - After entering your Click-ID™ you will then be able to enroll a new device
Tip: Use the same password and Click-ID™ across all devices so that it is easy to remember.
What if I cannot recall my Click-ID?
If you do not recall your Click-ID™ password, please follow the Reset instructions.
Return to Step 1 to add a new device.
Retrieved from BioSig-ID: Changing or Adding Devices (Article)
Input Method or Drawing Issues
Trouble using a mouse – checkout your pointer speed option
PC - Changing your Mouse Pointer Speed
Open Mouse Properties by clicking the Start Button and then clicking Control Panel. In the search box, type mouse, and then click Mouse.
- Click the Pointer Options tab, and then do any of the following:
- To change the speed at which the mouse pointer moves, under Motion, move the Select a pointer speed slider toward Slow or Fast.
- To make the pointer work more accurately when you're moving the mouse slowly, under Motion, select the Enhance pointer precision check box.
- To change the speed at which the mouse pointer moves, under Motion, move the Select a pointer speed slider toward Slow or Fast.
- Click OK.
MAC - Changing your Mouse Pointer Speed
How to change the scroll direction, right-click, and tracking speed of your mouse on a Mac
- Click the Apple icon in the upper-left corner of your screen.
- Select System Preferences.
- Click on Mouse in the System Preferences window.
- Click on Point & Click.
- Drag the Tracking Speed slider left or right to increase or decrease the speed at which your mouse pointer moves across the screen.
If you still are struggling:
we recommend trying a different input method or device and seeing if the problem persists, If it does not persist there may be an fault with your input device.
If you are using a wireless mouse we recommend battery replacement as failing batteries do not maintain consistant wireless connection to the computer.
Using a Touchpad
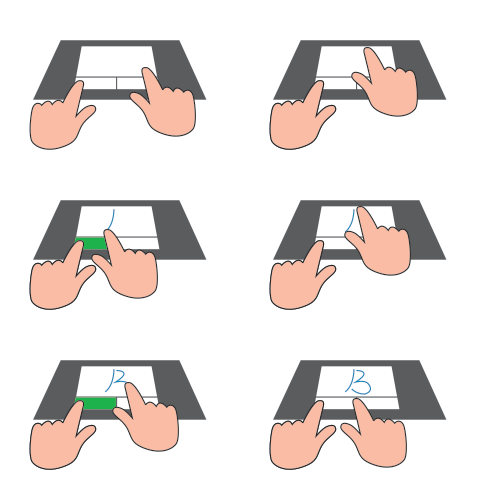
When using a touch pad to enroll your BioSig-ID password you will use one hand to hold down the corner (left button) while using a finger on the other hand to draw each character.
It is important that you keep the corner of the touch pad held down for the entire stroke. If you let up on the corner (left button) it will create an additional stroke and expect to you draw it with the extra stroke each time. Be sure that your "drawing" finger maintains contact with the Touch pad throughout the entire stroke as well.
If this does not solve the problem you may submit a support ticket for additional assistance.
Delayed Drawings or Only Straight Lines
Step 1: Identify the Symptoms
Are your drawings showing up as perfectly straight lines?
Example 1: Straight Lines Only
- You draw characters like “E 7 W 7,” but only perfectly straight lines are recorded:

- Is there a delay between drawing and seeing the lines appear?
Example 2: Delayed Rendering
- Your drawn lines don’t appear until after you’ve completed them, indicating significant lag.

Step 2: Basic System Checks
- Update your browser to the latest version
- Disable browser extensions
- Close unnecessary tabs and applications
- Try using another computer if available
Step 3: Hardware Acceleration & WebGL
- Enable Hardware Acceleration
- In Chrome/Edge: Settings → System → Toggle “Use hardware acceleration when available”
- Check WebGL Status
- Visit Get WebGL → Look for the spinning cube
- Visit BioSig-ID’s WebGL Check tool → Confirm values for Render, Vendor, Version, and Shading Language
- Go to chrome://gpu → Look for:
- ✔️ WebGL: Hardware accelerated
- ❌ WebGL: Software only
If WebGL is not hardware accelerated, continue to Step 4.
Step 4: Update Drivers
Outdated drivers can cause rendering issues—even if they appear “up-to-date".
- Update video card drivers directly from the manufacturer:
- Intel: Use Intel Driver & Support Assistant
- AMD / NVIDIA / Matrox: Visit official support sites
Drivers should be dated 2020 or later for full compatibility.
Example: Intel WHQL driver from 2015 may appear current but will not work properly.
Step 5: Scan for Malware
Malware can interfere with system performance and input rendering.
If you're unsure how to proceed, seek in-person IT support.
This issue may be caused by malware. If you suspect malware is present, use reputable anti-malware software to clean your device. While we don’t control third-party tools, users have reported success with MalwareBytes AdWareCleaner or Norton Power Eraser to remove unwanted malware.
Step 6: Submit a Support Ticket
If the issue continues try from a different device, or gather the following and contact support:
Include screenshots of:
- The spinning box from Get WebGL
- WebGL Render, Vendor, Version, and Shading Language
- chrome://gpu results showing WebGL status
Retrieved from Biometric Signature ID Knowledge Base
Reset BioSig-ID Password
IMPORTANT : If your email address is not listed on the button you must reach out directly to your institution.
IMPORTANT : DO NOT close the BioSig-ID page.
Step 4. Return to the BioSig-ID page and enter your security code. Be sure not to include any extra spaces or characters.
Still Need Help?
If you're still having difficulties after troubleshooting with the common issues addressed above, you can visit the Biometric Signature ID Knowledge Base directly for more guides, articles, and suggestions, or Submit a BioSig-ID Ticket for direct assistance from their support staff. Please provide the following in your submission:
- Contact Name: First and Last Name as it is listed in A-State records.
- Subject: Brief summary of the problem.
- Description: Give specific details about the error you're encountering. For best results, include a picture, screenshot, and/or video.
- Email Address: Please use your A-State student email address in case the support team needs to reach out to our Help Desk.
- School: Arkansas State University
Users can expect a response from BioSig-ID's support staff about their ticket request within 4-6 hours if submitted between 8 AM and 9 PM CST.