Banner Self Service Student
- Graduation Application
- How to Find a Syllabus
- Waitlist Registration Instructions
- Registration Status
- Browse Course Catalogue/ Browse Classes
- Register for Classes
- View Registration Information
- Plan Ahead
Graduation Application
Submit Your Graduation Application in Self Service
You can submit your application for graduation in Self Service. On the Self Service home page:
- Go to Graduation Application under Additional Links.
- If the page footer is covering some of the additional links, refresh your page.
- Select a curriculum term. This may not be the same as your graduation term.

- Choose a program and, if all the information is correct, select Continue.

- If you have two majors in the same degree, both majors will be listed under the same program.
- If you have two degrees, the programs will be listed separately. You need to file twice, once for each degree.
- If you are not eligible or have already applied for graduation, there will not be a program available.

If your curriculum information is incorrect or missing information, such as a major, concentration, or minor, contact your academic advisor to correct the information before continuing.
- Select the date you intend to graduate from the drop-down box.

- Indicate if you plan to attend the graduation ceremony and select Continue.

- This is asking if you plan to attend A-State Commencement on the Jonesboro campus.
- If you do not plan on attending Commencement on the Jonesboro campus, please select No.
- If you are graduating from a degree center, such as Beebe or Mountain Home, you may walk at Commencement on the Jonesboro campus if you choose to do so.
- Your answer to this question is used to plan seating for Commencement.
- To view the times that your college will graduate during the upcoming Commencement, please visit the graduation webpage.
- Select a name for your diploma from the drop-down box.

- Enter the name exactly as you want it on your diploma and select Continue.

- Middle initials and suffixes, such as Jr., should include periods.
- Do not use all capital letters.
- Select a payment method and select Continue.

The fee will be charged to your account and can be paid via Self Service or at the Cashier’s Window.
- Make sure the summary information is correct and select Submit Request.

- A successful submission will direct you to the Acknowledgement page.

- When the graduation application is completed, an automatic email is sent to your A-State email address notifying you of the receipt.
- Connect with your advisor or visit your Degree Works dashboard to view your graduation status.
- Continue to check your official A-State email account so you do not miss important correspondence about graduation. Graduation information is sent by official university email. Be sure you have not unsubscribed from university announcements or correspondence.
If you have any questions regarding graduation, please contact the Registrar’s Office at graduation@astate.edu or 870-972-2031, or visit the graduation webpage:
Office of The Registrar
How to Find a Syllabus
Accessing a Course Syllabus from the Class Schedule
-
Go to the A-State website at https://www.astate.edu/ and select A-Z Index.

-
Choose C from the alphabet list at the top of the page.

-
Select Class Schedule in the C section of the index.

-
Select a search term and select Continue.

-
Enter the course information you would like to use as search criteria. Open Advanced Search for more options, then select Search.

-
Scroll through the search results until you find the correct course, then select the course title. Example: Oral Communication.

-
The Class Details pop-up for the selected course will appear. Select the Syllabus tab.

-
Highlight and copy the Learning Objectives URL. Example:
https://webapp.astate.edu/wso2/syllabus/download.php?FileID=x
-
Paste the copied URL into the address bar of a new tab or browser window and press Enter on your keyboard.

-
If there is a syllabus on file for the course, it will automatically download. Select the file from your Downloads to open the syllabus.

-
If there is not a syllabus on file for the course, you will see the message below.


Waitlist Registration Instructions
Joining a Class Waitlist
When there are no longer seats available in a class, there may be an option to join a waitlist for the class.
If a class is at maximum capacity but has waitlist seats remaining
- Select Add to add the class to your registration summary.

- Choose Waitlisted from the Action drop-down box and select Submit.

Important: Adding a class to your summary does not mean you have been added to the waitlist for the class. You must select Submit, and the class status must show Waitlisted, in order to successfully join a waitlist.
If you receive a “Closed, Waitlisted” registration error
- Choose Waitlisted from the Action drop-down box and select Submit.

Important: Adding a class to your summary does not mean you have been added to the waitlist for the class. You must select Submit, and the class status must show Waitlisted, in order to successfully join a waitlist.
A successful addition to a waitlist shows the status Waitlisted.

If a seat opens for you in one of your waitlisted classes, you will receive a Waitlist Notification email at your @smail.astate.edu student email account with a deadline to register for the class.

You must register for the class by the deadline in your notification email. If you do not register within the timeline, the seat will be offered to the next student on the waitlist.
To register for a waitlisted class
- Go to Registration and Planning under Additional Links on the Self Service home page.
- Select Register for Classes from the registration menu.
- Select the term and select Continue.
- Choose Web Registered from the Action drop-down box and select Submit.

A successful registration shows the status Registered.

Important: If a class shows a Waitlisted or Pending status, you have not registered for the class. You must select Submit, and the class status must show Registered, in order to successfully register for the class.
Registration Status
Registration Status and Academic Advisor Information
- Go to Registration Status on the registration menu.
- Select a term and select Continue.
The Registration Status page identifies problems that may affect registration for the selected term, including holds, academic standing, and student status.
It also identifies any permits you have been granted, your earned hours, and curriculum information.

Viewing Holds

In addition to being listed under Registration Status, holds can also be viewed on the top right of the Self Service home page.
- Select Holds to view a list of holds on your account.
- Use the arrow icon to display more information about a hold.
You cannot register if Registration is listed as an affected process.
Locating Your Academic Advisor
Your academic advisor is listed on the Self Service home page.
- Locate the gray area beginning with Bio Information.
- Your advisor is listed at the bottom of this area under Advisors.
Select an advisor’s name to view their email address.

Browse Course Catalogue/ Browse Classes
There are two ways to look up course information in Self Service

- Go to Browse Course Catalog or Browse Classes on the registration menu.
- Select a term and select Continue.
- Enter the course information you would like to use as search criteria and select Search.
- Open Advanced Search for more search options.
- Use the symbol % for wildcard searches.

Course Information and Search Criteria
When looking up classes, there is course information that can be used as search criteria. Important details to review include how a course will be taught, where it will be taught, the date range when it will be taught, and any special course features.
Course Reference Number
A Course Reference Number, or CRN, is the unique five digit ID of a class section for a given term. Instead of having to remember the subject prefix, course number, and section number, you can use the CRN when asking questions about or registering for classes.
- Spring CRNs begin with 1.
- Summer CRNs begin with 3.
- Fall CRNs begin with 6.
Instructional Method
Using the Instructional Method, students can search for courses outside of those that are typically considered traditional. This includes online and web assisted courses. The course details will list whether a course is online or web assisted in both the instructional method and the course location.

- WEB 0% FACE TO FACE - These courses are 100% online and do not have mandatory meeting times.
- WEB ASSIST - The majority of content in these courses is taught online. However, there may be 1 to 25%, 26 to 50%, or 51 to 99% mandatory face to face meeting times either in class or online via a virtual community. This includes courses that require exams to be proctored in person or at a specific online location with mandatory times.
Campus
Students should be aware of the campus codes assigned since this is where the course will be taught. Students on the Jonesboro campus cannot register for classes in Querétaro, for example.
Common campus codes include:
- JONESBORO CAMPUS
- GLOBAL CAMPUS, A-State Online
- QUERÉTARO CAMPUS
Parts of Term

Part of term is used to designate periods of a semester in which courses occur. This appears as a date range under meeting times.
The three main parts of term for any given semester are:
- Full Term
- Session I, first half of the term
- Session II, second half of the term
If a date range is displayed, the part of term can be determined from the dates listed. For example, a fall course that runs from August to December is likely full term.
Attributes
Some courses are marked with attributes which denote special features of those courses. These attributes can be used to search for courses.
Common course attributes include:
- HONORS - These sections count toward the required Honors coursework in the Honors College.
- STRUCTURE LEARNING ASSISTANCE, SLA - These sections have mandatory support hours.
Register for Classes
Registering for Classes
- Go to Register for Classes on the registration menu.
- Select a term and select Continue.
- There are three ways to register for classes.
If you do not know the CRNs of your desired sections
- Open the Find Classes tab.
- Enter the search criteria and select Search.
- Scroll through the search results to find a section.
Closed sections show the status FULL.

Open seats may be reserved for waitlists.

- Select Add to add a section to your summary.
The course will show the status Pending.

You cannot select Add on sections already in your summary.

- To register for pending classes, select Submit.
A successful registration shows the status Registered.

An issue registering shows the status Errors Preventing Registration.
If you do know the CRNs of your desired sections
- Open the Enter CRNs tab.
- Enter one CRN per box.
- Select +Add Another CRN to add more boxes if needed.
- Select Add to Summary.
The course or courses will show the status Pending.


- To register for pending classes, select Submit.
A successful registration shows the status Registered.

An issue registering shows the status Errors Preventing Registration.
Using a Saved Plan
If you have a plan saved for the term, you can open the Plans tab. More information on registering from a plan can be found in the Plan Ahead section of this guide.
Registering for Corequisites
If you are trying to register for a class that has a corequisite, such as a Chemistry lecture and corresponding laboratory course, make sure both classes are pending in your summary before selecting Submit.
You must register for both corequisites at the same time or you will receive a prerequisite and test score error.
Registration Errors
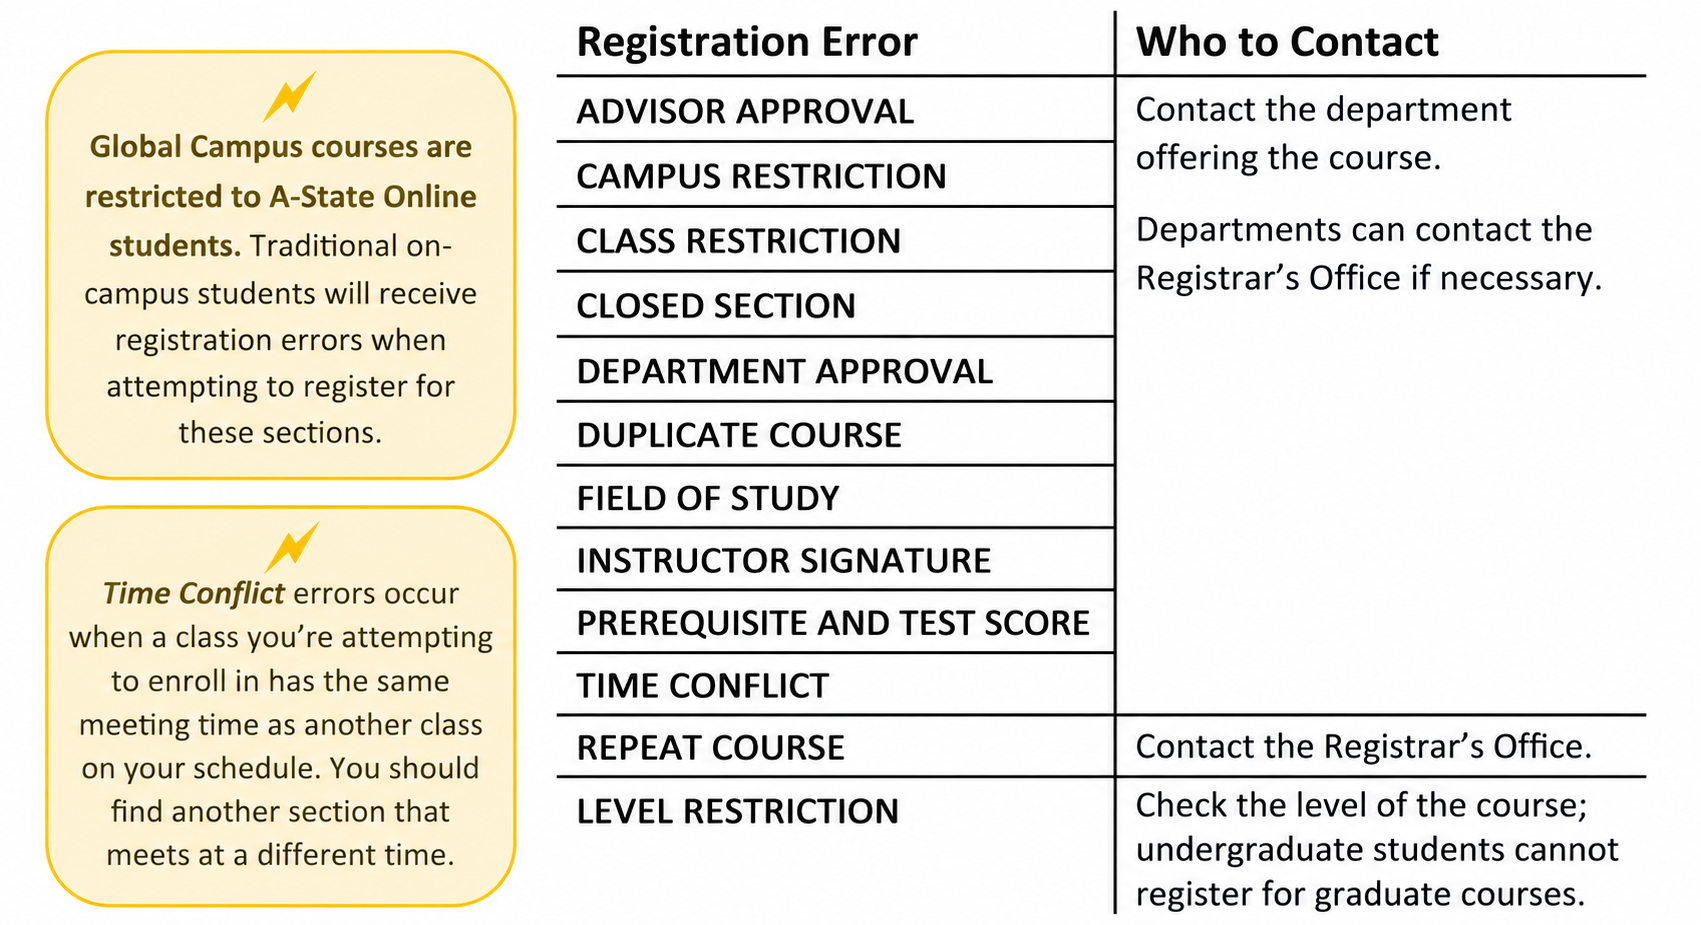
A successful registration will show the status Registered. If an issue occurs, the status will show Errors Preventing Registration. A notification will list the course information and the error that occurred.

The department offering a course and the Registrar’s Office can issue permits to override some registration errors. Not all errors will receive permits.
To request a permit override, send an email to the contact listed below and include your name, ID number, the error type, and CRN. You can view your permits under Registration Status.
Dropping Classes
- Go to Register for Classes on the registration menu.
- Select a term and select Continue.
- Choose Drop Web (DD) from the Action drop-down box for the classes you want to drop.

- Select Submit. A successful drop shows the status Deleted.


Waitlisting
There are two ways to add yourself to the waitlist for a section.
If a class is at maximum capacity but has waitlist seats remaining


- Select Add to add the class to your summary.
- Choose Waitlisted from the Action drop-down box.
- Select Submit to add yourself to the waitlist.
A successful addition to a waitlist shows the status Waitlisted.

If you receive a Closed, Waitlisted registration error

- Choose Waitlisted from the Action drop-down box.
- Select Submit to add yourself to the waitlist.
A successful addition to a waitlist shows the status Waitlisted.

Registering from a Waitlist
If a seat opens in the class, you will receive a Waitlist Notification email to your @smail.astate.edu student email account with a deadline to register for the class.
After receiving the notification, log in to Self Service and register for the class.
- Go to Register for Classes.
- Select a term and select Continue.
- Choose Web Registered from the Action drop-down box for the waitlisted classes with open seats.

- Select Submit to register for the class.
A successful registration shows the status Registered.


View Registration Information
Registration History
- Go to View Registration Information on the registration menu.
- Open the Look Up a Schedule tab.
- Select a term from the drop-down box.
- A summary of your schedule for the selected term is shown in the top panel.

- Select Schedule on the bottom panel to view a weekly schedule for the term.


- Select Schedule Details on the bottom panel to view detailed course information.
- You can find an instructor’s email address by selecting their name.

Active Registration
- Go to View Registration Information on the registration menu.
- Open the Active Registrations tab.
- Here you can view all currently registered courses, including upcoming terms.
- Select a course title to view the syllabus, required textbooks, and other class details.
Plan Ahead
Self Service Plans
Self Service plans make it easier to enroll in classes during registration by saving a planned schedule of classes for the term.
Your advisor may have created a Degree Works plan for you that outlines which courses you should take each term. This is also known as an eight semester degree plan.
You can use your Degree Works plan in Plan Ahead to find courses and then select specific class sections.
Creating a Self Service Plan
On the registration menu:
- Go to Plan Ahead.
- Select a term and select Continue.
- On the Select a Plan page, choose +Create a New Plan.
- Enter the course information you would like to use as search criteria and select Search.
Open Advanced Search for more search criteria options.
There are two ways to add to your plan.
Add a Course
- Select +Add Course to add a course to your plan.
The course will show the status Pending.

Add a Class Section
- Select View Sections to find a class section.
- Select Add to add a class section to your plan.
The class section will show the status Pending.


- After adding courses or class sections to your plan, select Save Plan.
A successfully planned course shows the status Planned.

To designate a preferred plan, select Make Preferred on the Select a Plan page.
Editing Self Service Plans
On the Select a Plan page, select Edit.
Removing Courses
- Choose Delete from the Action drop down box for the class or classes you want to remove.
- Select Save Plan.
A successfully removed course will no longer appear in the plan summary.

Using a Degree Works Plan to Create a Self Service Plan
On the registration menu:
- Go to Plan Ahead.
- Select a term and select Continue.
- Scroll to Number of Degree Works Plans on the Select a Plan page.
- Make sure the number is greater than zero and there is a plan listed.
- Contact your academic advisor if you believe there should be a Degree Works plan listed and one is not available.
- If you have a Degree Works plan, choose +Create a New Plan.
- Open the Degree Works Plans tab.
Course and Choice requirements assigned to the term in Degree Works will be displayed.

Course Requirements
- Make sure there is not a number listed in the Choice Group column.
If a number is listed, the requirement is a Choice requirement.
- Select View Sections to find a class section for the course.
- Select Add to add a class section to your plan.
The class section will show the status Pending.


Source HTML reviewed from uploaded document. :contentReference[oaicite:0]{index=0}