Captioning Guide
Browse topics covered in our Captioning Guide or download the full document for reference.
- Our Goal & File Download
- Benefits of Captioning
- Definitions
- Best Practices
- Captioning Assistance
- Captioning with Adobe Premiere Pro
- Captioning with YouTube
- Simple Caption File Formatting
- Additional Resources
Our Goal & File Download
Our goal for the Captioning & Accessibility Operating Procedure is for faculty and staff alike to aid in giving all A-State students equal access and experience to/with content. Because of this, we are prioritizing captioning content used across campus. If for some reason the content being used cannot be captioned, then we strongly encourage the instructor(s) to supply the transcripts necessary.
The hope is that we don’t just meet the bare minimum compliance requirement but set a standard beyond our legal obligation.
Download the full Captioning Guide
Benefits of Captioning
- Acquiring a disability or realization of a disability condition can occur unexpectedly at any time in one’s life. Captioning being required for all recorded content used for class instruction, allows the university to be proactive in these situations, rather than reactive.
- With online learning becoming a reality for most institutions, including A-State, recorded lectures and videos are being utilized more often. We can troubleshoot a lot of accommodation and accessibility related concerns by already requiring those videos to be captioned.
- Students with disabilities are encouraged to register with AAS, but they are not required to, meaning there could be students that are hard of hearing that have not disclosed.
- Captioning enhances access for all students. Students with learning and processing disorders often benefit from captioning because it allows them to access material in multiple formats (visual and audio). Captioning can also be beneficial to ESL students and students without disabilities because it can allow them to access video material regardless of environmental factors.
- Having all videos captioned is a major component of the concept of Universal Design, the philosophy that environments should be designed as accessible as possible to all people on the front-end to eliminate the need for individuals to request accommodations.
Definitions
- Closed captioning is a process where specifically encoded text is placed onto video or other media for the benefit of those hard of hearing. Normally invisible, closed captioning requires an internal decoder to be activated for viewing on the monitor/television.
- Open captioning is a process by which text is added to video or other media that is a written translation of the media’s dialogue. Unlike closed captioning, open captions require no special decoding equipment for viewing on televisions or monitors and are always displayed and cannot be turned off.
- Voice recognition software are apps where you use your voice and speak in natural language. AI then turns speech to text and can also understands spoken commands.
- Sound effects are sound(s) other than speech or music made artificially for use in media. In captions and transcripts, they are normally marked with Brackets “[ ]”.
- Font is a set of characters of a certain size, weight, and style.
- Caption placement is the location of captions on the screen.
Best Practices
Captions are best when they are:
- Errorless captions are the goal for each production.
- Synchronized with the audio and displayed with enough time to be read completely.
- Not obscured by, nor do they obscure, the visual content.
- Under 30 characters per line.
- No more than two lines on the screen at a time.
Tips for Captioning Dialogue:
- Write exactly what the speakers are saying.
- Use italics or write “(off-screen)”/ “(VO)” (for voice-over) when speakers cannot be seen.
- Identify speakers by name, or role (i.e. Man 1), when it is not visually clear who is s All speaker identification should be lowercase unless this identification is being used as a proper noun.
- Identify hard to hear dialogue as “[unintelligible]” or “[inaudible]”.
- Identify screaming/shouting by using all capital letters (i.e. “HELP!”)
Tips for Captioning Non-Dialogue Sounds:
- Sound Effects should be shown in captions by brackets “[ ]” – NOT parentheses – to separate them from dialogue. Always name the object making the sound as what it is (i.e. “[engine revving]” or “[clock ticking]”). This creates meaning to those viewing content.
- Establish that a sound stopped (i.e. “[clapping stops]”) or that there is a sudden silence (i.e. “[silence]”).
-
- Always identify if a sound or music fades away slowly (i.e. “[cheering slowly fades]”).
-
- If a speaker is moving their lips without dialogue, identify this with “[mouths words]” or “[inaudible]”
- Distorted sounds should be identified by the type of distortion (i.e. “[muffled]” or “[echoing]”).
-
- Also identify when the distortion ends.
-
Tips for Captioning Music:
- Name the song/artist or the instrument and identify with music notes (i.e. “♪ As It Seems by Lily Kershaw ♪” or “♫ saxophone ♫”).
- If the song, artist, and/or instrument is unknown, do your best to describe tone/mood of the music (i.e. “♫ somber music ♫” or “♪ eerie music ♪”).
Other Tips for Captioning:
- Automatic captions will need manual edits to ensure accuracy.
- Be Consistent. Uniformity in style and presentation of all captioning features is crucial for viewer understanding. Please be consistent in the spelling of words throughout the media.
-
- This includes vocabulary that can be spelled either as one or two words or in hyphenated form.
-
- Equal access requires that the meaning and intention of the material is completely preserved.
-
- If it holds value for someone with access to the full audio, you need to caption it.
-
- Do not emphasize a word using all capital letters except to indicate screaming or shouting.
Captioning Assistance
If you have content that needs to be captioned and you need assistance, please email the Assistive Technology and Access Coordinator. They can assist in navigating software to caption your content and/or determine if third-party captioning services are necessary.
To ensure quality content is received on time, AAS requires all captioning requests be submitted a minimum of two weeks prior to the date it will be used.
Captioning with Adobe Premiere Pro
Auto Generating Captions with Premiere Pro
In this section we will show the basics with Adobe software on captioned video creation, as well as how to edit, and more importantly, save your work.
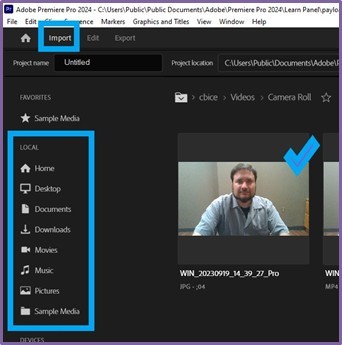
After starting Adobe Premiere Pro, import the video you are going to add captions to. Go to Import and select the file you want to start with.
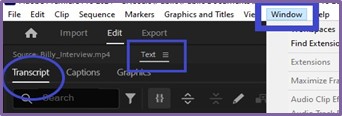
Access your audio layer by clicking on the Text tab. Make sure you are in the Transcript section. If the Text tab does not show up, click Window (next to Help) > Text. You will then be able to see the Text tab in the top left corner of the screen.
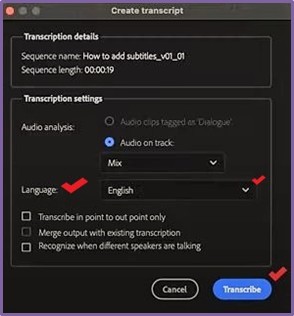
The Create Transcript window will pop up. Select your language and click Transcribe. Transcription times will vary depending on video length.
Select Create Captions and change the caption settings (maximum length of the characters, minimum duration, etc.) if necessary. Most people will leave the settings at default.
Click Create, and Premiere Pro will add and align the captions with the video's audio.
Now your captions are done, but reviewing auto-generated captions is necessary to ensure accuracy. Make sure you are in the Captions tab, and from here you can edit the captions, find/replace text, and navigate to specific portions of your video.
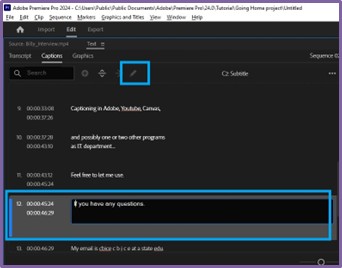
Saving Your Work
Using Adobe, there are different ways to save your work:
-
- As a project. This will be saved as an Adobe Premiere Pro file with the file extension .prproj (found at the end of your file name like .pdf, .doc, etc.).
- As a finalized video. This will save your original video with the newly added captions with the file extension .mp4.
It is highly recommended that you keep a current copy of the .prproj file even after you have a completed video. If you do not keep a copy of your .prproj file, you will not be able to edit the captions. You will have to start over with the caption-free video.
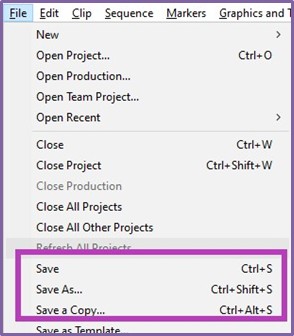
To save a copy of the project, you would follow the usual steps, just like saving a Word document or an Excel file.
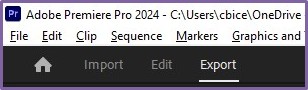
To save a copy of your finalized video, select the Export Tab (found next to where you imported the original file).
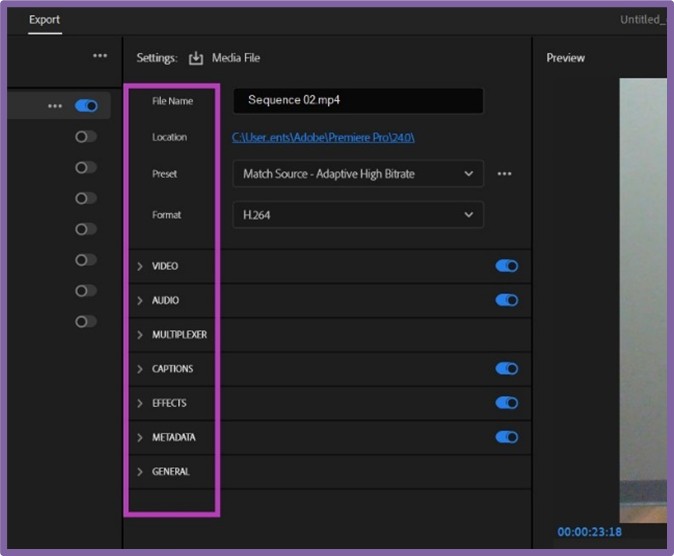
This will open a new screen (pictured below). On the left-hand side, you can see the options for video customization. Once you are satisfied, click the Export button found in the lower right-hand corner.
Remember to review your .mp4 file after completion to ensure accuracy of captions.
Keyboard Shortcuts
|
Function |
macOS |
Windows |
|
Create new captions track |
Opt + Cmd + A |
Ctrl + Alt + A |
|
Add a new caption segment at the play-head |
Opt + Cmd + C |
Ctrl + Alt + C |
|
Go to the previous caption segment in the timeline |
Opt + Cmd + Up |
Ctrl + Alt + Up |
|
Go to next caption segment in the timeline |
Opt + Cmd + Down |
Ctrl + Alt + Down |
Captioning with YouTube
Auto Generating Captions for a New Upload
Make sure you are signed into YouTube, otherwise you will not be able to upload/edit videos. Once you are logged in, click Create > Upload Video in the top right corner.
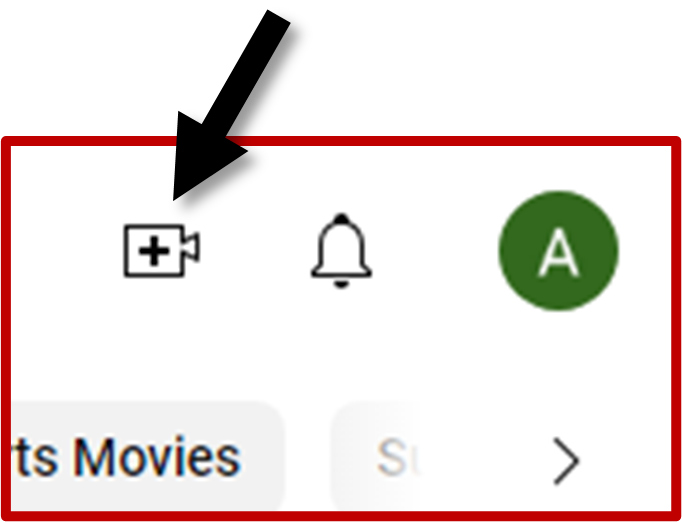
This will pull up a dialog box in the middle of your screen. Drag and drop or select a file to upload. After it has finished uploading, YouTube will supply a video link.
You will then be prompted to add details to your upload such as a title, description, etc. Once satisfied, click Next (bottom right) to progress to video elements.
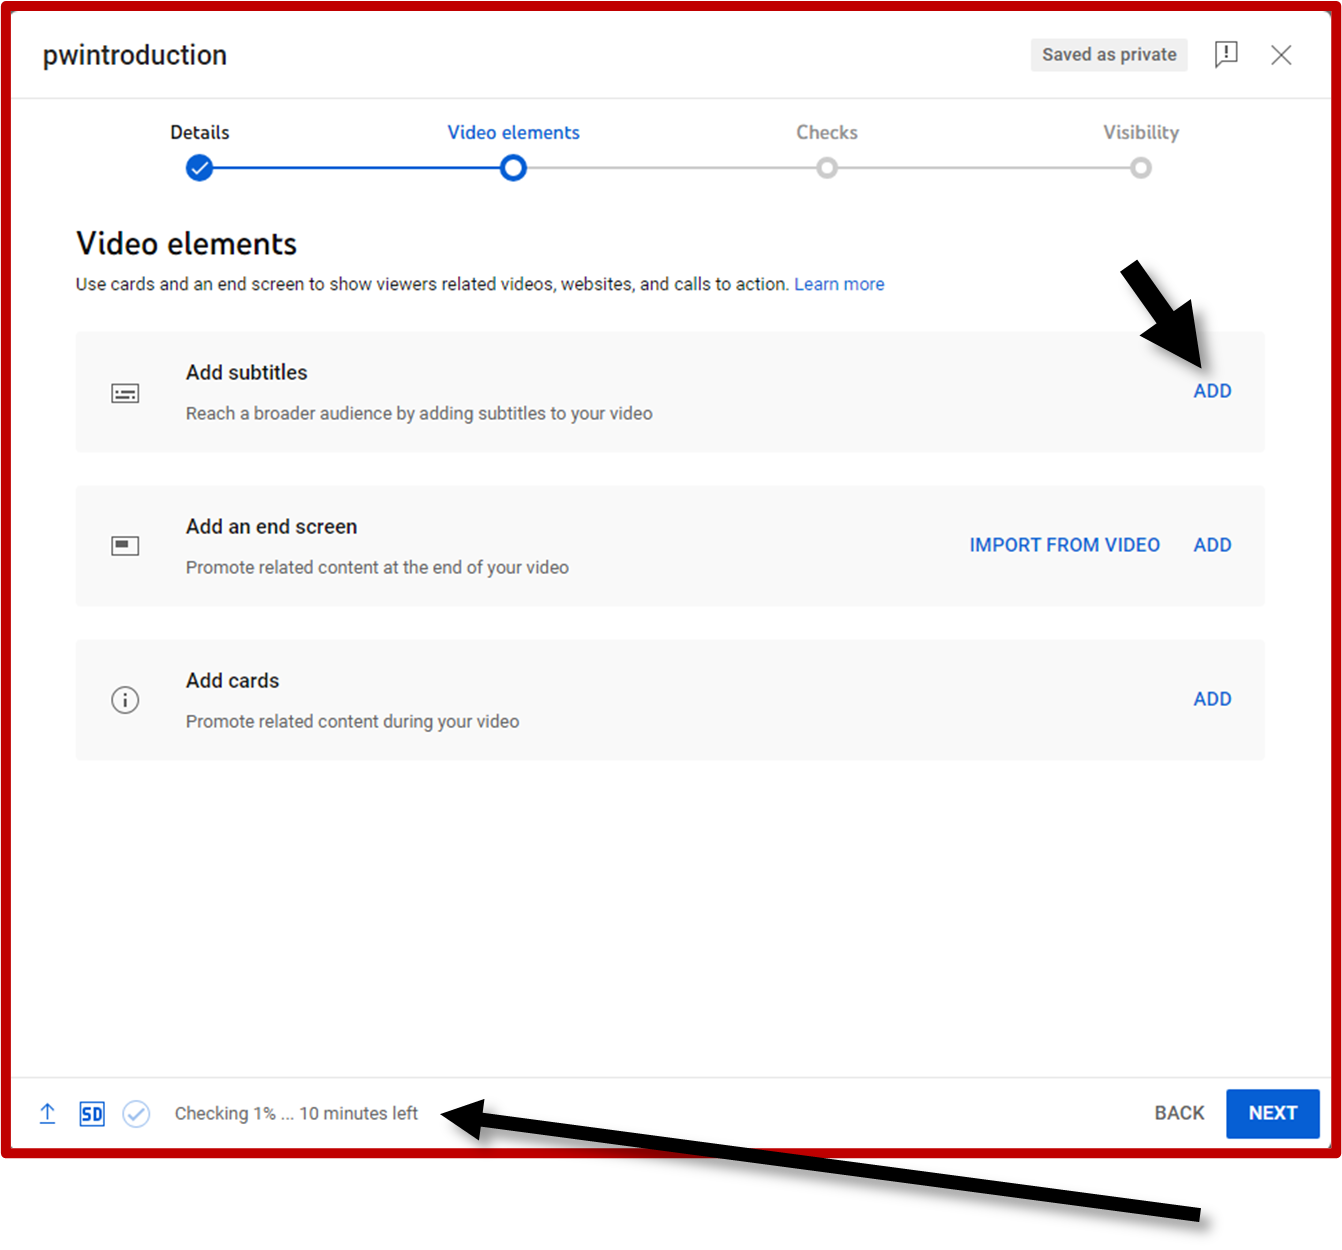 Click ADD on the right-hand side of the top bar to add captions.
Another screen will appear asking how you would like to add captions. Ensure the video language is set to English.
You do not have to do anything else; close this window.
You will have to wait, maybe for several minutes, for this stage to be completed.
Once your video has finished processing (check the progress in the bottom left):
- Ensure there is a blue dot with a checkmark under Checks.
- Click Visibility and set who can see your video. We recommend setting it as ‘Private’ until your captions are complete. You can change this setting at any time.
- Return to Video elements.
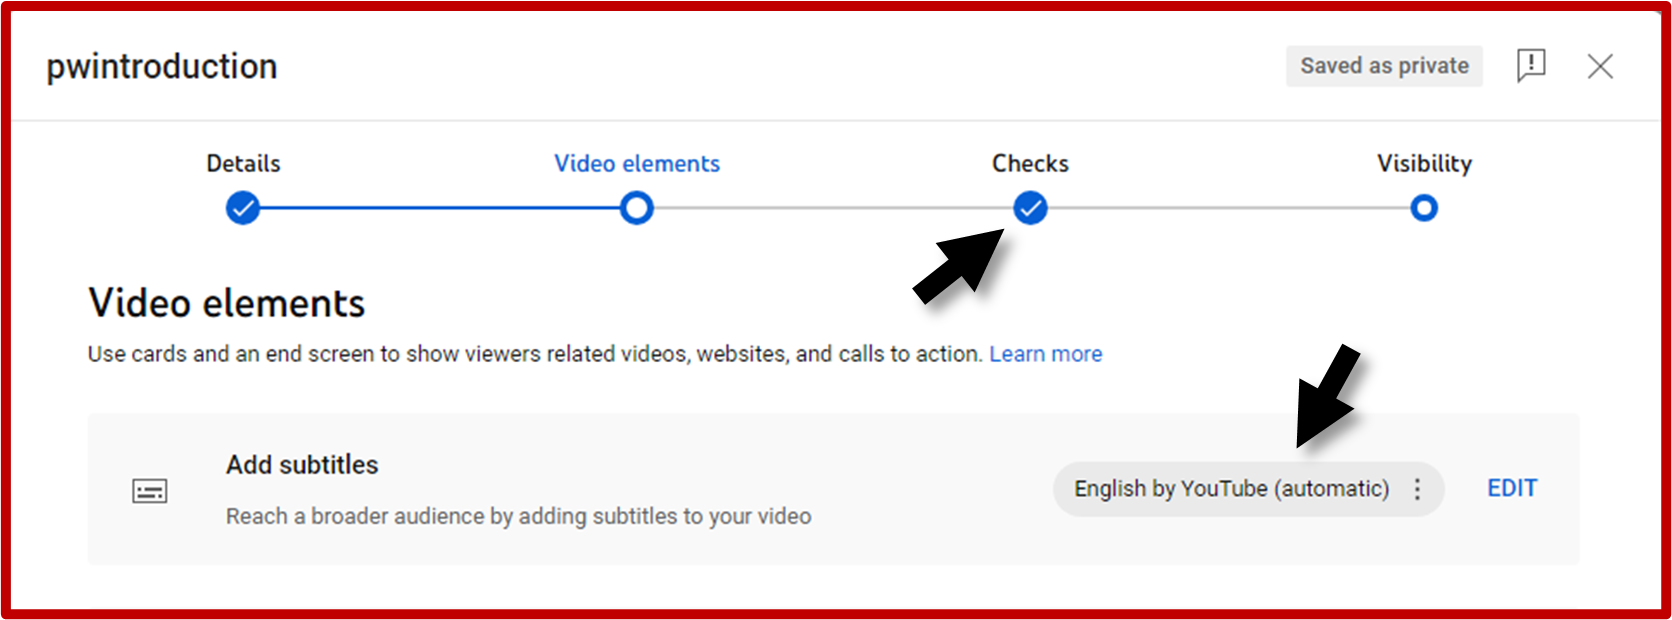
You will see the auto-generated captions (as shown above) are finished. Click Edit to review timing, grammar, spelling, etc. This is a necessary step to ensure accuracy.
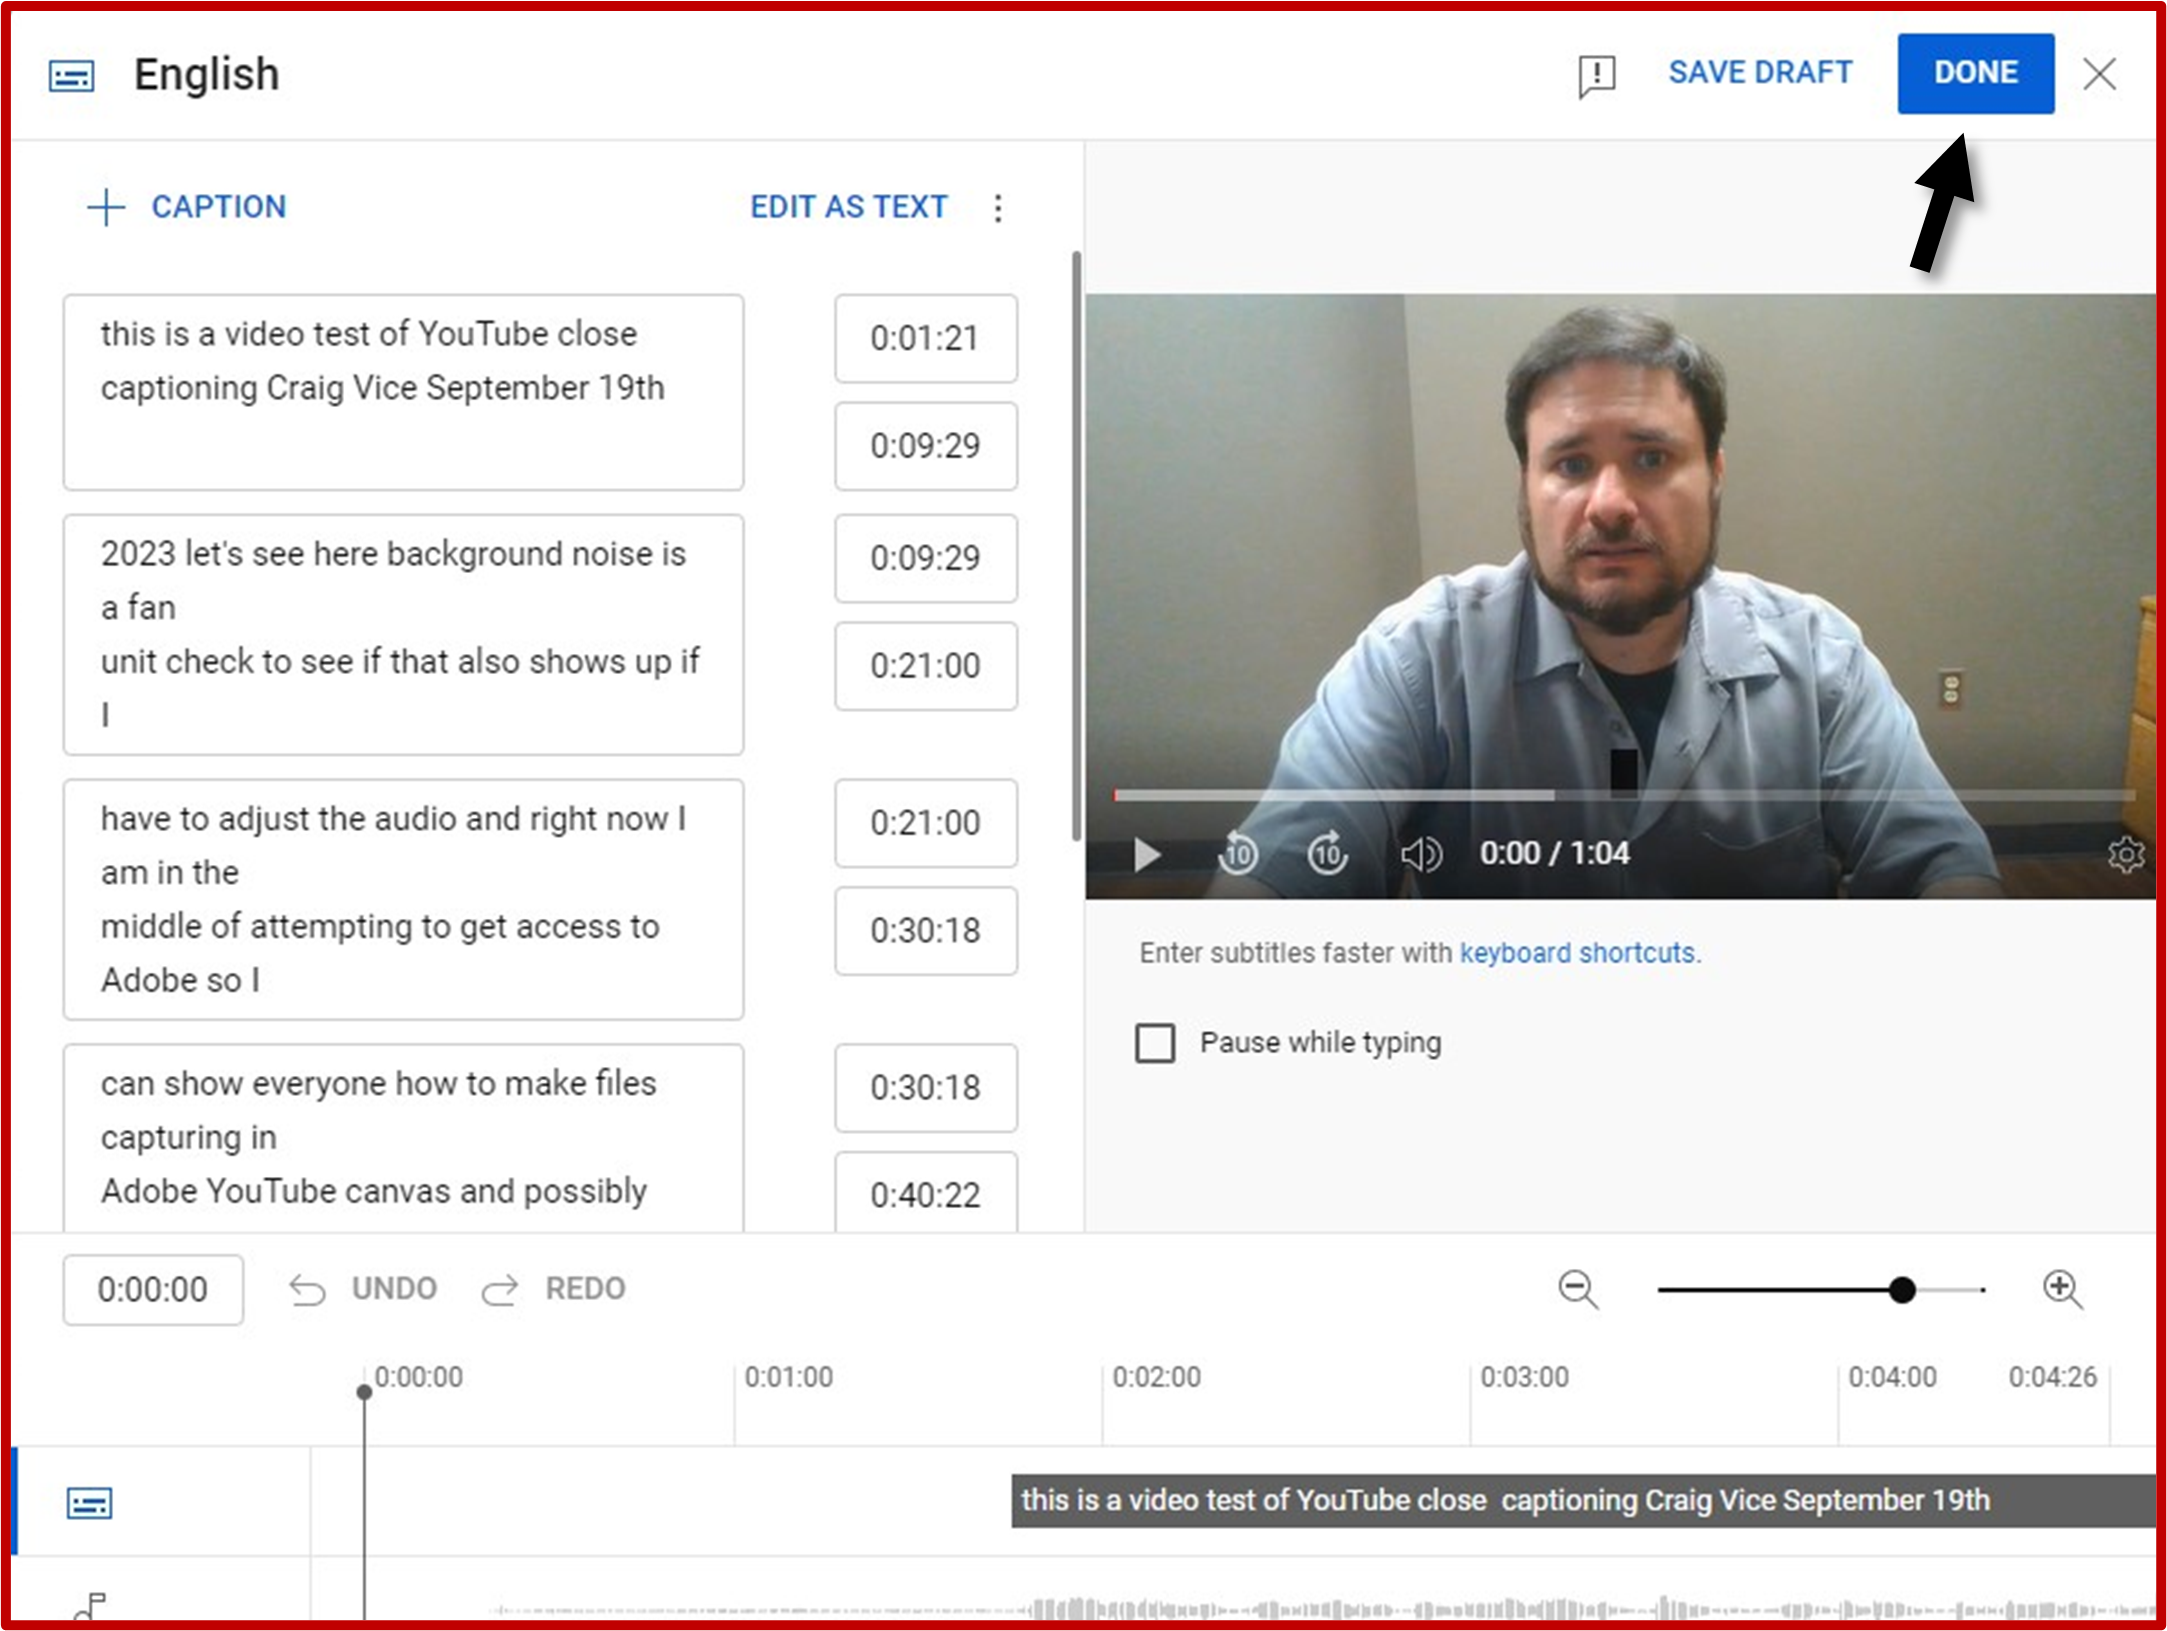
Your screen should now look like the image found below. Click Done in the upper right corner when edits are complete.
Remember to review your video after completion to ensure accuracy of captions.
Auto Generating Captions for Videos Already on YouTube
Make sure you are signed into YouTube, otherwise you will not be able to upload/edit videos.
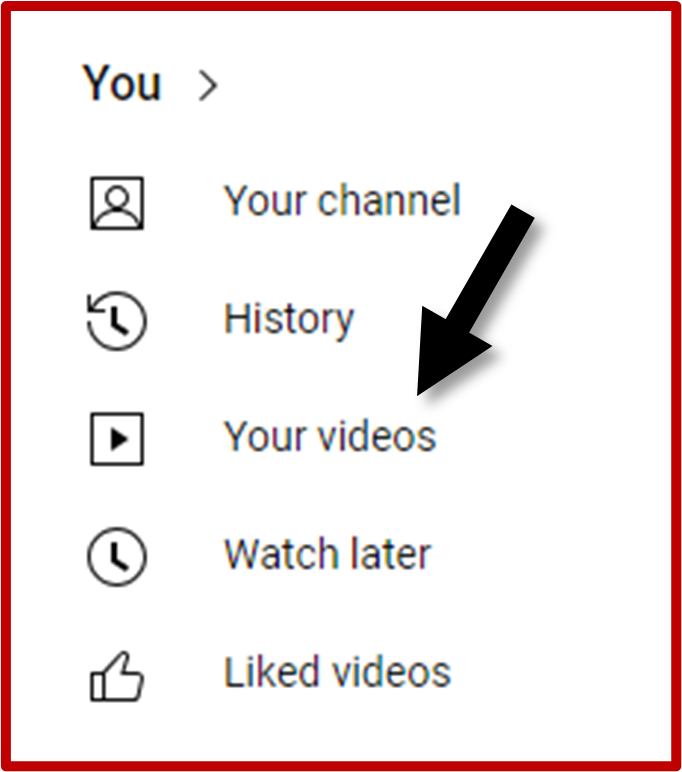
Once you are logged in, click Your Videos on the left side of the screen.
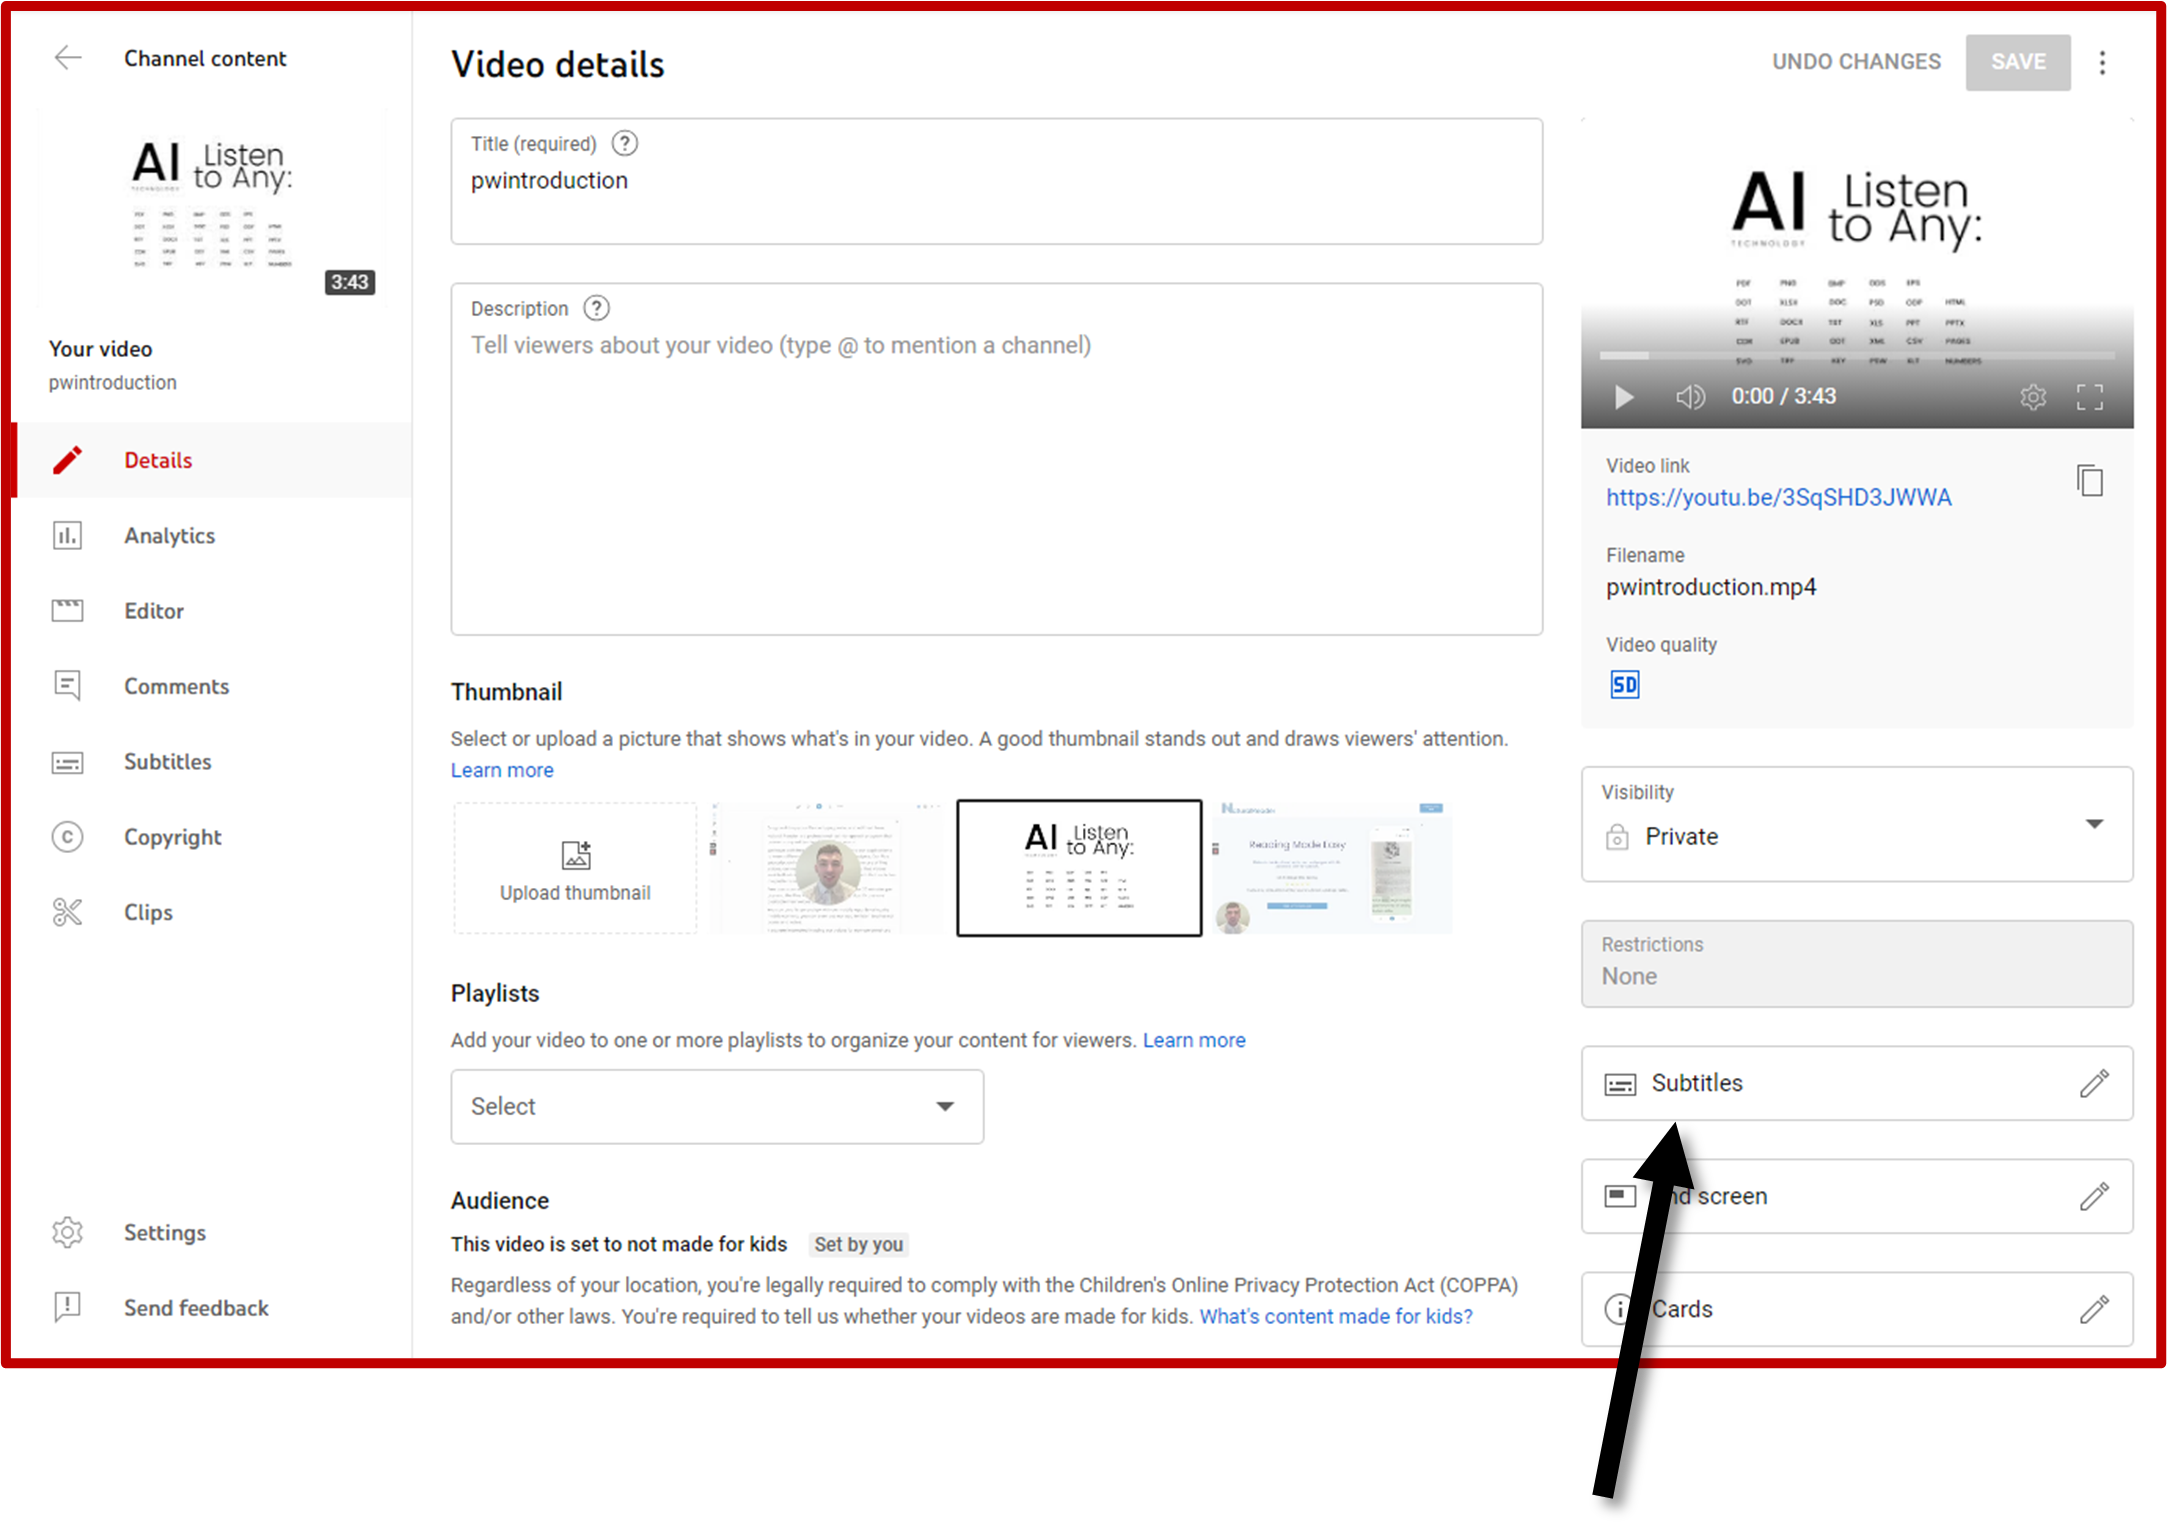
Hover over the video needing to be captioned and click the Details button. It will look like a little pencil. Your screen should now look like the image below.
On the right-hand side of the screen, select the Subtitles option. This will bring up the video editor as pictured in the end of the last section. Click Done in the upper right corner when edits are complete.
Remember to review your video after completion to ensure accuracy of captions.
Simple Caption File Formatting
To begin, you must have, or be ready to create a transcription of your video. Once you have a completed transcript, open a text editor such as Notepad or Word.
Create a new text file and save it with an .srt or .txt file extension (pictured below). When you save a Word document as a text file, be sure to check “Allow Character Substitution” to minimize the editing you will have to do.

You will divide the captions into different sections. Each section should include:
- Section number: The first line of each section should be a number indicating the order of the captions.
- Start and end times: The second line should include the start and end time of the caption in the format hh:mm:ss,ms (hours:minutes:seconds:milliseconds). There needs to be a two-hash arrow ( --> ) to separate beginning and end times.
- Text: The third and possibly fourth line(s) should include the caption text. Refer to “Captioning Best Practices” on page 4 for more guidance on text formatting.
Below is an example of what your caption file should look like.

Additional Resources
- How to Caption YouTube Videos by YouTube
- Best Practices for Writing Closed Captions by MSU Denver
- Adobe Premiere Pro for Absolute Beginners by Surfaced Studio
- How to Automatically Create Captions in Premiere Pro CC 2021 by Surfaced Studio
- How to Add/Edit Video Captions in Adobe Premiere Pro by Adobe
- The Ultimate Guide to Closed Captioning by 3Play Media
- Web Content Accessibility Guidelines