Captioning & Transcription
View our guides on captioning, transcription, and the full Captioning & Accessibility Operating Procedure.
- Captioning Guide
- Our Goal & File Download
- Benefits of Captioning
- Definitions
- Best Practices
- Captioning Assistance
- Captioning with Adobe Premiere Pro
- Captioning with YouTube
- Simple Caption File Formatting
- Additional Resources
- Transcription
- Captioning & Accessibility Operating Procedure
- Captioning in Kaltura
Captioning Guide
Browse topics covered in our Captioning Guide or download the full document for reference.
Our Goal & File Download
Our goal for the Captioning & Accessibility Operating Procedure is for faculty and staff alike to aid in giving all A-State students equal access and experience to/with content. Because of this, we are prioritizing captioning content used across campus. If for some reason the content being used cannot be captioned, then we strongly encourage the instructor(s) to supply the transcripts necessary.
The hope is that we don’t just meet the bare minimum compliance requirement but set a standard beyond our legal obligation.
Download the full Captioning Guide
Benefits of Captioning
- Acquiring a disability or realization of a disability condition can occur unexpectedly at any time in one’s life. Captioning being required for all recorded content used for class instruction, allows the university to be proactive in these situations, rather than reactive.
- With online learning becoming a reality for most institutions, including A-State, recorded lectures and videos are being utilized more often. We can troubleshoot a lot of accommodation and accessibility related concerns by already requiring those videos to be captioned.
- Students with disabilities are encouraged to register with AAS, but they are not required to, meaning there could be students that are hard of hearing that have not disclosed.
- Captioning enhances access for all students. Students with learning and processing disorders often benefit from captioning because it allows them to access material in multiple formats (visual and audio). Captioning can also be beneficial to ESL students and students without disabilities because it can allow them to access video material regardless of environmental factors.
- Having all videos captioned is a major component of the concept of Universal Design, the philosophy that environments should be designed as accessible as possible to all people on the front-end to eliminate the need for individuals to request accommodations.
Definitions
- Closed captioning is a process where specifically encoded text is placed onto video or other media for the benefit of those hard of hearing. Normally invisible, closed captioning requires an internal decoder to be activated for viewing on the monitor/television.
- Open captioning is a process by which text is added to video or other media that is a written translation of the media’s dialogue. Unlike closed captioning, open captions require no special decoding equipment for viewing on televisions or monitors and are always displayed and cannot be turned off.
- Voice recognition software are apps where you use your voice and speak in natural language. AI then turns speech to text and can also understands spoken commands.
- Sound effects are sound(s) other than speech or music made artificially for use in media. In captions and transcripts, they are normally marked with Brackets “[ ]”.
- Font is a set of characters of a certain size, weight, and style.
- Caption placement is the location of captions on the screen.
Best Practices
Captions are best when they are:
- Errorless captions are the goal for each production.
- Synchronized with the audio and displayed with enough time to be read completely.
- Not obscured by, nor do they obscure, the visual content.
- Under 30 characters per line.
- No more than two lines on the screen at a time.
Tips for Captioning Dialogue:
- Write exactly what the speakers are saying.
- Use italics or write “(off-screen)”/ “(VO)” (for voice-over) when speakers cannot be seen.
- Identify speakers by name, or role (i.e. Man 1), when it is not visually clear who is s All speaker identification should be lowercase unless this identification is being used as a proper noun.
- Identify hard to hear dialogue as “[unintelligible]” or “[inaudible]”.
- Identify screaming/shouting by using all capital letters (i.e. “HELP!”)
Tips for Captioning Non-Dialogue Sounds:
- Sound Effects should be shown in captions by brackets “[ ]” – NOT parentheses – to separate them from dialogue. Always name the object making the sound as what it is (i.e. “[engine revving]” or “[clock ticking]”). This creates meaning to those viewing content.
- Establish that a sound stopped (i.e. “[clapping stops]”) or that there is a sudden silence (i.e. “[silence]”).
-
- Always identify if a sound or music fades away slowly (i.e. “[cheering slowly fades]”).
-
- If a speaker is moving their lips without dialogue, identify this with “[mouths words]” or “[inaudible]”
- Distorted sounds should be identified by the type of distortion (i.e. “[muffled]” or “[echoing]”).
-
- Also identify when the distortion ends.
-
Tips for Captioning Music:
- Name the song/artist or the instrument and identify with music notes (i.e. “♪ As It Seems by Lily Kershaw ♪” or “♫ saxophone ♫”).
- If the song, artist, and/or instrument is unknown, do your best to describe tone/mood of the music (i.e. “♫ somber music ♫” or “♪ eerie music ♪”).
Other Tips for Captioning:
- Automatic captions will need manual edits to ensure accuracy.
- Be Consistent. Uniformity in style and presentation of all captioning features is crucial for viewer understanding. Please be consistent in the spelling of words throughout the media.
-
- This includes vocabulary that can be spelled either as one or two words or in hyphenated form.
-
- Equal access requires that the meaning and intention of the material is completely preserved.
-
- If it holds value for someone with access to the full audio, you need to caption it.
-
- Do not emphasize a word using all capital letters except to indicate screaming or shouting.
Captioning Assistance
If you have content that needs to be captioned and you need assistance, please email the Assistive Technology and Access Coordinator. They can assist in navigating software to caption your content and/or determine if third-party captioning services are necessary.
To ensure quality content is received on time, AAS requires all captioning requests be submitted a minimum of two weeks prior to the date it will be used.
Captioning with Adobe Premiere Pro
Auto Generating Captions with Premiere Pro
In this section we will show the basics with Adobe software on captioned video creation, as well as how to edit, and more importantly, save your work.
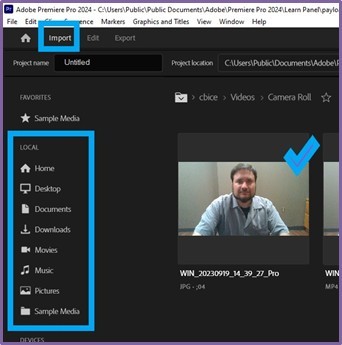
After starting Adobe Premiere Pro, import the video you are going to add captions to. Go to Import and select the file you want to start with.
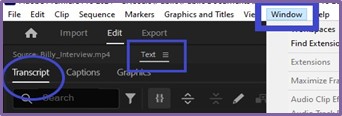
Access your audio layer by clicking on the Text tab. Make sure you are in the Transcript section. If the Text tab does not show up, click Window (next to Help) > Text. You will then be able to see the Text tab in the top left corner of the screen.
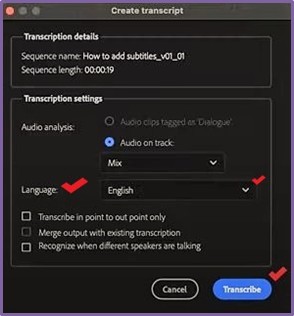
The Create Transcript window will pop up. Select your language and click Transcribe. Transcription times will vary depending on video length.
Select Create Captions and change the caption settings (maximum length of the characters, minimum duration, etc.) if necessary. Most people will leave the settings at default.
Click Create, and Premiere Pro will add and align the captions with the video's audio.
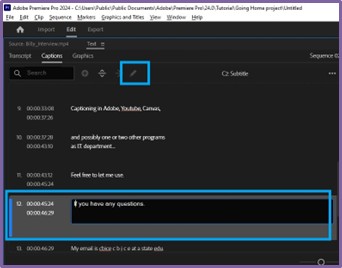
Now your captions are done, but reviewing auto-generated captions is necessary to ensure accuracy. Make sure you are in the Captions tab, and from here you can edit the captions, find/replace text, and navigate to specific portions of your video.
Saving Your Work
Using Adobe, there are different ways to save your work:
-
- As a project. This will be saved as an Adobe Premiere Pro file with the file extension .prproj (found at the end of your file name like .pdf, .doc, etc.).
- As a finalized video. This will save your original video with the newly added captions with the file extension .mp4.
It is highly recommended that you keep a current copy of the .prproj file even after you have a completed video. If you do not keep a copy of your .prproj file, you will not be able to edit the captions. You will have to start over with the caption-free video.
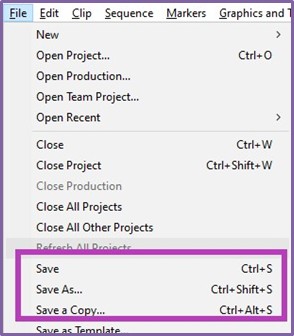
To save a copy of the project, you would follow the usual steps, just like saving a Word document or an Excel file.
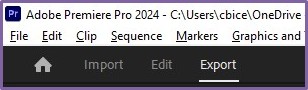
To save a copy of your finalized video, select the Export Tab (found next to where you imported the original file).
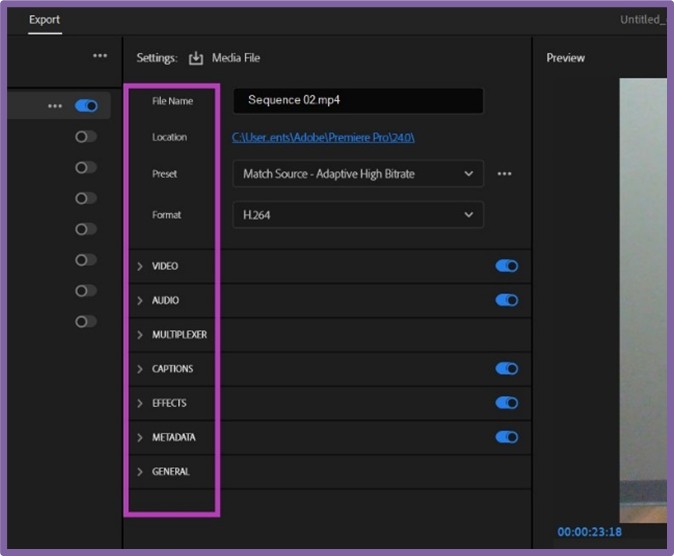
This will open a new screen (pictured below). On the left-hand side, you can see the options for video customization. Once you are satisfied, click the Export button found in the lower right-hand corner.
Remember to review your .mp4 file after completion to ensure accuracy of captions.
Keyboard Shortcuts
|
Function |
macOS |
Windows |
|
Create new captions track |
Opt + Cmd + A |
Ctrl + Alt + A |
|
Add a new caption segment at the play-head |
Opt + Cmd + C |
Ctrl + Alt + C |
|
Go to the previous caption segment in the timeline |
Opt + Cmd + Up |
Ctrl + Alt + Up |
|
Go to next caption segment in the timeline |
Opt + Cmd + Down |
Ctrl + Alt + Down |
Captioning with YouTube
Auto Generating Captions for a New Upload
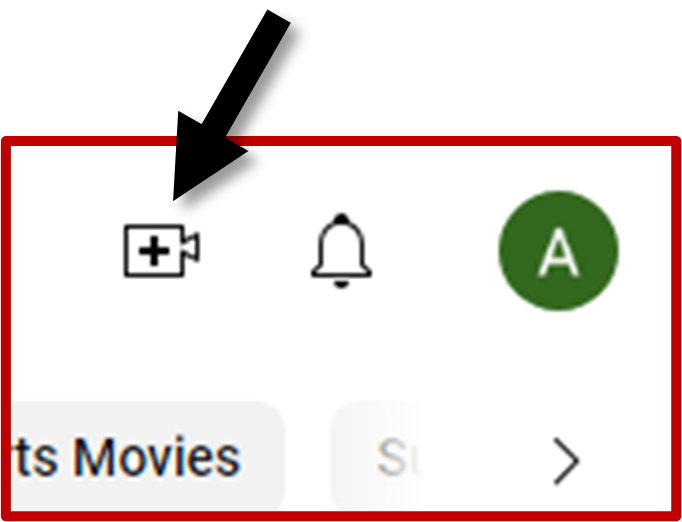
Make sure you are signed into YouTube, otherwise you will not be able to upload/edit videos. Once you are logged in, click Create > Upload Video in the top right corner.
This will pull up a dialog box in the middle of your screen. Drag and drop or select a file to upload. After it has finished uploading, YouTube will supply a video link.
You will then be prompted to add details to your upload such as a title, description, etc. Once satisfied, click Next (bottom right) to progress to video elements.
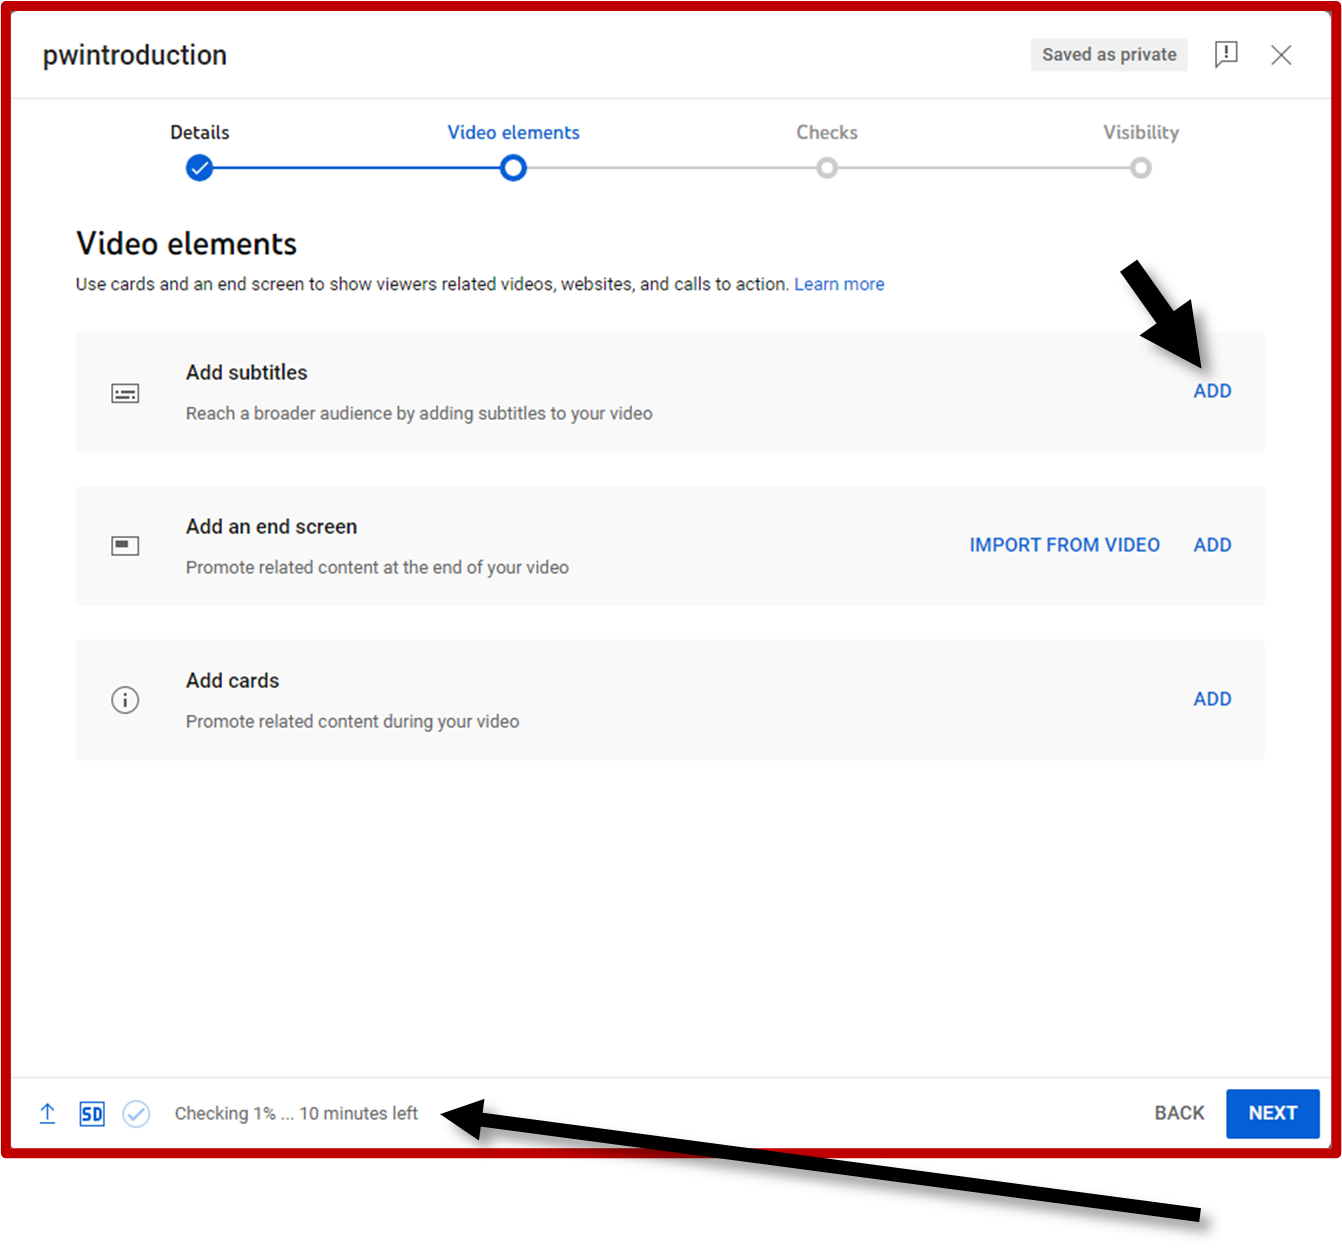 Click ADD on the right-hand side of the top bar to add captions.
Another screen will appear asking how you would like to add captions. Ensure the video language is set to English.
You do not have to do anything else; close this window.
You will have to wait, maybe for several minutes, for this stage to be completed.
Once your video has finished processing (check the progress in the bottom left):
- Ensure there is a blue dot with a checkmark under Checks.
- Click Visibility and set who can see your video. We recommend setting it as ‘Private’ until your captions are complete. You can change this setting at any time.
- Return to Video elements.
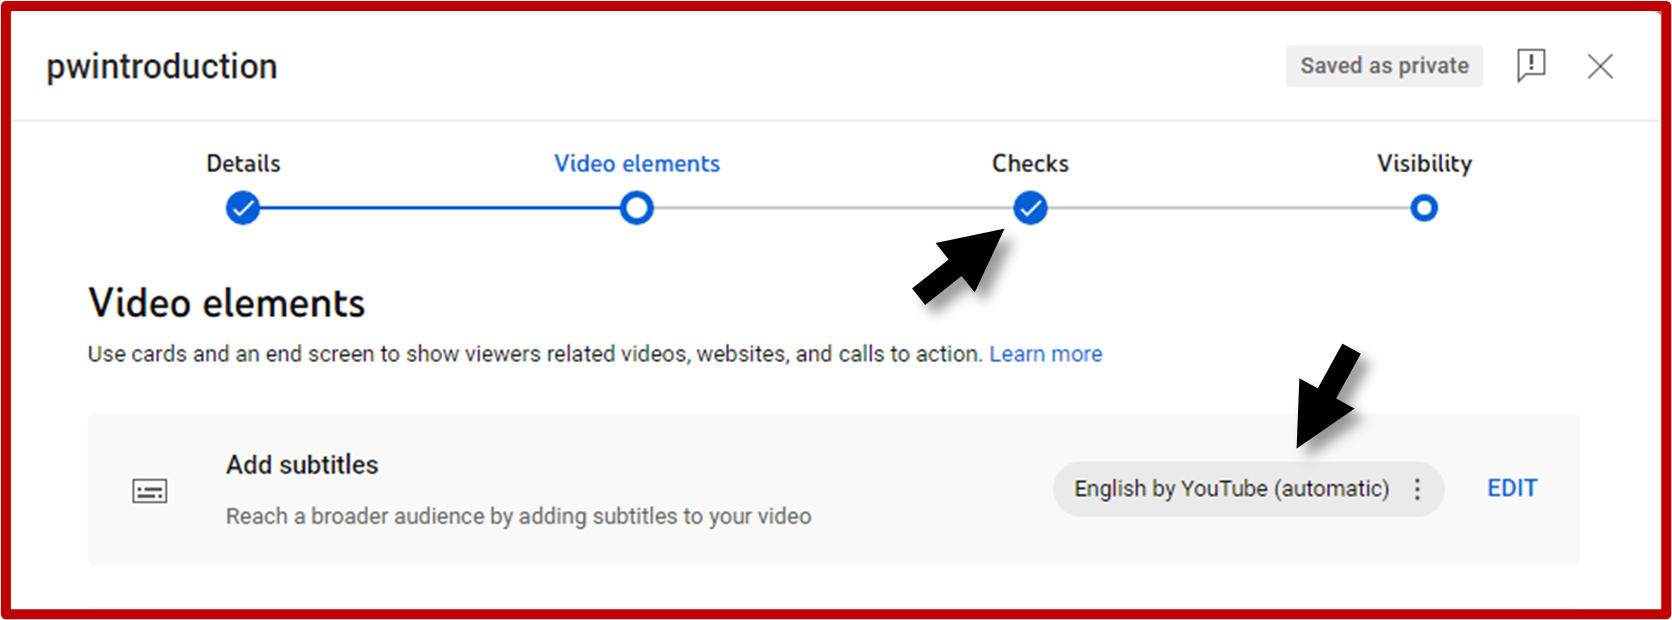
You will see the auto-generated captions (as shown above) are finished. Click Edit to review timing, grammar, spelling, etc. This is a necessary step to ensure accuracy.
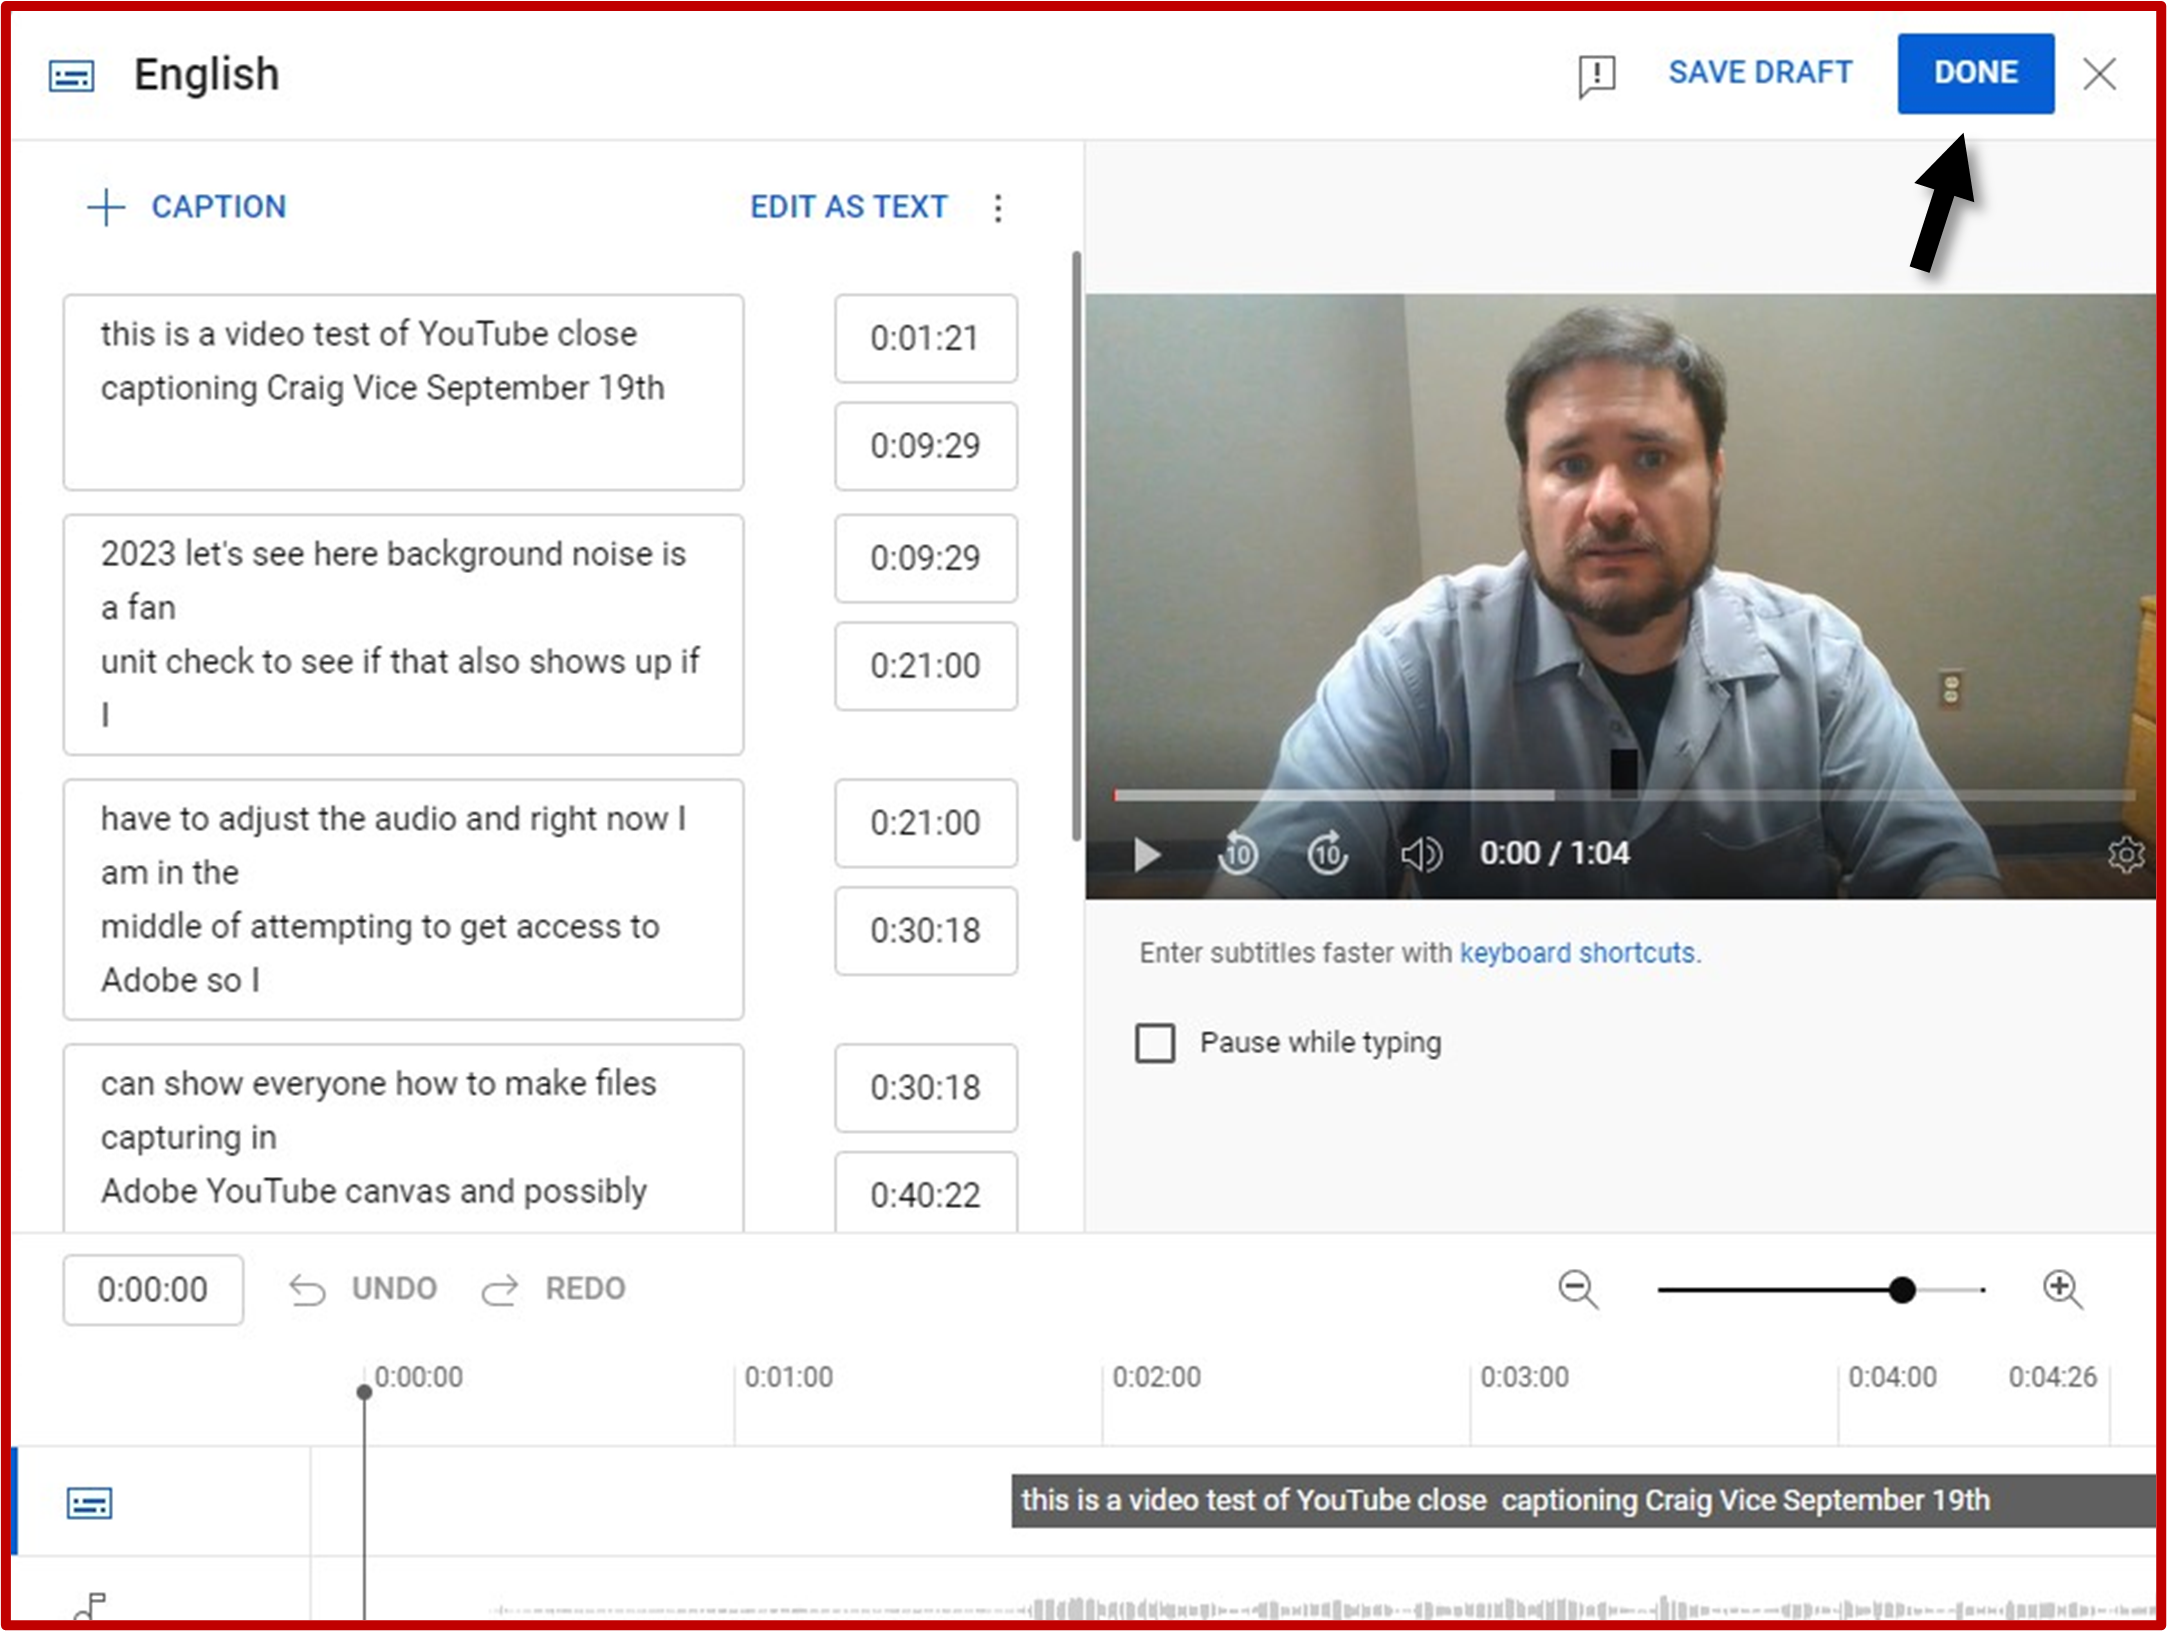
Your screen should now look like the image found below. Click Done in the upper right corner when edits are complete.
Remember to review your video after completion to ensure accuracy of captions.
Auto Generating Captions for Videos Already on YouTube
Make sure you are signed into YouTube, otherwise you will not be able to upload/edit videos.
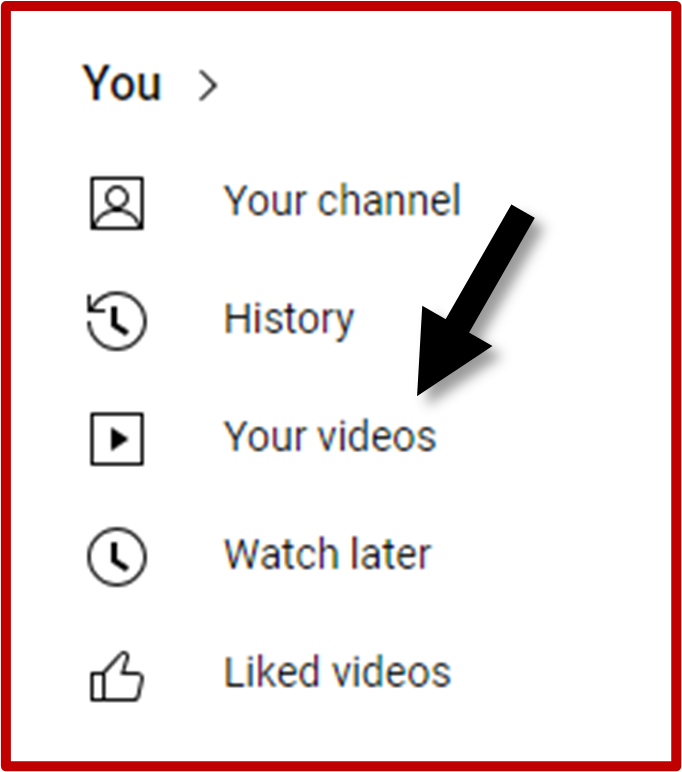
Once you are logged in, click Your Videos on the left side of the screen.
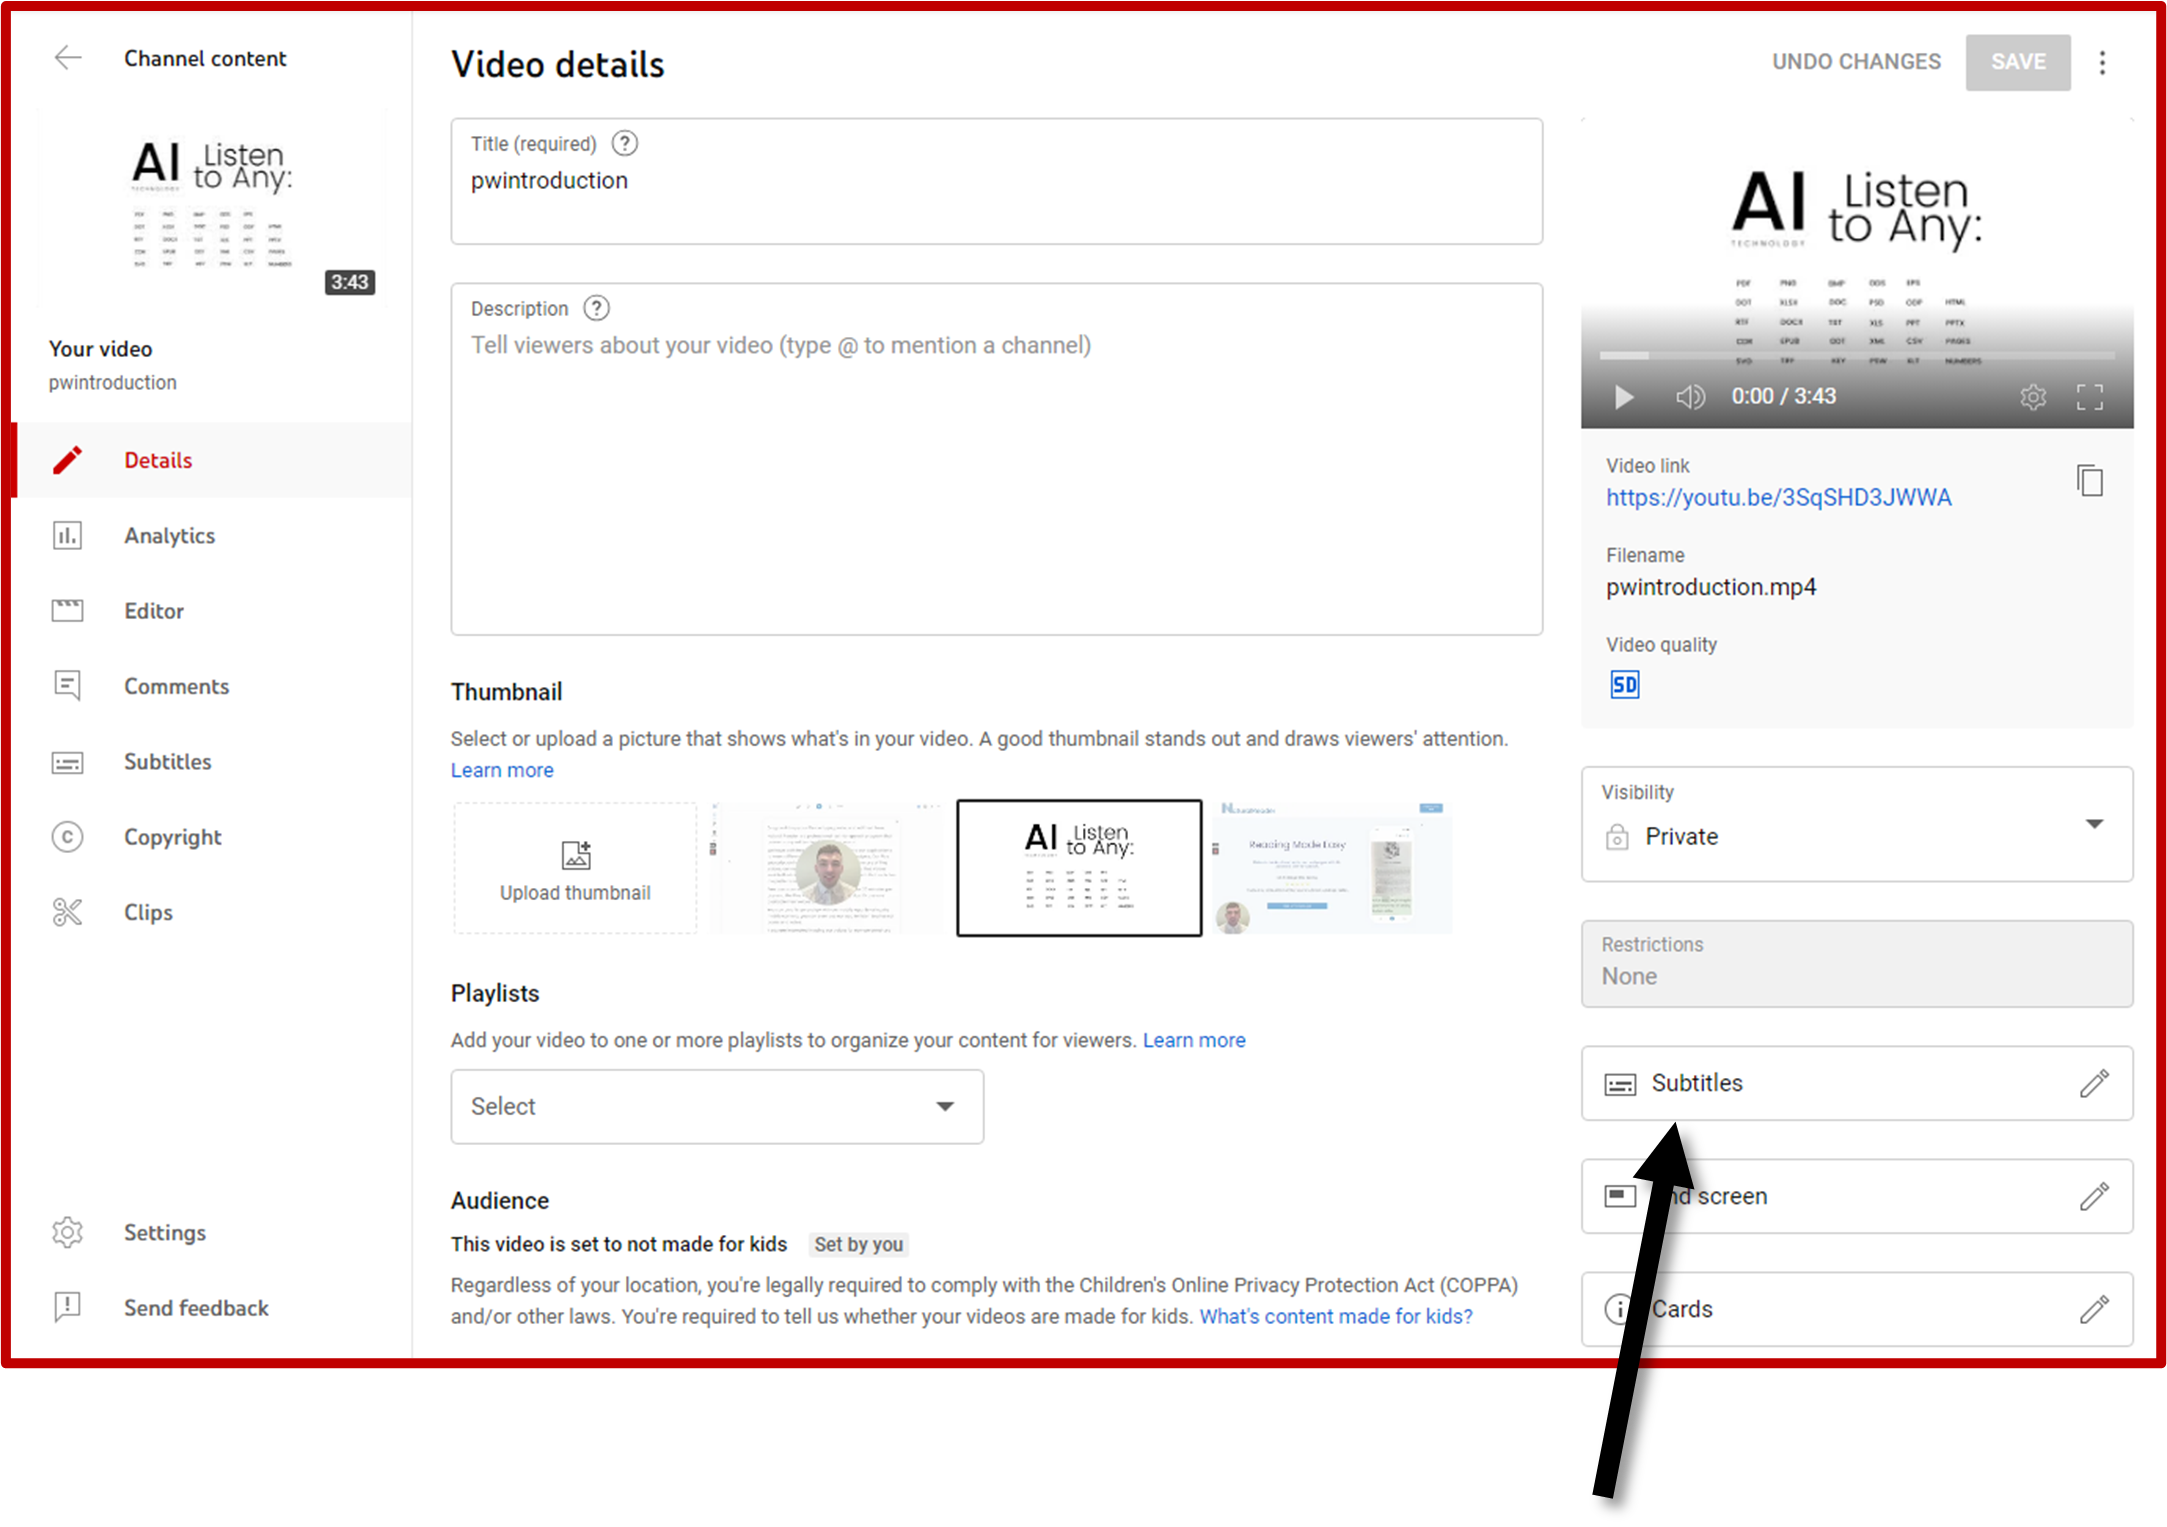
Hover over the video needing to be captioned and click the Details button. It will look like a little pencil. Your screen should now look like the image below.
On the right-hand side of the screen, select the Subtitles option. This will bring up the video editor as pictured in the end of the last section. Click Done in the upper right corner when edits are complete.
Remember to review your video after completion to ensure accuracy of captions.
Simple Caption File Formatting
To begin, you must have, or be ready to create a transcription of your video. Once you have a completed transcript, open a text editor such as Notepad or Word.
Create a new text file and save it with an .srt or .txt file extension (pictured below). When you save a Word document as a text file, be sure to check “Allow Character Substitution” to minimize the editing you will have to do.

You will divide the captions into different sections. Each section should include:
- Section number: The first line of each section should be a number indicating the order of the captions.
- Start and end times: The second line should include the start and end time of the caption in the format hh:mm:ss,ms (hours:minutes:seconds:milliseconds). There needs to be a two-hash arrow ( --> ) to separate beginning and end times.
- Text: The third and possibly fourth line(s) should include the caption text. Refer to “Captioning Best Practices” on page 4 for more guidance on text formatting.
Below is an example of what your caption file should look like.

Additional Resources
- How to Caption YouTube Videos by YouTube
- Best Practices for Writing Closed Captions by MSU Denver
- Adobe Premiere Pro for Absolute Beginners by Surfaced Studio
- How to Automatically Create Captions in Premiere Pro CC 2021 by Surfaced Studio
- How to Add/Edit Video Captions in Adobe Premiere Pro by Adobe
- The Ultimate Guide to Closed Captioning by 3Play Media
- Web Content Accessibility Guidelines
Transcription
Our Goal & File Download
Our goal for the Captioning & Accessibility Operating Procedure is for faculty and staff alike to aid in giving all A-State students equal access and experience to/with content. Because of this, we are prioritizing captioning content used across campus. If for some reason the content being used cannot be captioned, then we strongly encourage the instructor(s) to supply the transcripts necessary.
The hope is that we don’t just meet the bare minimum compliance requirement but set a standard beyond our legal obligation.
Download the full Simple Transcription Guide
Full or Clean Verbatim?
AAS recommends using a type of transcript known as clean verbatim. This type of transcription does not change the text’s meaning or paraphrase it. Content (verbal and non-verbal) that does not add value to the transcript is left out, including but not limited to stammering, “um” or “ah”, background noises, verbal pauses, coughs, etc.
Below, we will be comparing clean and full verbatim transcripts so you can see the difference.
Full Verbatim:
Max Taylor: Real quick, uh, Max Taylor of Sports Direct here talking to, uh, Jamal Hadid. Let’s discuss your strong finish this afternoon, man. Congratulations, Jamal.
Jamal Hadid: Oh, thank you very much. [coughs]
Max: What brought you back to, um, this track? I understand you stayed away for a while.
Jamal: Oh, it was just-- [laughs] It’s-- If you love racing and it’s in your bones, you can’t really, like, stay away. Uh, it’s true that I haven’t been back, um, for a few years. I was on a roll trying to discover new places. But-but now I’m back. You know, it’s been incredible. The fans are-- Well, uh, nothing beats the fans, right?
Clean Verbatim:
Max Taylor: Real quick, Max Taylor of Sports Direct here talking to Jamal Hadid. Let’s discuss your strong finish this afternoon, man. Congratulations, Jamal.
Jamal Hadid: Thank you very much.
Max: What brought you back to this track? I understand you stayed away for a while.
Jamal: [laughs] If you love racing and it’s in your bones, you can’t really stay away. It’s true that I haven’t been back for a few years. I was on a roll trying to discover new places, but now I’m back. You know, it’s been incredible. The fans are-- Well, nothing beats the fans, right?
Notice the clean verbatim shows a smoother flow and is more concise.
Again, when content is not relevant for the purposes of the transcription, these elements can be removed to create a clean verbatim transcription. The goal of this mode of transcription is to achieve a balance between readability and completeness.
Formatting
When you are ready to format your transcription, the title and page numbers are added, and text is grouped into distinct paragraphs. Elements that must be considered when formatting the transcript include:
Font Type and Size
AAS recommends using Calibri or Arial at 12 or 14 points, for size. The font type and size can be changed, just ensure your choices are accessible to all.
Paragraph Length
It is recommended to avoid large chunks of text in one paragraph to improve readability. If your transcript is long, break it into paragraphs of 400 to 500 characters each. Do not indent the paragraphs. Generally, a new topic or speaker warrants a new paragraph.
Speaker Labels
Speaker labels are the terms you use to identify speakers in your content. When labeling a speaker, use their full name, role, or a generic label such as “Speaker 1”. Only use generic labels if you cannot identify a speaker or their role. It’s best to write the speaker label in bold. For example:
Jane: Hello.
Speaker 1: Hello, Jane.
Interviewer: Hello.
Inaudible and Crosstalk Tags
Insert inaudible tags where you cannot hear the speaker’s words, and crosstalk tags when there is input from multiple speakers at the same time, making it impossible to comprehend what they are all saying. Mark the tags with a timestamp. You can always return to this part during the proofreading process. For example:
[inaudible 00:30] or [crosstalk 01:30]
Sounds
In clean verbatim transcriptions, you do not have to annotate background sounds and any other non-speech elements if they are non-essential to understanding the content.
- If you determine nonverbal cues are essential to understanding the meaning of the dialogue, remember not to interpret the nonverbal cue.
- For example, you would write “This clown is obnoxious [laughing]”. You would not write “This clown is obnoxious [laughing out loud].”
- If there is a pause you need to document in your transcription, we recommend using “...” for this.
- For example, you would write “I just... couldn’t imagine doing anything else.”
Capitalization
For capitalization, use the standard grammar capitalization rules. Capitalize the first letter in names, places, companies, and job titles. Do not use all capital letters unless you are trying to signify shouting or screaming.
Grammar
Use “[sic]” to denote grammatical errors in the transcription. For example, if you heard “They is confused” in the recording, transcribe it as “They are [sic] confused.” Do not just write “They are confused.”
Example of Clean Verbatim Transcript
Steve: Welcome back, Brad. This Is the second part of our Interview, and I want to get through all these as quickly as possible because I know you have somewhere to be.
Brad: Thank you. It's my pleasure.
Steve: It says on the website you worked doing graphic design for a local branding agency before branching out and starting your own business.
Brad: Yes.
Steve: Was that a conscious choice?
Brad: Yes.
Steve: Sorry, one sec. We can hear the fan.
Charlene: (inaudible 00:27)
Steve: No, no, that's perfect. Thanks, Charlene. Good. Was starting your own company intentional, or did you just sort of fall into it?
Brad: Actually, sort of both. I started out doing it as a favor for a friend. I didn't really know what I was doing at the time, but at some point I found out I was having some success with that, and so I started doing it for local businesses and restaurants.
Then it kind of took off from there, and then I figured, well, if I'm going to be taking on all these new clients I might as well get a website going and make something out of this, you know?
Steve: Sure. What kind of challenges did you experience when you were starting out, that you weren't expecting?
Brad: Hmm, challenges I wasn't expecting.
Steve: (laughs) I keep putting you on the spot. I don't think I put that one in the questions either. We're just ad-libbing here.
Brad: No, it's fine. So, challenges ...
Steve: Yeah. It could be funding or anything. I forgot to ask you earlier, did you bootstrap?
Brad: Oh, yeah. Oh, yeah. I had literally, like, $200 in the bank when I started out. And that's Canadian dollars, so that's like, what, two cents US? [laughs] Nah, just kidding. Pretty sad though.
Captioning & Accessibility Operating Procedure
View the full operating procedure here.
Summary & File Download
The purpose of this document is to outline the Captioning and Accessibility Operating Procedure for all A-State academic programs. The adoption of this operating procedure requires that all video content used for class instruction is captioned to create greater accessibility, and when video content is deemed essential but captions cannot be provided, transcripts must be made available to students. This procedure ensures that those who are deaf or hearing impaired or those with other related challenges have equal access to learning materials. This procedure is also advantageous for students without disabilities, as there are many learning and processing benefits to captioned audio content.
Download the full Captioning & Accessibility Operating Procedure
Key Provisions
Effective Date: August 18, 2023
Number: 10
Section: 2
Subject: Key Provisions of Captioning & Accessibility Operating Procedure- Summary
The purpose of this document is to outline the Captioning and Accessibility Operating Procedure for all A-State academic programs. The adoption of this operating procedure requires that all video content used for class instruction is captioned to create greater accessibility, and when video content is deemed essential but captions cannot be provided, transcripts must be made available to students. This procedure ensures that those who are deaf or hearing impaired or those with other related challenges have equal access to learning materials. This procedure is also advantageous for students without disabilities as there are many learning and processing benefits to captioned audio content.
Rationale for operating procedure:
- Arkansas State University’s administrators, faculty, and staff are committed to providing a barrier-free environment to every student who has the desire to learn and succeed in the collegiate environment. With this in mind, we have a responsibility to adhere to the requirements of Sections 504 and 508 of the Rehabilitation Act of 1973 and the Americans with Disabilities Act and its amendments. This is to provide reasonable accommodations to qualified individuals with disabilities. Providing captions for all video content used as part of class instruction is aligned with the goals and mission of A-State as well as our legal obligation.
Implementation:
- It is most effective to use products with open or closed-captioning or subtitles, whether they are shown in class, assigned outside of class, or utilized for other university purposes. It is the responsibility of all colleges, departments, administrators, faculty and staff to utilize only media produced with open or closed captions or subtitles or provide an alternative format such as a transcript. When a video is shown in class, employees should ensure that captions are turned on, as doing so benefits all students.
New Video/DVD/Film Releases:
- It is the responsibility of the college/department, administrators, faculty and staff to:
-
-
- Purchase and use captioned videos/DVDs/films for teaching purposes in their assigned classroom and/or college/department or University-sponsored event;
- Substitute a video/DVD/film with captioning in the place of an older version without captioning;
- Update all video/DVD/film stock to include only those with captioning; and
- Create captions for any University-created video.
-
-
Non-Captioned Video/DVD/Film Releases:
- It is the responsibility of the college/department, administrators, faculty, and staff to:
-
-
- Transition their media materials into captioned and accessible products for all;
- Determine if the University or another entity has a captioned version;
- Seek an alternative video/DVD/film with closed-captioning;
- Make a determination if the video/DVD/film is essential to a course or if it may be deleted from a syllabus; or
- Offer an alternative assignment to a student in place of viewing a non-captioned video/DVD/film.
-
-
Alternative Accommodations for Non-Captioned Videos/DVDs/Films in Academic Courses:
- In the event the college/department, administrators, faculty or staff determine a non-captioned media product is essential to academic course requirements, it is the responsibility of the college/department, administrator, faculty or staff member to meet with the student who is hearing impaired/deaf to determine reasonable alternatives. Access and Accommodation Services staff can facilitate or be involved in that interactive process, if needed. A list of possible alternatives is shown below. This list is not all-inclusive:
-
-
- The individual’s American Sign Language (ASL) interpreter for that particular class will interpret the video/DVD/film, the ASL interpreter will review the media transcript, if available, and/or preview the video. ASL Interpreters must be informed at least two weeks in advance of the assignment.
- If a captioned video/DVD/film is not available, then the student who is hearing impaired/deaf and the ASL interpreter may be given a copy of the script at least two class meetings prior to the showing. If no ASL interpreter is assigned to the class because the student who is hearing impaired does not understand American Sign Language (ASL), such a student may depend on speech/lip reading and/or the use of an Assistive Listening Device (ALD). In such a situation, when captioning is not available, a transcript of the video should be made available to the student at least two class meetings prior to the showing. It is the responsibility of the instructor to contact the publisher to obtain a copy of the transcript. If a transcript is not available through the publisher, Access and Accommodation Services staff will work with faculty to provide a transcript if given at least two weeks’ notice.
- The instructor may offer an alternative assignment to the student in place of viewing a non-captioned video/DVD/film. Alternative assignments should be determined on an individual
basis between the professor and the student who is hearing impaired/deaf. Access and Accommodations staff is available for consultation, if needed. Possible alternatives could include but are not limited to:-
- Providing in-depth copies of the instructor’s notes on the video/DVD/film to ensure the student is given full access to the main points of the media presentation.
- Allowing the student who is hearing impaired to view the video/DVD/film additional times on their own personal time with a copy of the instructor’s notes.
-
-
-
- Faculty must note in their syllabus any instructional material or assignments that will involve videos/DVDs/films that are not captioned or for which a transcript cannot be made available. This will allow for adequate notice that a discussion about alternate accommodations will be needed for a particular assignment.
The Role of Access and Accommodation Services (A&AS):
- Access and Accommodation Services will provide captioning services for short videos (1 hour or less), provided the material is given to staff in a timely manner (at least 2 weeks in advance). Longer video content should be outsourced to a contracted captioning service. Further, if faculty have more than 3-5 video lectures per course that are 1 hour or less, the captioning service must be outsourced. A&AS will cover the cost of captioning services. Turnaround time for captioning done by A&AS staff is approximately the week before content will be covered in class. If outsourcing is needed, the account for content in need of captioning will be maintained by A&AS. Videos will be uploaded, and returned to the necessary parties as timely as possible.
- Priority regarding captioning is given to classes that have or will soon have a deaf or hearing-impaired student enrolled.
- If captions on existing materials is needed in a time-frame earlier than what A&AS or third-party captioning can provide, the department/unit will be given resources to have it captioned by an outside company at the department’s expense.
- It is the responsibility of A&AS to determine reasonable accommodations, auxiliary aids and services based upon documentation presented by the individual and/or information gathered from an intake session and other assessment. A&AS provides accommodations for eligible students who are hearing impaired/deaf. Below is a list of some standard accommodations. This list is not all-inclusive.
-
-
- Provision of auxiliary aids;
- Assistance in locating a peer note-taker;
- Assignment of a qualified American Sign Language (ASL) interpreter.
-
- A&AS will inform professors and instructors when a student who is hearing impaired/deaf will have an interpreter present in their classroom. Notification generally, will be provided within three work days of A&AS receiving a finalized schedule; timely notification is dependent upon voluntary disclosure by the student.
-
-
-
- A&AS, in collaboration with the Faculty Support Center, will also provide the University community with general informational materials regarding:
-
-
- Captioned videos and accessible media
- Working with a hearing impaired/deaf individual & interpreter
-
-
Definitions:
- Open captioning is a process by which text is added to video or other media that is a written translation of the media’s dialogue. Unlike closed captioning, open captions require no special decoding equipment for viewing on televisions or monitors and are always displayed and cannot be turned off.
- Closed captioning is a process where specifically encoded text is placed onto video or other media for the benefit of the hearing impaired. Normally invisible, closed captioning requires an internal decoder to be activated for viewing on the monitor/television.
*Adapted from The University of Texas at El Paso policy and University of Arkansas at Little Rock
SGOC Document
Effective Date: August 18, 2023
Number: 10
Section: 2
Subject: Captioning & Accessibility Operating Procedure – SGOC Document
Date: September 2, 2022
Sponsoring Constituent(s): The Access and Accommodation Services Committee
Statement of the Issue:
- The purpose of this document is to recommend that captioning of recorded videos used for class instruction be adopted as operating procedure for all A-State Jonesboro academic programs. The adoption of this operating procedure would require institutional expense and possibly contracting with a third-party captioning provider. The approval of this procedure would ensure that those who are deaf or hearing impaired or those with other related challenges have equal access to class material. This procedure would also be advantageous for students without disabilities as there are many learning and processing benefits to captioned audio content.
Rationale for operating procedure:
- Arkansas State University’s administrators, faculty and staff are committed to providing a barrier free environment to every student who has the desire to learn and succeed in the collegiate environment. With this in mind, we have a responsibility to adhere to the requirements of Sections 504 and 508 of the Rehabilitation Act of 1973 and the Americans with Disabilities Act and its amendments. This is to provide reasonable accommodations to qualified individuals with disabilities. As of fall 2022, Access and Accommodation Services had approximately 26 students registered with hearing impairments. Although Access and Accommodation Services (A&AS) works tirelessly to provide necessary accommodations to students with hearing impairments registered with the A&AS office, it is likely that there are students with hearing related struggles or other similar challenges who are not registered with the office as registration is not mandatory. In addition, the Proposal Subcommittee of the larger Access and Accommodation Services Committee, feels that it is important for the university to take an official stance regrading accessibility by requiring all courses and academic programs to provide captioned content. Further rationale for this request is as follows:
-
- Students who may need captioned material as an accommodation are encouraged to register with Access and Accommodation Services (A&AS). A&AS works with faculty to provide the necessary accommodation, whether that be captioning, interpreters or another accommodation that would meet students’ needs. However, a hearing disability or impairment may not be present at the beginning of the academic term or year. Acquiring a disability or realization of a disability condition can occur unexpectedly at any time in one’s life. So, if captioning were already required for recorded content used for class instruction, those concerns would not have to be addressed from a reactive standpoint because the university would be proactive by already having this procedure in place.
- The captioning process can take anywhere between 24 hours to a few days depending upon how much material one student needs captioned, the subject matter being discussed on video, etc. So, if a course is requiring video material and the student is not aware of this ahead of time, A&AS staff won’t be given adequate notice to address the need. With the turnaround time being at least 24 hours (and this is for an experienced captionist), the student is missing important class content through no fault of their own because material was not accessible from the start. This can be the case for multiple students in multiple classes during one term.
- With online learning becoming a reality for most institutions, including A-State, recorded lectures and videos are being utilized more often. We can troubleshoot a lot of accommodation and accessibility related concerns by already requiring those videos to be captioned.
- While students with disabilities are encouraged to register with A&AS, they are not required to. So, there could be students in courses with hearing impairments that are not registered with A&AS. They may wear hearing aids, be proficient at lip reading, or have simply figured out how to do the best they can without asking for accommodations. That being said, these students could still greatly benefit from captioned material and would not have to work so hard to fully access and process information. While work to de-stigmatize disability and encourage people to seek the help that they need is on-going, the hope is that we work to make equitable access the norm so that accessibility is commonplace, whether students are registered with A&AS or not.
- Captioning enhances access for all students. Students with learning and processing disorders often benefit from captioning because it allows them to access material in multiple formats (visual and audio). Captioning can also be beneficial to ESL students. In addition, captioning is beneficial to students without disabilities because it can allow them to access video material regardless of environmental factors.
- Having all videos captioned is a major component of the concept of Universal Design, the philosophy that environments should be designed as accessible as possible to all people on the front-end so as to eliminate the need for individuals to request accommodations.
- The university has accessibility standards in place for all public facing media (recruitment material, community outreach, promotional, press releases, etc.), and one of these standards is that all videos must be captioned. This proposed operating procedure would ensure that our educational and instructional videos are in line with the policy of Marketing and Communications.
- All A-State Online courses follow standards that require captioning or video transcripts to meet accessibility guidelines. All videos are captioned and transcribed and available for students within AOS courses. Part of their course build (and rebuild) process for online programs is that every course has to meet a set of guidelines (one of which is a section on ADA compliance) and all courses are required to have media that is captioned/transcribed. If A-State were to adopt a captioning operating procedure, it would be in line with what A-State Online Programs is already doing.
- The hope is that we don’t just meet the bare minimum compliance requirement but set a standard beyond our legal obligation.
- Setting captioning standards for content used in the classroom also sets a standard for further honoring the idea of disability as diversity. It will show that we honor the diversity of our student population by recognizing their needs and honoring their lived experience as a foundation of our university policies and not as an afterthought.
-
Type of review: Full
Other Pertinent Information:
Goal:
- The university’s mission is to educate leaders, enhance intellectual growth and enrich lives. Students who are deaf or hearing impaired are leaders, in the present and in the future. Their intellectual growth is enhanced if they have full access to class material and instruction. Their lives as a part of the A-State community are enriched when they can fully participate in all academic programs and services. Their lives are also enriched when they can leave the university and fully immerse themselves into a vibrant workforce with confidence because their educational experience was equitable to their peers due to Arkansas State University’s commitment to inclusion, equity and access. The goal of this captioning operating procedure is directly linked to A-State’s university mission.
Implementation:
- It is most effective to use products with open or closed-captioning or subtitles, whether they are shown in class, assigned outside of class, or utilized for other university purposes. It is the responsibility of all colleges, departments, administrators, faculty and staff to utilize only media produced with open or closed captions or subtitles or provide an alternative format such as a transcript. When a video is shown in class, employees should ensure that captions are turned on, as doing so benefits all students.
New Video/DVD/Film Releases:
- It is the responsibility of the college/department, administrators, faculty and staff to:
-
- Purchase and use captioned videos/DVDs/films for teaching purposes in their assigned classroom and/or college/department or University-sponsored event;
- Substitute a video/DVD/film with captioning in the place of an older version without captioning;
- Update all video/DVD/film stock to include only those with captioning; and
- Create captions for any University-created video.
-
Non-captioned Video/DVD/Film Releases:
- It is the responsibility of the college/department, administrators, faculty and staff to:
-
- Transition their media materials into captioned and accessible products for all;
- Determine if the University or another entity has a captioned version;
- Seek an alternative video/DVD/film with closed-captioning;
- Make a determination if the video/DVD/film is essential to a course or if it may be deleted from a syllabus; or
- Offer an alternative assignment to a student in place of viewing a non-captioned video/DVD/film.
-
Alternative Accommodations for Non-Captioned Videos/DVDs/Films in Academic Courses:
- In the event the college/department, administrators, faculty or staff determine a non-captioned media product is essential to academic course requirements, it is the responsibility of the college/department, administrator, faculty or staff member to meet with the student who is hearing impaired/deaf to determine reasonable alternatives. Access and Accommodation Services staff can facilitate or be involved in that interactive process, if needed. A list of possible alternatives is shown below. This list is not all-inclusive:
-
- The individual’s American Sign Language (ASL) interpreter for that particular class will interpret the video/DVD/film, the ASL interpreter will review the media transcript, if available, and/or preview the video. ASL Interpreters must be informed at least two weeks in advance of the assignment.
- If a captioned video/DVD/film is not available, then the student who is hearing impaired/deaf and the ASL interpreter may be given a copy of the script at least two class meetings prior to the showing. If no ASL interpreter is assigned to the class because the student who is hearing impaired does not understand American Sign Language (ASL), such a student may depend on speech/lip reading and/or the use of an Assistive Listening Device (ALD). In such a situation, when captioning is not available, a transcript of the video should be made available to the student at least two class meetings prior to the showing. It is the responsibility of the instructor to contact the publisher to obtain a copy of the transcript. If a transcript is not available through the publisher, Access and Accommodation Services staff will work with faculty to provide a transcript if given at least two-weeks’ notice.
- The instructor may offer an alternative assignment to the student in place of viewing a non-captioned video/DVD/film. Alternative assignments should be determined on an individual basis between the professor and the student who is hearing impaired/deaf. Access and Accommodations staff is available for consultation, if needed. Possible alternatives could include but are not limited to:
-
-
- Providing in-depth copies of the instructor’s notes on the video/DVD/film to ensure the student is given full access to the main points of the media presentation.
- Allowing the student who is hearing impaired to view the video/DVD/film additional times on their own personal time with a copy of the instructor’s notes.
-
-
- Faculty must note in their syllabus any instructional material or assignments that will involve videos/DVDs/films that are not captioned or for which a transcript cannot be made available. This will allow for adequate notice that a discussion about alternate accommodations will be needed for a particular assignment.
-
The Role of Access and Accommodation Services (A&AS):
- Access and Accommodation Services’ Technology Specialist (and one part-time support staff) will provide captioning services for short videos (1 hour or less) provided the material is given to staff in a timely manner (at least 2 weeks in advance). Longer video content should be outsourced to a contracted captioning service. Further, if faculty have more than 3-5 video lectures per course that are 1 hour or less, the captioning service must be outsourced. A&AS will cover the cost of captioning services through an account maintained for such accommodations. Turnaround time for captioning done by A&AS staff is approximately the week before content will be covered in class. If outsourcing is needed, the account for content in need of captioning will be maintained by A&AS. Videos will be uploaded, and returned to the necessary parties as timely as possible. Examples of captioning services include REV or Cielo24, two third party companies who specialize in captioning and transcribing video and live content. Information for both services will be provided below as a reference regarding cost, turnaround time, accuracy of captioned content, etc. These companies are simply detailed as a reference point but any captioning service that is cost-effective, has reasonable turnaround times and a high level of captioning accuracy would suffice.
- Priority regarding captioning is given to classes that have or will soon have a deaf or hearing-impaired student enrolled.
- If captions on existing materials is needed in a time-frame earlier than what A&AS or third-party captioning can provide, the department/unit will be given resources to have it captioned by an outside company at the department’s expense.
- It is the responsibility of A&AS to determine reasonable accommodations, auxiliary aids and services based upon documentation presented by the individual and/or information gathered from an intake session and other assessment. A&AS provides accommodations for eligible students who are hearing impaired/deaf. Below is a list of some standard accommodations. This list is not all-inclusive.
-
- Provision of auxiliary aids;
- Assistance in locating a peer note-taker;
- Assignment of a qualified American Sign Language (ASL) interpreter.
-
-
- A&AS will inform professors and instructors when a student who is hearing impaired/deaf will have an interpreter present in their classroom. Notification generally will be provided within three work days of A&AS receiving a finalized schedule; timely notification is dependent upon voluntary disclosure by the student.
-
-
- A&AS, in collaboration with the Faculty Support Center, will also provide the University community with general informational materials regarding:
-
-
- Captioned videos and accessible media
- Working with a hearing impaired/deaf individual & interpreter
-
-
-
Cost:
- If short form videos are captioned through A&AS, the cost of services will simply be funds provided by the university to Access and Accommodation Services to hire a qualified part time employee to assist the Technology Specialist in captioning videos. If faculty need captioning services for more than 3-5 hour long videos per course or any videos that are longer than one hour, those services should be outsourced to a third party. This will require a university contract with a third-party company to assist with getting captions completed and returned in a timely manner at the lowest cost possible. If outsourcing is needed, A&AS will cover the cost through an account maintained for such accommodations, and the account for content in need of captioning will be maintained by A&AS. Videos will be uploaded, and returned to the necessary parties as timely as possible. Detailed information regarding two reputable third-party service providers can be found below.
- All orders of third-party captioning services should be coordinated and tracked through A&AS and conform to Arkansas procurement law. A&AS will coordinate all agreements, regardless of whether they exceed the small procurements threshold, with A-State Procurement Services.
Third-Party References (For Example Only)
-
-
-
-
- CIELO24:
- 99% accuracy
- $1 per minute (the more captioning that is needed, this price decreases).
- Turnaround time: As little as 2 hours but on average, less than 24 hours (cost of contract depends on expected turnaround time).
- Standard university contracts are a 48 hour turn around.
- REV:
- 99% accuracy
- $1.25 per minute
- 24-hour turnaround time
- CIELO24:
-
-
-
Expected Outcome:
- If Arkansas State University adopts this phased in captioning operating procedure, the university will be setting a tone of inclusion, access and commitment to diversity. Adoption of this procedure will assert that the university is committed to providing equal access to all learners. The expected outcome is also retention of students who might otherwise fall through the cracks and will benefit from more equitable access to class material. In addition, another expected outcome would be increased enrollment due to Arkansas State University becoming more accessible and therefore a more viable option for parents and prospective students. Retention of students and an increase in the student population ultimately increases the university’s financial gain as well.
Definitions:
- Open captioning is a process by which text is added to video or other media that is a written translation of the media’s dialogue. Unlike closed captioning, open captions require no special decoding equipment for viewing on televisions or monitors and are always displayed and cannot be turned off.
- Closed captioning is a process where specifically encoded text is placed onto video or other media for the benefit of the hearing impaired. Normally invisible, closed captioning requires an internal decoder to be activated for viewing on the monitor/television.
*Adapted from The University of Texas at El Paso policy and University of Arkansas at Little Rock
Captioning in Kaltura
What is Kaltura?
Kaltura is a cloud-based video management system that allows:
- Secure hosting of instructional videos
- Easy embedding in Canvas courses
- Auto-captioning and accessibility features
- Video quizzes with gradebook integration
- Analytics to track student engagement
It is integrated with Canvas and available to all A-State faculty, staff, and students.
How do I access Kaltura?
-
Kaltura MediaSpace
Use your A-State credentials to log in and manage your media library. -
Canvas Integration
- Access via My Media in the global navigation menu
- Use Media Gallery in individual courses
- Embed videos using the Browse & Embed tool in the Rich Content Editor
For more details about Kaltura, please review CETL's Learning Technology.
How do I add captions to my videos in Kaltura?
All Kaltura videos receive AI-generated auto captions. This includes videos that have been uploaded onto the Kaltura platform but may have originated elsewhere. Auto captions are generally accurate, but they are not perfect. Kaltura closed captions must be edited to ensure your video is accessible. To edit a video’s captions, please follow the instructions below. You can access your videos through A-State MediaSpace or Canvas. Use the same steps on both platforms.
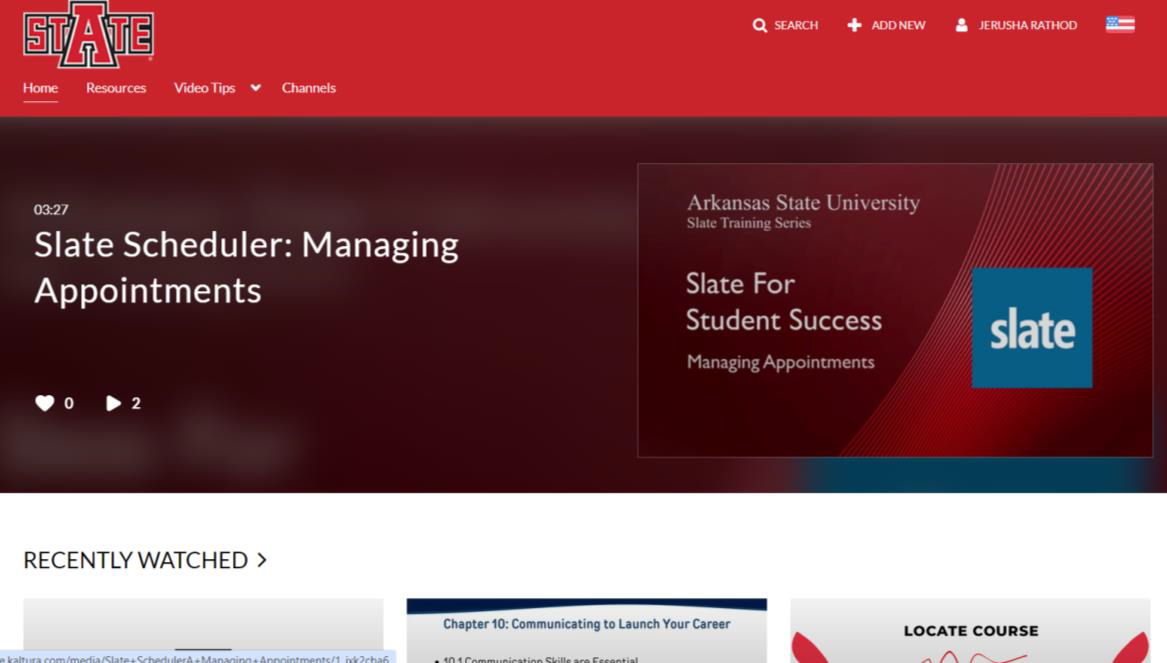
- Log in to MediaSpace using your A-State credentials.
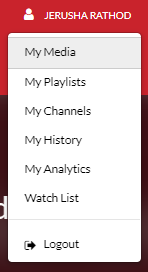
- Click on your profile on the upper right corner of the page.

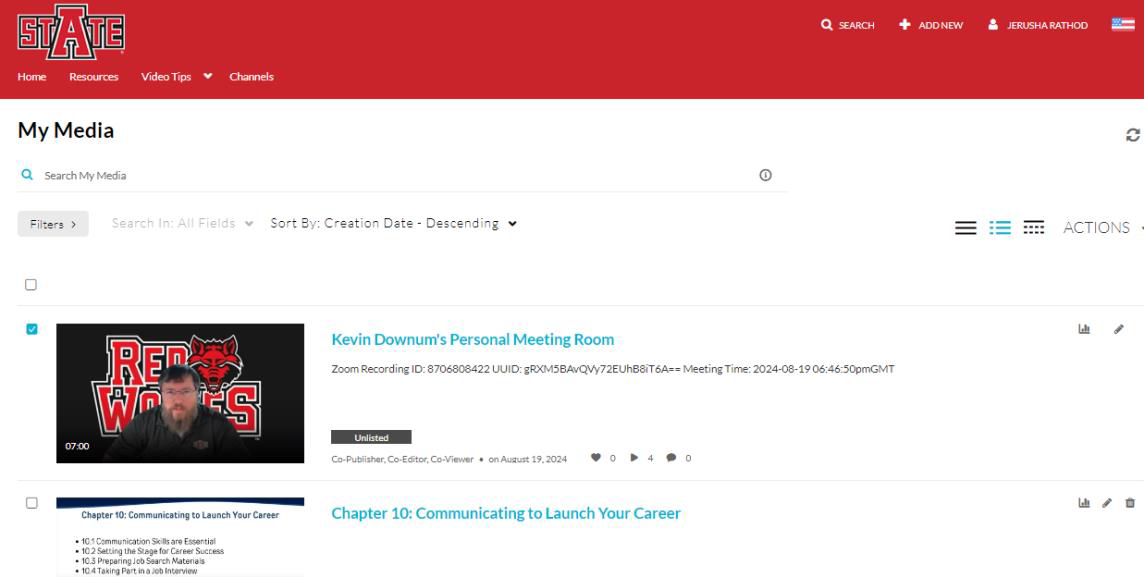
- Click on My Media to view your collection of videos.

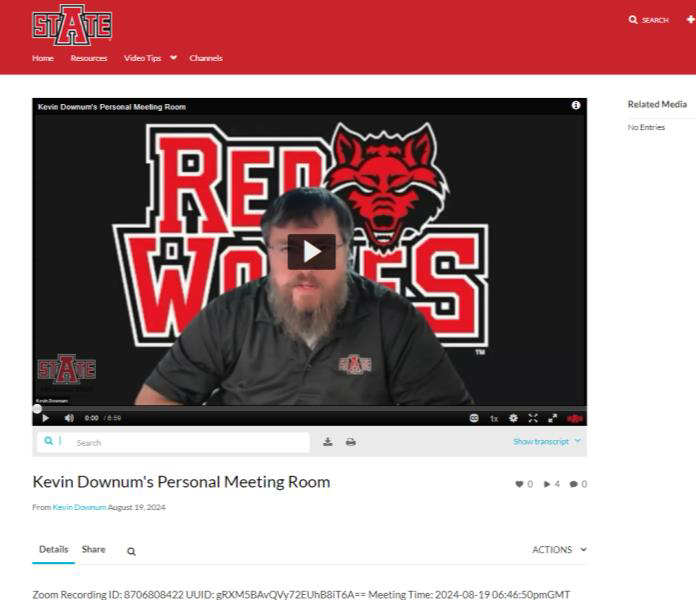
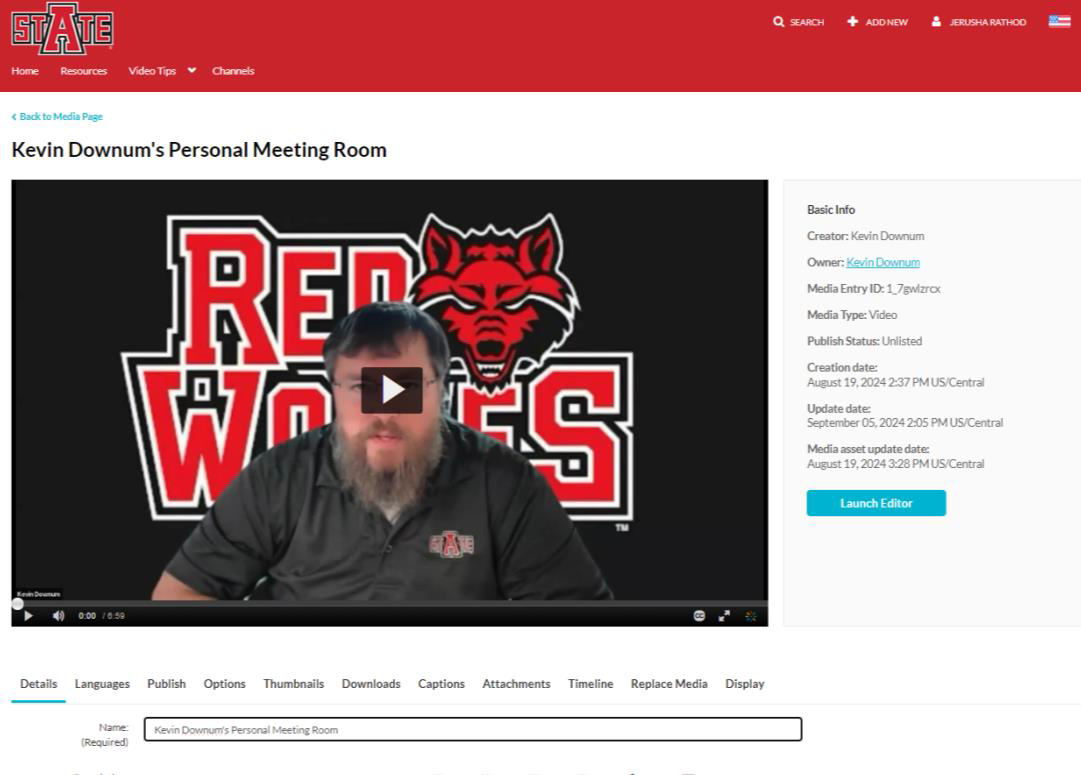
- Select the video for which you wish to edit the captions.

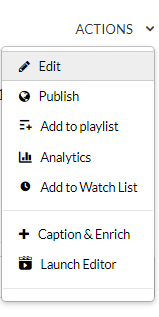
- Click Actions on the bottom right corner below the video screen. Next, click Edit.


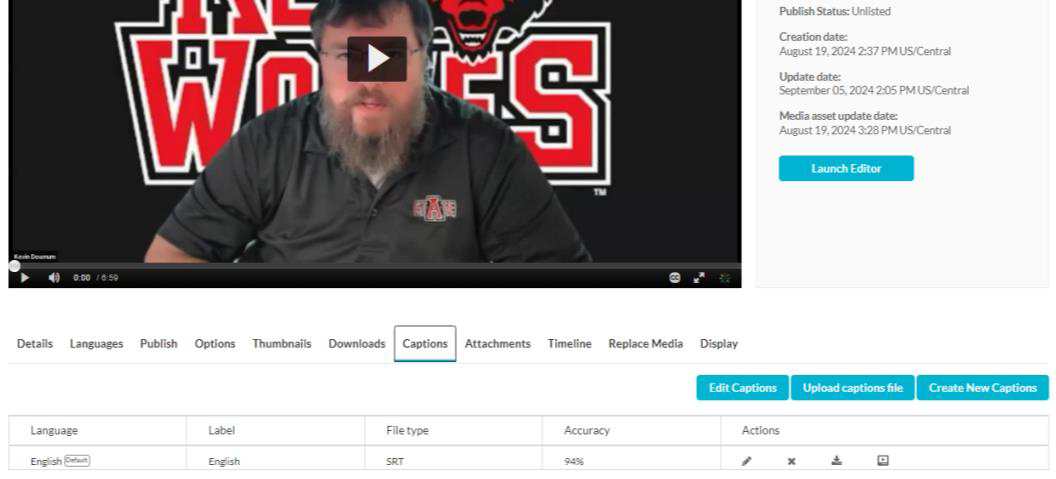
- On the horizontal navigation menu below the video screen, select Captions. Next, select Edit Captions.
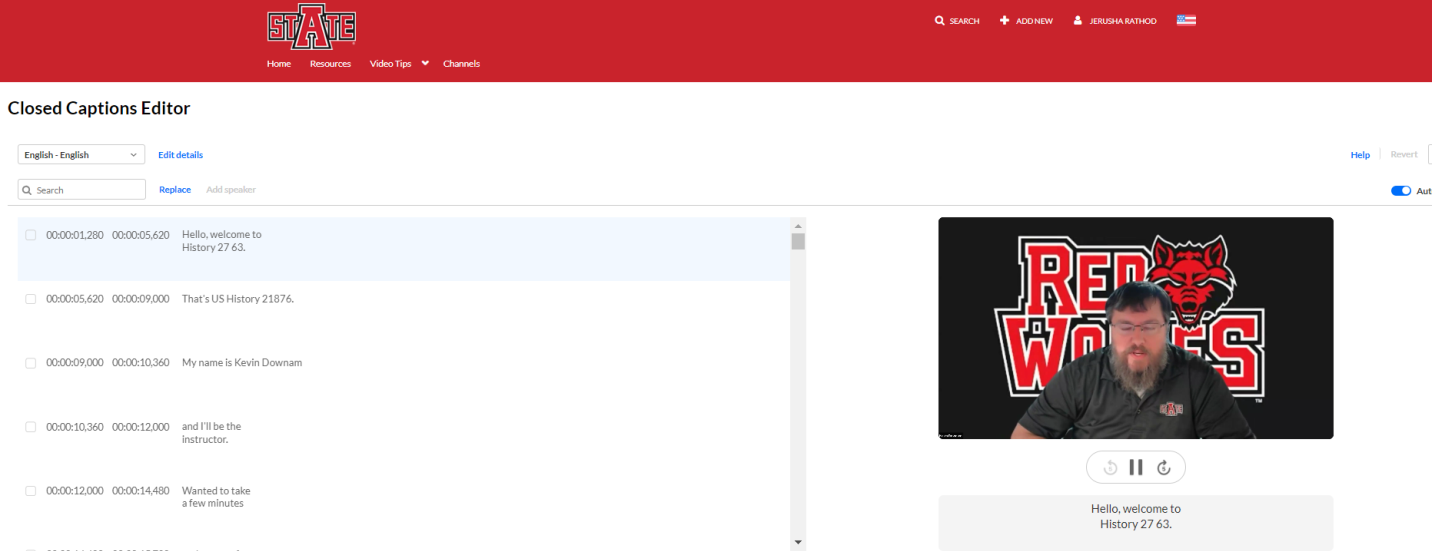
PRO TIP: Use the video player icon on the actions table to enable/disable the closed captions editor screen.

- The Closed Captions Editor screen allows users to edit the captions second-by-second. You can enable/disable auto-scrolling while editing, and if you make a mistake, you can use the Revert button to return to previously saved captions. Don’t forget to SAVE your work before exiting the cc editor!