# Installing CA Certificates

# Install Certificate Authority certificates

These instruction assume the user has administrative access to the server/workstation.

## Windows

First copy the CA certificate(s) to the Windows server/workstation.

The following files were copied to the user account home directory.

- Arkansas\_State\_University\_Root\_CA\_certificate.cer
- Arkansas\_State\_University\_Issuing\_CA\_certificate.cer

### [<svg aria-hidden="true" class="svg octicon-link" height="16" viewbox="0 0 16 16" width="16" xmlns="http://www.w3.org/2000/svg"><path d="m7.775 3.275 1.25-1.25a3.5 3.5 0 1 1 4.95 4.95l-2.5 2.5a3.5 3.5 0 0 1-4.95 0 .75.75 0 0 1 .018-1.042.75.75 0 0 1 1.042-.018 2 2 0 0 0 2.83 0l2.5-2.5a2.002 2.002 0 0 0-2.83-2.83l-1.25 1.25a.75.75 0 0 1-1.042-.018.75.75 0 0 1-.018-1.042m-4.69 9.64a2 2 0 0 0 2.83 0l1.25-1.25a.75.75 0 0 1 1.042.018.75.75 0 0 1 .018 1.042l-1.25 1.25a3.5 3.5 0 1 1-4.95-4.95l2.5-2.5a3.5 3.5 0 0 1 4.95 0 .75.75 0 0 1-.018 1.042.75.75 0 0 1-1.042.018 2 2 0 0 0-2.83 0l-2.5 2.5a2 2 0 0 0 0 2.83"></path></svg>](https://its-sys-forge.astate.edu:3000/forge_admin/Documentation/src/branch/main/Certificate%20Management/Installing%20CA%20Certificates.md#windows-gui)Windows GUI

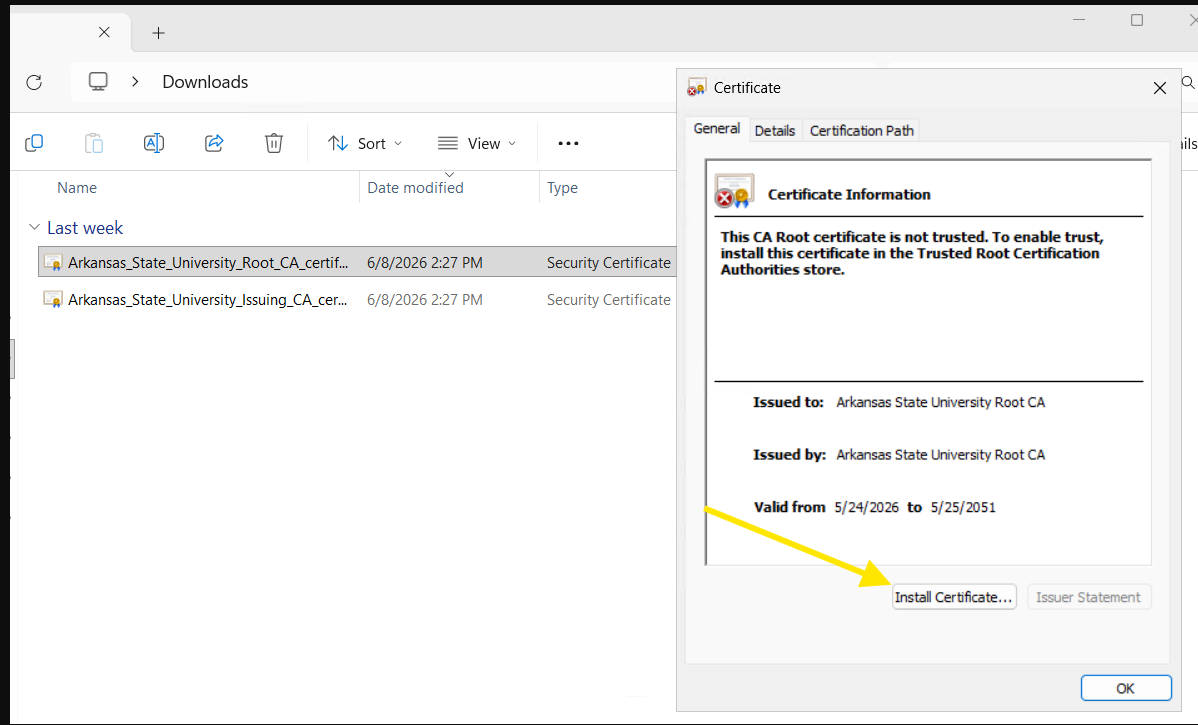
- Double click on the CA certificate to start the install process.
- Select **Install Certificate...**

[![image.png](https://kb.astate.edu/uploads/images/gallery/2026-10/scaled-1680-/image.png)](https://kb.astate.edu/uploads/images/gallery/2026-10/image.png)
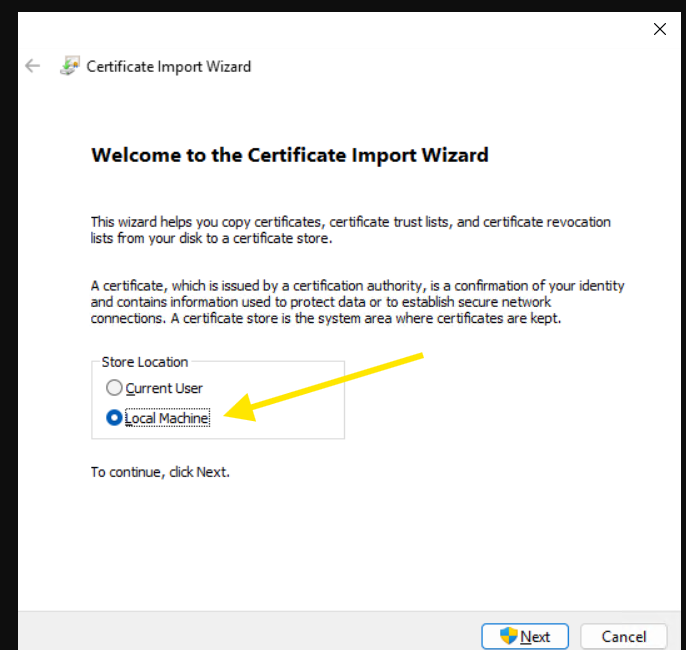
- Select `Local Machine` for the store location and click **Next**.

[![image.png](https://kb.astate.edu/uploads/images/gallery/2026-10/scaled-1680-/OMlimage.png)](https://kb.astate.edu/uploads/images/gallery/2026-10/OMlimage.png)
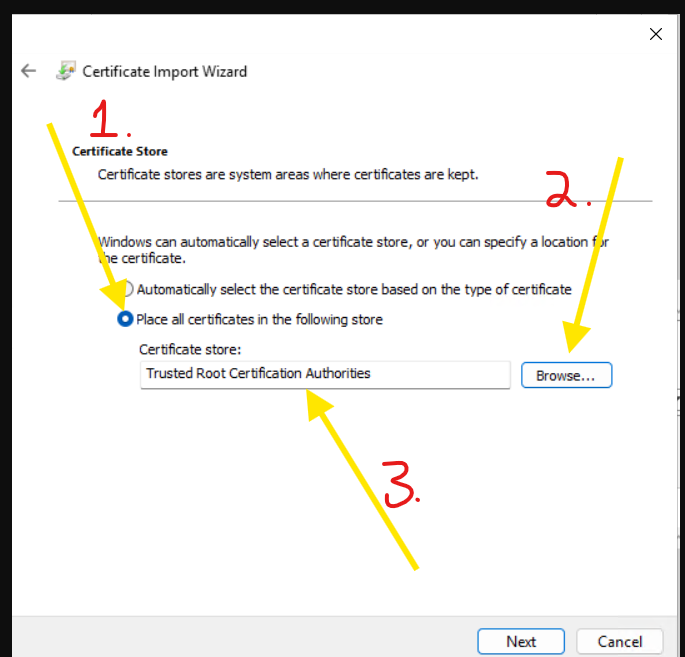
- On the `Certificate Store` dialog 
    - Select `Place all certificates in the following store`
    - Select `Browse`
    - For the *Arkansas\_State\_University\_Root\_CA\_certificate.cer* certificate 
        - Choose the `Trusted Root Certification Authorities`
    - For the *Arkansas\_State\_University\_Issuing\_CA\_certificate.cer* certificate 
        - Choose the `Intermediate Certificatoin Authorities`
    - Click **Next**
    - [![image.png](https://kb.astate.edu/uploads/images/gallery/2026-10/scaled-1680-/5I1image.png)](https://kb.astate.edu/uploads/images/gallery/2026-10/5I1image.png)
        
        
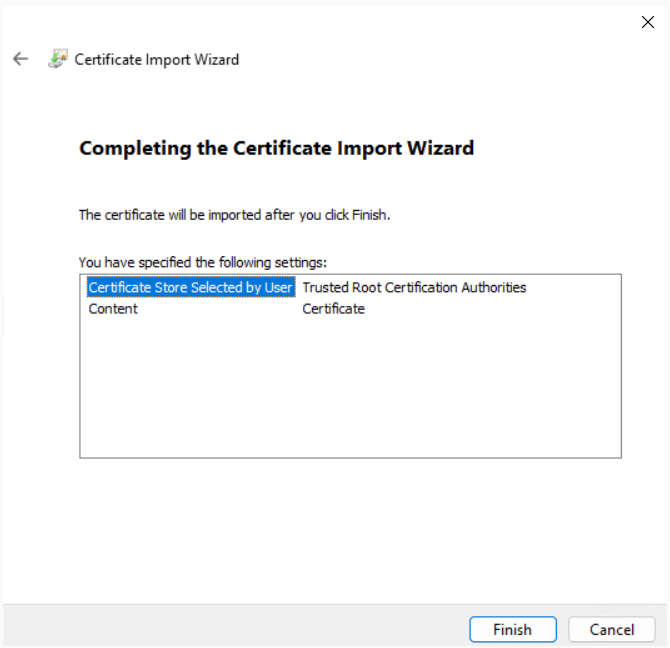
        - Select **Finish**
        - [![image.png](https://kb.astate.edu/uploads/images/gallery/2026-10/scaled-1680-/01Zimage.png)](https://kb.astate.edu/uploads/images/gallery/2026-10/01Zimage.png)
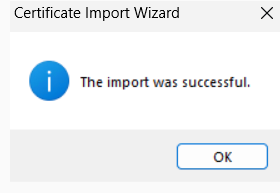
- Select **Ok**[![image.png](https://kb.astate.edu/uploads/images/gallery/2026-10/scaled-1680-/dEMimage.png)](https://kb.astate.edu/uploads/images/gallery/2026-10/dEMimage.png)
### Windows prompt

From an administrative command prompt or PowerShell session, extecute the following two commands.

```powershell
# Install the Root CA certificate
certutil -addstore -f root "C:\Users\user account\Arkansas_State_University_Root_CA_certificate.cer"

# Install the Intermediate (Issuing) CA certificate
certutil -addstore -f intermediate "C:\Users\user account\Arkansas_State_University_Issuing_CA_certificate.cer"

```

## [<svg aria-hidden="true" class="svg octicon-link" height="16" viewbox="0 0 16 16" width="16" xmlns="http://www.w3.org/2000/svg"><path d="m7.775 3.275 1.25-1.25a3.5 3.5 0 1 1 4.95 4.95l-2.5 2.5a3.5 3.5 0 0 1-4.95 0 .75.75 0 0 1 .018-1.042.75.75 0 0 1 1.042-.018 2 2 0 0 0 2.83 0l2.5-2.5a2.002 2.002 0 0 0-2.83-2.83l-1.25 1.25a.75.75 0 0 1-1.042-.018.75.75 0 0 1-.018-1.042m-4.69 9.64a2 2 0 0 0 2.83 0l1.25-1.25a.75.75 0 0 1 1.042.018.75.75 0 0 1 .018 1.042l-1.25 1.25a3.5 3.5 0 1 1-4.95-4.95l2.5-2.5a3.5 3.5 0 0 1 4.95 0 .75.75 0 0 1-.018 1.042.75.75 0 0 1-1.042.018 2 2 0 0 0-2.83 0l-2.5 2.5a2 2 0 0 0 0 2.83"></path></svg>](https://its-sys-forge.astate.edu:3000/forge_admin/Documentation/src/branch/main/Certificate%20Management/Installing%20CA%20Certificates.md#linux)Linux

First copy the CA certificate(s) to the linux server/workstation and change the extension from `.cer` to `.crt`.

### [<svg aria-hidden="true" class="svg octicon-link" height="16" viewbox="0 0 16 16" width="16" xmlns="http://www.w3.org/2000/svg"><path d="m7.775 3.275 1.25-1.25a3.5 3.5 0 1 1 4.95 4.95l-2.5 2.5a3.5 3.5 0 0 1-4.95 0 .75.75 0 0 1 .018-1.042.75.75 0 0 1 1.042-.018 2 2 0 0 0 2.83 0l2.5-2.5a2.002 2.002 0 0 0-2.83-2.83l-1.25 1.25a.75.75 0 0 1-1.042-.018.75.75 0 0 1-.018-1.042m-4.69 9.64a2 2 0 0 0 2.83 0l1.25-1.25a.75.75 0 0 1 1.042.018.75.75 0 0 1 .018 1.042l-1.25 1.25a3.5 3.5 0 1 1-4.95-4.95l2.5-2.5a3.5 3.5 0 0 1 4.95 0 .75.75 0 0 1-.018 1.042.75.75 0 0 1-1.042.018 2 2 0 0 0-2.83 0l-2.5 2.5a2 2 0 0 0 0 2.83"></path></svg>](https://its-sys-forge.astate.edu:3000/forge_admin/Documentation/src/branch/main/Certificate%20Management/Installing%20CA%20Certificates.md#rhel-distributions)RHEL distributions

- Make sure that the `ca-certificates` package is installed
    
    ```bash
    sudo dnf install ca-certificates
    
    ```
- Copy the CA certificate(s) to `/etc/pki/ca-trust/source/anchors/`
    
    ```bash
    sudo cp CA_CERT /etc/pki/ca-trust/source/anchors/CA_CERT.crt
    
    ```
    
    Repeat for each certificate that needs to be added to the trust store.
- Update the system certificate trust store
    
    ```bash
    sudo update-ca-trust extract
    
    ```
    
    > <svg aria-hidden="true" class="attention-icon attention-tip svg octicon-light-bulb" height="16" viewbox="0 0 16 16" width="16"><path d="M8 1.5c-2.363 0-4 1.69-4 3.75 0 .984.424 1.625.984 2.304l.214.253c.223.264.47.556.673.848.284.411.537.896.621 1.49a.75.75 0 0 1-1.484.211c-.04-.282-.163-.547-.37-.847a9 9 0 0 0-.542-.68q-.126-.149-.268-.32C3.201 7.75 2.5 6.766 2.5 5.25 2.5 2.31 4.863 0 8 0s5.5 2.31 5.5 5.25c0 1.516-.701 2.5-1.328 3.259q-.142.172-.268.319c-.207.245-.383.453-.541.681-.208.3-.33.565-.37.847a.751.751 0 0 1-1.485-.212c.084-.593.337-1.078.621-1.489.203-.292.45-.584.673-.848q.113-.133.213-.253c.561-.679.985-1.32.985-2.304 0-2.06-1.637-3.75-4-3.75M5.75 12h4.5a.75.75 0 0 1 0 1.5h-4.5a.75.75 0 0 1 0-1.5M6 15.25a.75.75 0 0 1 .75-.75h2.5a.75.75 0 0 1 0 1.5h-2.5a.75.75 0 0 1-.75-.75"></path></svg>**Tip**
    > 
    > `extract` is not strictly needed but it does provide more warnings if there is any issues.
- Verify the certificates were added to the trust store
    
    ```bash
    trust list | grep "My Private CA Name"
    
    ```

#### [<svg aria-hidden="true" class="svg octicon-link" height="16" viewbox="0 0 16 16" width="16" xmlns="http://www.w3.org/2000/svg"><path d="m7.775 3.275 1.25-1.25a3.5 3.5 0 1 1 4.95 4.95l-2.5 2.5a3.5 3.5 0 0 1-4.95 0 .75.75 0 0 1 .018-1.042.75.75 0 0 1 1.042-.018 2 2 0 0 0 2.83 0l2.5-2.5a2.002 2.002 0 0 0-2.83-2.83l-1.25 1.25a.75.75 0 0 1-1.042-.018.75.75 0 0 1-.018-1.042m-4.69 9.64a2 2 0 0 0 2.83 0l1.25-1.25a.75.75 0 0 1 1.042.018.75.75 0 0 1 .018 1.042l-1.25 1.25a3.5 3.5 0 1 1-4.95-4.95l2.5-2.5a3.5 3.5 0 0 1 4.95 0 .75.75 0 0 1-.018 1.042.75.75 0 0 1-1.042.018 2 2 0 0 0-2.83 0l-2.5 2.5a2 2 0 0 0 0 2.83"></path></svg>](https://its-sys-forge.astate.edu:3000/forge_admin/Documentation/src/branch/main/Certificate%20Management/Installing%20CA%20Certificates.md#rhel-example)RHEL example

This example uses the Arkansas State University private certificate authority.

The following files were copied to the user account home directory.

- Arkansas\_State\_University\_Root\_CA\_certificate.cer
- Arkansas\_State\_University\_Issuing\_CA\_certificate.cer

```bash

# Copy the certificates to the correctly directory
# Note the extension change from .cer to .crt
$ sudo cp /home/user account/Arkansas_State_University_Root_CA_certificate.cer /etc/pki/ca-trust/source/anchors/Arkansas_State_University_Root_CA_certificate.crt
$ sudo cp /home/user account/Arkansas_State_University_Issuing_CA_certificate.cer /etc/pki/ca-trust/source/anchors/Arkansas_State_University_Issuing_CA_certificate.crt

# Update the ca trust store
$ sudo update-ca-trust extract

# Verify the certificates were added
$ trust list | grep "Arkansas State University"

# If the certificates were loaded into the trust store you should see the following output.
    label: Arkansas State University Root CA
    label: Arkansas State University Issuing CA

```

### [<svg aria-hidden="true" class="svg octicon-link" height="16" viewbox="0 0 16 16" width="16" xmlns="http://www.w3.org/2000/svg"><path d="m7.775 3.275 1.25-1.25a3.5 3.5 0 1 1 4.95 4.95l-2.5 2.5a3.5 3.5 0 0 1-4.95 0 .75.75 0 0 1 .018-1.042.75.75 0 0 1 1.042-.018 2 2 0 0 0 2.83 0l2.5-2.5a2.002 2.002 0 0 0-2.83-2.83l-1.25 1.25a.75.75 0 0 1-1.042-.018.75.75 0 0 1-.018-1.042m-4.69 9.64a2 2 0 0 0 2.83 0l1.25-1.25a.75.75 0 0 1 1.042.018.75.75 0 0 1 .018 1.042l-1.25 1.25a3.5 3.5 0 1 1-4.95-4.95l2.5-2.5a3.5 3.5 0 0 1 4.95 0 .75.75 0 0 1-.018 1.042.75.75 0 0 1-1.042.018 2 2 0 0 0-2.83 0l-2.5 2.5a2 2 0 0 0 0 2.83"></path></svg>](https://its-sys-forge.astate.edu:3000/forge_admin/Documentation/src/branch/main/Certificate%20Management/Installing%20CA%20Certificates.md#debian-distributions)Debian distributions

- Make sure that the `ca-certificates` package is installed
    
    ```bash
    sudo apt install ca-certificates
    
    ```
- Copy the CA certificate(s) to `/usr/local/share/ca-certificates/`
    
    ```bash
    sudo cp CA_CERT /usr/local/share/ca-certificates/CA_CERT.crt
    
    ```
    
    Repeat for each certificate that needs to be added to the trust store.
- Update the system certificate trust store
    
    ```bash
    sudo update-ca-certificates
    
    ```
- Verify the certificates were added to the trust store
    
    ```bash
    awk -v cmd='openssl x509 -noout -subject' ' /BEGIN/{close(cmd)}; {print | cmd}' < /etc/ssl/certs/ca-certificates.crt | grep "My Private CA Name"
    
    ```

#### [<svg aria-hidden="true" class="svg octicon-link" height="16" viewbox="0 0 16 16" width="16" xmlns="http://www.w3.org/2000/svg"><path d="m7.775 3.275 1.25-1.25a3.5 3.5 0 1 1 4.95 4.95l-2.5 2.5a3.5 3.5 0 0 1-4.95 0 .75.75 0 0 1 .018-1.042.75.75 0 0 1 1.042-.018 2 2 0 0 0 2.83 0l2.5-2.5a2.002 2.002 0 0 0-2.83-2.83l-1.25 1.25a.75.75 0 0 1-1.042-.018.75.75 0 0 1-.018-1.042m-4.69 9.64a2 2 0 0 0 2.83 0l1.25-1.25a.75.75 0 0 1 1.042.018.75.75 0 0 1 .018 1.042l-1.25 1.25a3.5 3.5 0 1 1-4.95-4.95l2.5-2.5a3.5 3.5 0 0 1 4.95 0 .75.75 0 0 1-.018 1.042.75.75 0 0 1-1.042.018 2 2 0 0 0-2.83 0l-2.5 2.5a2 2 0 0 0 0 2.83"></path></svg>](https://its-sys-forge.astate.edu:3000/forge_admin/Documentation/src/branch/main/Certificate%20Management/Installing%20CA%20Certificates.md#debian-example)Debian example

This example uses the Arkansas State University private certificate authority.

The following files were copied to the **user account** home directory.

- Arkansas\_State\_University\_Root\_CA\_certificate.cer
- Arkansas\_State\_University\_Issuing\_CA\_certificate.cer

```bash

# Copy the certificates to the correctly directory
# Note the extension change from .cer to .crt
$ sudo cp /home/user account/Arkansas_State_University_Root_CA_certificate.cer /usr/local/share/ca-certificates/Arkansas_State_University_Root_CA_certificate.crt
$ sudo cp /home/user account/Arkansas_State_University_Issuing_CA_certificate.cer /usr/local/share/ca-certificates/Arkansas_State_University_Issuing_CA_certificate.crt

# Update the ca trust store
$ sudo update-ca-certificates

Updating certificates in /etc/ssl/certs...
rehash: warning: skipping ca-certificates.crt,it does not contain exactly one certificate or CRL
2 added, 0 removed; done.
Running hooks in /etc/ca-certificates/update.d...
done.

# Note: you can ignore the rehash warnings about certificates 'does not contain exactly one certificate or CRL'.

# Verify the certificates were added
$ awk -v cmd='openssl x509 -noout -subject' ' /BEGIN/{close(cmd)}; {print | cmd}' < /etc/ssl/certs/ca-certificates.crt | grep 'Arkansas State University'

# If the certificates were loaded into the trust store you should see the following output.
subject=C=US, ST=Arkansas, L=State University, O=Arkansas State University, CN=Arkansas State University Issuing CA
subject=C=US, ST=Arkansas, L=State University, O=Arkansas State University, CN=Arkansas State University Root CA
```

# Installing the Certificate Profile on Mac/iPad (iOS)

To install the Certificate Profile.

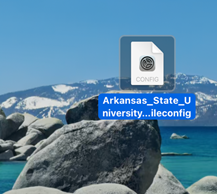
<span style="mso-bidi-font-family: Aptos; mso-bidi-theme-font: minor-latin;"><span style="mso-list: Ignore;">1.<span style="font: 7.0pt 'Times New Roman';"> </span></span></span>Click on the certificate profile app:

<span style="mso-no-proof: yes;">![](https://kb.astate.edu/uploads/images/gallery/2026-10/embedded-image-ezkczdcq.png)</span>

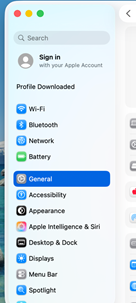
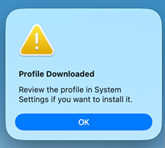
<span style="mso-bidi-font-family: Aptos; mso-bidi-theme-font: minor-latin;"><span style="mso-list: Ignore;">2.<span style="font: 7.0pt 'Times New Roman';"> </span></span></span>At the Profile Downloaded box click ok.
<span style="mso-no-proof: yes;">![](https://kb.astate.edu/uploads/images/gallery/2026-10/embedded-image-ncvkpev2.png)</span>

<span style="mso-bidi-font-family: Aptos; mso-bidi-theme-font: minor-latin;"><span style="mso-list: Ignore;">3.<span style="font: 7.0pt 'Times New Roman';"> </span></span></span>Go to System Settings and General.

<span style="mso-spacerun: yes;"> </span><span style="mso-no-proof: yes;">![](https://kb.astate.edu/uploads/images/gallery/2026-10/embedded-image-r320s8bh.png)</span>

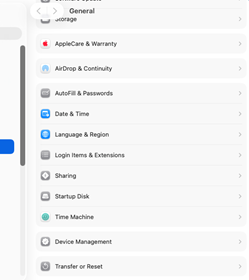
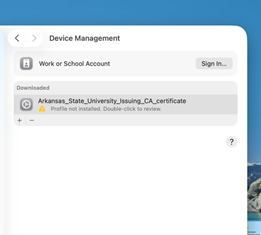
<span style="mso-bidi-font-family: Aptos; mso-bidi-theme-font: minor-latin;"><span style="mso-list: Ignore;">4.<span style="font: 7.0pt 'Times New Roman';"> </span></span></span>Go to Device Management

<span style="mso-no-proof: yes;">![](https://kb.astate.edu/uploads/images/gallery/2026-10/embedded-image-f1vobcoq.png)</span>

<span style="mso-bidi-font-family: Aptos; mso-bidi-theme-font: minor-latin;"><span style="mso-list: Ignore;">5.<span style="font: 7.0pt 'Times New Roman';"> </span></span></span><span style="mso-spacerun: yes;"> </span>Under Device Management, you should see the Certificate Profile. Click on it to install.
<span style="mso-no-proof: yes;">![](https://kb.astate.edu/uploads/images/gallery/2026-10/embedded-image-pro4e9tm.png)</span>

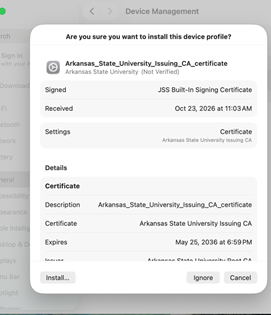
<span style="mso-bidi-font-family: Aptos; mso-bidi-theme-font: minor-latin;"><span style="mso-list: Ignore;">6.<span style="font: 7.0pt 'Times New Roman';"> </span></span></span>In the *Are you sure you want to install this device profile*, click install.
<span style="mso-no-proof: yes;">![](https://kb.astate.edu/uploads/images/gallery/2026-10/embedded-image-5dpjzjzv.png)</span>

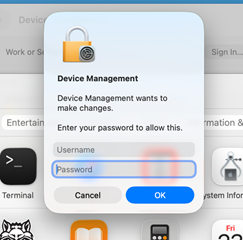
<span style="mso-bidi-font-family: Aptos; mso-bidi-theme-font: minor-latin;"><span style="mso-list: Ignore;">7.<span style="font: 7.0pt 'Times New Roman';"> </span></span></span>It will prompt you for your username and password.
<span style="mso-no-proof: yes;">![](https://kb.astate.edu/uploads/images/gallery/2026-10/embedded-image-wjfzxodi.png)</span>

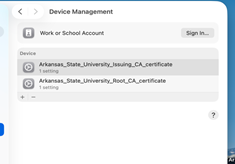
<span style="mso-bidi-font-family: Aptos; mso-bidi-theme-font: minor-latin;"><span style="mso-list: Ignore;">8.<span style="font: 7.0pt 'Times New Roman';"> </span></span></span>Once it is installed, you should see the Certificate profile in Device Management.

<span style="mso-spacerun: yes;"> </span>.<span style="mso-no-proof: yes;">![](https://kb.astate.edu/uploads/images/gallery/2026-10/embedded-image-fp6uet0m.png)</span>