# Kaltura: Student Instructions

# Kaltura FAQ for Students

---

##### **What is Kaltura?**

**Kaltura** is a media management software that is used to record audio, screen capture, webcam videos and upload them or existing media from your device to Kaltura My Media in Canvas.

##### **Terminology**

·<span class="s2"> </span>**My Media** is a collection of all the videos you've recorded or uploaded with the Kaltura tools.  
·<span class="s2"> </span>**Media Gallery** is the place, within a course, where professors may post videos for you to view. If you are asked to record and post a video, the professor may ask you to post the video in the Media Gallery. We still recommend recording the video from your **My Media** account and then publishing it to the course Media Gallery, as opposed to recording a video in the Media Gallery.

##### **How can I create a Kaltura account?**

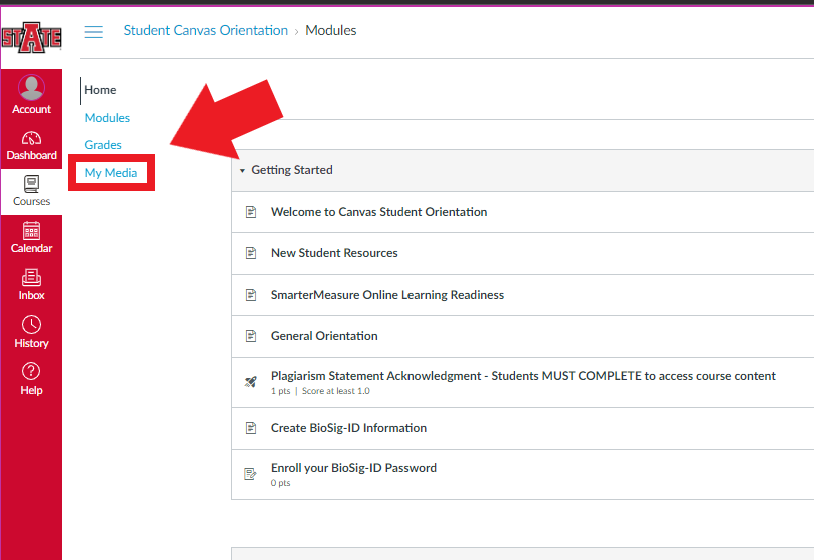
Login into Canvas and go to Courses. Select a course and click on My Media on the global course navigation bar. It will redirect you to your automatically created account on Kaltura Mediaspace.

##### **What does Kaltura My Media allow me to do?**

1.<span class="s2"> </span>**Add New (Content)**

·<span class="s2"> </span>Media Upload  
·<span class="s2"> </span>Express Capture  
·<span class="s2"> </span>YouTube  
·<span class="s2"> </span>Kaltura Capture  
·<span class="s2"> </span>Video Quiz

2\. **Actions**

·<span class="s2"> </span>Caption &amp; Enrich  
·<span class="s2"> </span>Publish  
·<span class="s2"> </span>Delete

3.<span class="s2"> </span>**View Analytics**

4.<span class="s2"> </span>**Launch Editor**

##### **What are the features available in Kaltura Media Gallery for students?**

Students registered in a particular course can access the course-related media published by both instructors and/or students in Kaltura Media Gallery. Many instructors publish videos for the course inside the Media Gallery.<span class="s2"> </span>Instructors can also allow students to publish videos inside the course Media Gallery.

##### **What is Publishing Status?**

**Private** - Media page will be visible to the content owner only.

**Published** - Media page will be visible to individuals according to entitlements on published destinations.

##### **How do I upload a video?**

**Media Upload** is used to upload or **drag** and **drop** a file from a computer to My Media. All common video, audio, and image formats in all resolutions are accepted. If a user wants to add a video to Kaltura which they have previously recorded on the computer, they can use the upload content feature.

**Kaltura My Media** &gt; **Add New &gt;** **Media Upload** &gt; Drag &amp; Drop file or choose to upload from your computer.

##### **How can I upload a YouTube video?<span class="Apple-converted-space"> </span>**

The YouTube feature in my media is used to upload public YouTube videos to Kaltura My Media.   
Go to **My Media** -&gt; **Add New** -&gt; **YouTube** -&gt; **Video Page Link (or Content ID)** -&gt; Paste the YouTube video Link -&gt; Click on Preview.

Fill out any relevant information you would like to associate with the video (name, description, tags and select the publishing status). Finally click on the save button. Now the YouTube video can be seen in your Kaltura My Media.

##### **What is Kaltura Capture?**

Kaltura Capture is a tool to record videos in Kaltura.

To record your videos using Kaltura Capture in Canvas, use the Kaltura Capture Desktop Recorder application. Kaltura Capture Desktop Recorder is an application that makes it easy for users to create and upload videos to Kaltura through Canvas. This software is available for Windows or Mac. If you’ve already installed **Kaltura Capture Desktop Recorder**, it will launch automatically. If not, install the application before using Kaltura Capture.

##### **How can I record videos using Kaltura Capture?**

Go to **My Media** -&gt; **Add New** -&gt; **Kaltura Capture**.<span class="s2"><span class="Apple-converted-space"> </span></span>

Now click on the new recordings. A new window will be opened with options to select appropriate content to be recorded (screen, camera, and audio). Select the type of content to be recorded and Click on the red button to start recording.<span class="s2"><span class="Apple-converted-space"> </span></span>

##### **How do I save recorded videos in Kaltura Capture?<span class="s2"><span class="Apple-converted-space"> </span></span>**

Once the recording is completed, click on the stop recording button. Now fill out the title, description and tags then click on **Save** or **Save and Upload** option.

##### **What is the difference between “save” versus “save &amp; upload” in Kaltura Capture?<span class="s2"><span class="Apple-converted-space"> </span></span>**

- If you click on **Save**, the videos will be saved to the Kaltura Capture Desktop Recorder application library and cannot be seen in Kaltura My Media. You can later upload the videos to Kaltura my media from the library by clicking on the upload option.<span class="Apple-converted-space"> </span>
- If you click on **Save and Upload**, the videos will be saved to the Kaltura Capture Desktop Recorder application library and uploaded to Kaltura My Media.<span class="Apple-converted-space"> </span>

##### **What is Express Capture?<span class="s2"><span class="Apple-converted-space"> </span></span>**

Express Capture is a tool that enables recording content directly from the browser without the need to install any additional software. The recorded content can be saved to My Media.<span class="s2"><span class="Apple-converted-space"> </span></span>

Go to **My Media** -&gt; **Add New** -&gt; **Express Capture**.

##### **How can I edit captions in Kaltura?**

To edit the already existing captions for the uploaded videos follow the instructions below.<span class="s2"><span class="Apple-converted-space"> </span></span>

1.<span class="s2"> </span>From your My Media page, select the existing media for which you wish to edit captions.  
2.<span class="s2"> </span>Click the **Actions** drop-down menu and select Caption and Enrich.  
3.<span class="s2"> </span>The resulting table will display one row for each of the recording's caption tracks. The Edit icon is displayed for all completed captions. Click **Edit** in the right-most column to edit the desired captions.  
4.<span class="s2"> </span>The caption editor will open. Edit the desired caption in the text field at the center of the page.

##### **How can I edit my videos?**

If the user wants to launch the editor.

Kaltura My Media -&gt; Click on the edit button on the right-hand side of the video-&gt; Launch Editor

##### **What is<span class="s2"> <span class="s3">Kaltura</span> <span class="s3">Knowledge</span> <span class="s3">Cente</span></span>r?**

Kaltura Learning is a new video portal based on Media Space. Contained on the portal are short "How To” tutorial videos, covering the various workflows present in the Kaltura product.<span class="Apple-converted-space"> </span>

You can visit the Kaltura Knowledge Center here: :<span class="s2"> <span class="s3">[https://knowledge.kaltura.com](https://knowledge.kaltura.com)</span></span>

##### **Kaltura Student Training Videos:**

[https://astate.mediaspace.kaltura.com/channel/Student%2BVideo%2BResources/298602042](https://astate.mediaspace.kaltura.com/channel/Student%2BVideo%2BResources/298602042 "https://astate.mediaspace.kaltura.com/channel/Student%2BVideo%2BResources/298602042")

# Kaltura Student Guides

<main class="content-wrap card" id="bkmrk-kaltura-is-a%E2%80%91state%E2%80%99s">Kaltura is A‑State’s platform for recording, uploading, and sharing videos in Canvas.

## Accessing Kaltura

You can access Kaltura by typing the [direct link (https://astate.mediaspace.kaltura.com/)](https://astate.mediaspace.kaltura.com/ "Kaltura") into your browser, using the mediaspace link in your Pack Portal, or by clicking **My Media** from within Canvas.

<div class="container" style="display: grid; grid-template-columns: 10% 90%; gap: 20px;"><div class="box">[![My Media Link.png](https://kb.astate.edu/uploads/images/gallery/2026-04/scaled-1680-/my-media-link.png)](https://kb.astate.edu/uploads/images/gallery/2026-04/my-media-link.png)</div><div class="box">[![My Media link in Canvas Course.png](https://kb.astate.edu/uploads/images/gallery/2026-04/scaled-1680-/my-media-link-in-canvas-course.png)](https://kb.astate.edu/uploads/images/gallery/2026-04/my-media-link-in-canvas-course.png)</div></div>If you use the direct link, Kaltura will open in a new tab in your browser. Click **Guest** in the upper right corner and select **Login**. This will take you to the SSO Login page that launches when you log in to Canvas or Pack Portal. Log in with your A-State credentials to access your student Kaltura account.

## Guides

<details><summary>### Uploading Videos to Kaltura

</summary>

Once you're on the Kaltura homepage, you can click the **Add New** option in the top right corner of your screen. This will give you a menu with several options, but the ones most useful for this course are **Media Upload**, **Express Capture**, and **Kaltura Capture**.

[![Add New menu.png](https://kb.astate.edu/uploads/images/gallery/2026-04/scaled-1680-/add-new-menu.png)](https://kb.astate.edu/uploads/images/gallery/2026-04/add-new-menu.png)
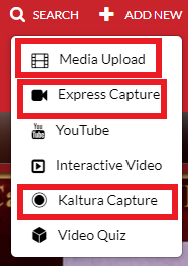
- **Media Upload** – Using this option allows you to upload a video from your computer files. If you create your video using your computer’s default recording software, you can use Media Upload to add the video to your Kaltura account.
- **Express Capture** – This option allows you to create a short recording of yourself using your computer’s front-facing camera. You can then choose to record again if you would like, download a copy to your computer, or select the Use This option to save the video to your Kaltura account.
- **Kaltura Capture** – This is the most versatile option. From this page, you can download the Kaltura Capture software onto your computer. With Kaltura Capture, you can record using your computer’s front and/or rear cameras and record your screen. This is ideal for presentations. You can also store your recorded videos in the Kaltura Capture application on your computer and/or upload them to Kaltura from within the application.

</details><details><summary>### Sharing Kaltura Videos

</summary>

Once you've got your video uploaded to your Kaltura account, get it ready to share. Click on your name at the top right of the page and select My Media from the menu. This will bring up all of your Kaltura videos.

On the right of each video are three icons. From left to right, these icons allow users to **View Analytics**, **Edit**, and **Delete**. Click the middle icon that looks like a pencil to **Edit** your video.

[![kaltura video gallery sample.jpg](https://kb.astate.edu/uploads/images/gallery/2026-04/scaled-1680-/kaltura-video-gallery-sample.jpg)](https://kb.astate.edu/uploads/images/gallery/2026-04/kaltura-video-gallery-sample.jpg)

- Under **Details**, give your video a meaningful title that will help you distinguish it from videos you may need to create for other courses or assignments. Its recommended that you include the course and assignment name. Be sure to press **Save**.
- Click **Publish** to change the Publishing Status. The video is set to Private by default; you will need to change it to **Unlisted** to share it with your class or instructor(s). Press **Save**.

Your video is now ready to share! To retrieve the share link:

- Return to **My Media** and click on your edited video. You can also click the **Back to Media Page** button above the video and title to get there faster.
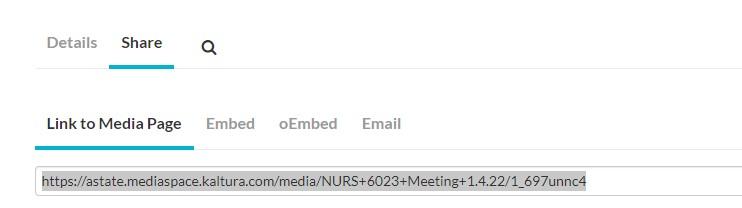
- Beneath your video, you will see **Details** and **Share**. Click **Share**. Copy the link provided under the **Link to Media Page**. Share the link with your classmates and instructor(s).  
    [![details and share.jpg](https://kb.astate.edu/uploads/images/gallery/2026-04/scaled-1680-/details-and-share.jpg)](https://kb.astate.edu/uploads/images/gallery/2026-04/details-and-share.jpg)
</details><details><summary>### Embed Your Videos into Assignments or Discussions

</summary>

To turn in an embedded Kaltura video for an assignment:

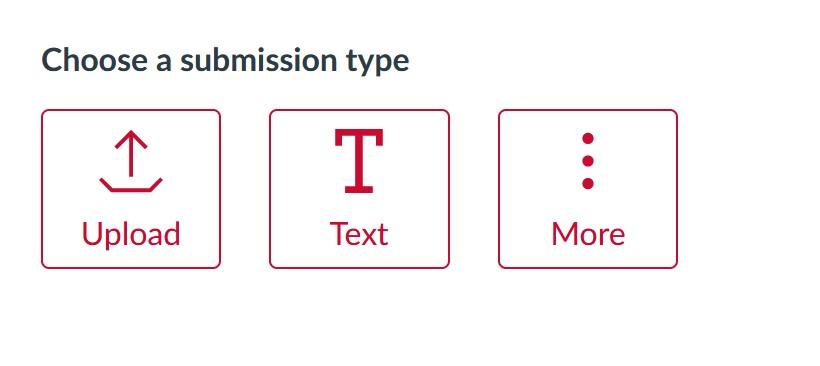
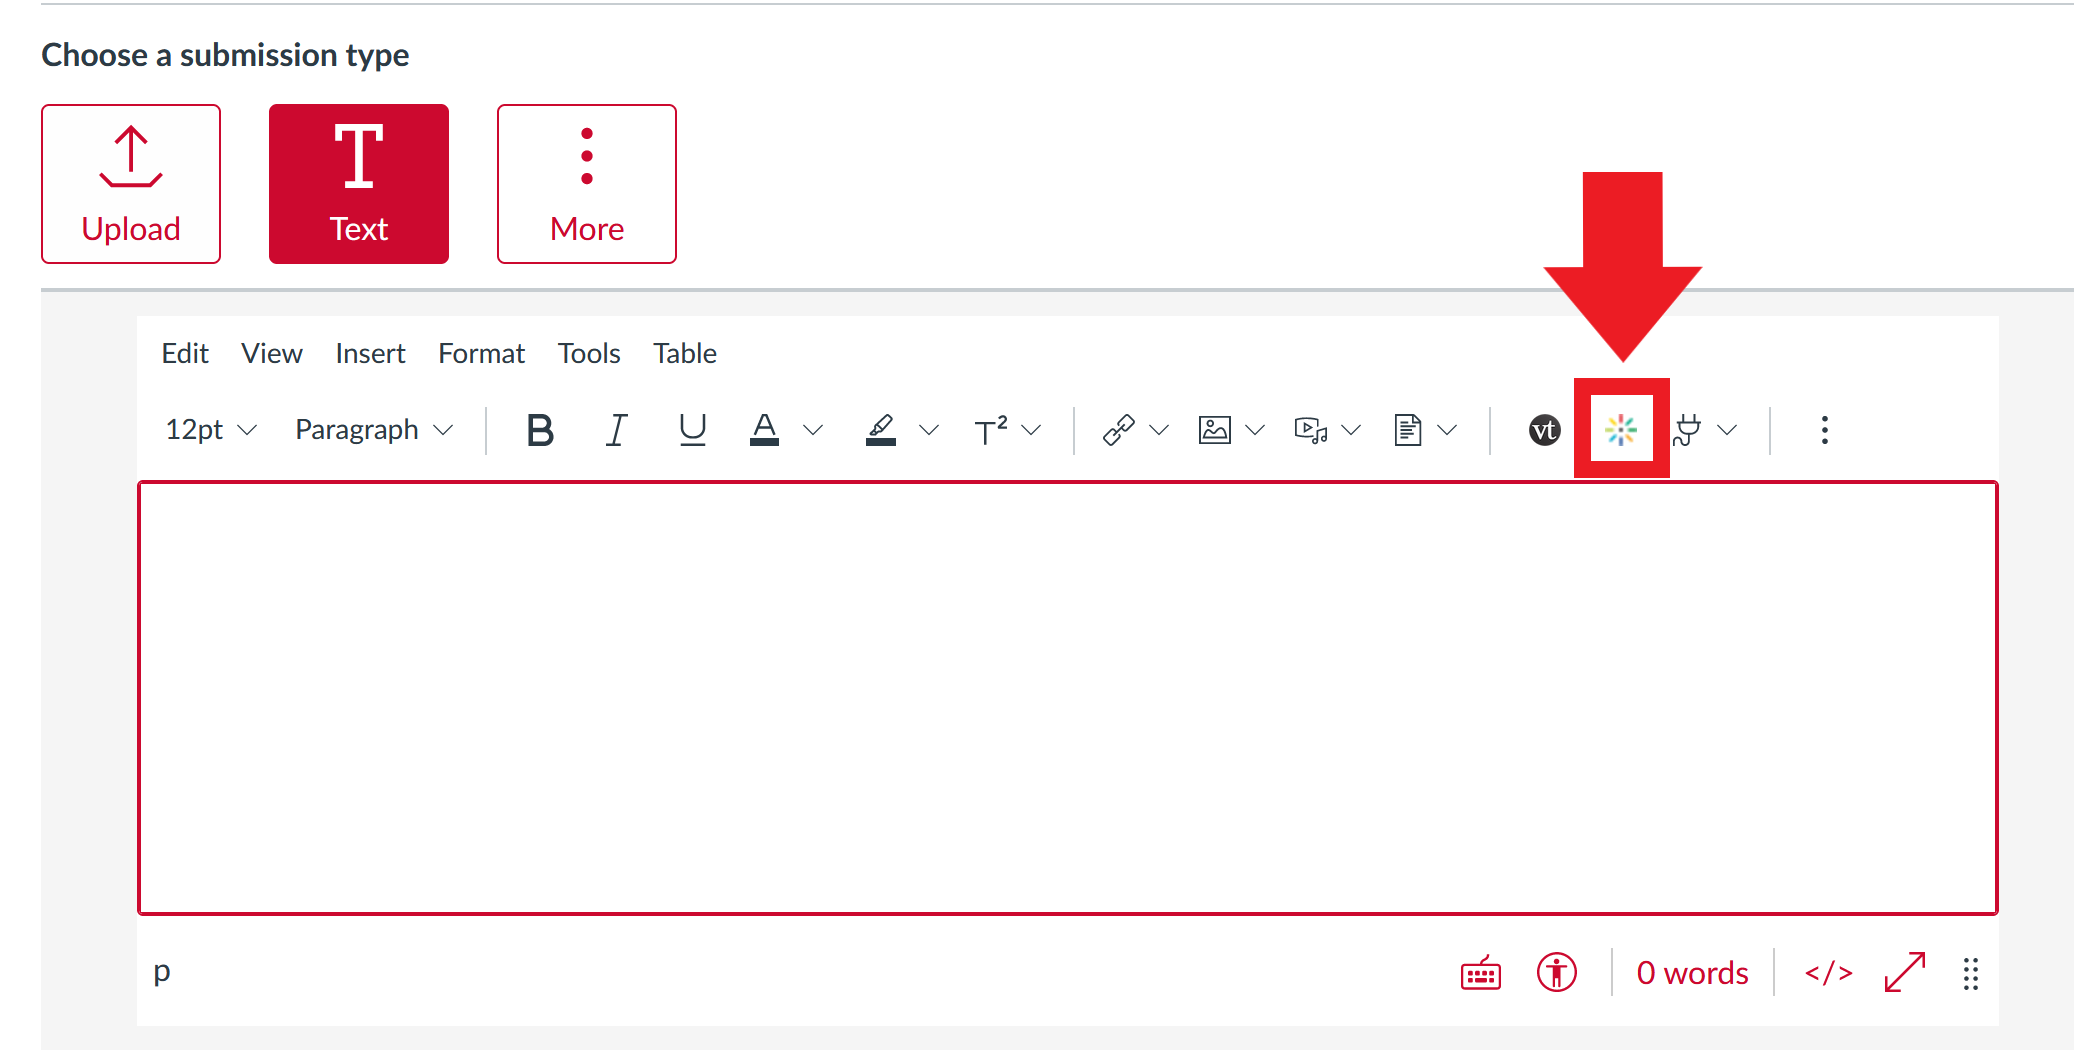
- Scroll to the bottom of the assignment and under **Choose a submission** type select **Text**:  
    [![text submission.jpg](https://kb.astate.edu/uploads/images/gallery/2026-04/scaled-1680-/text-submission.jpg)](https://kb.astate.edu/uploads/images/gallery/2026-04/text-submission.jpg)
- This will bring up the Rich Content Editor. From here, you can select the Kaltura icon:  
    [![canvas kaltura embed student.png](https://kb.astate.edu/uploads/images/gallery/2026-04/scaled-1680-/canvas-kaltura-embed-student.png)](https://kb.astate.edu/uploads/images/gallery/2026-04/canvas-kaltura-embed-student.png)
- Find the video you want to submit and click **Embed**. You can also create your video here directly using the Add New button in the top right corner.  
    [![Add from kaltura.png](https://kb.astate.edu/uploads/images/gallery/2026-04/scaled-1680-/add-from-kaltura.png)](https://kb.astate.edu/uploads/images/gallery/2026-04/add-from-kaltura.png)
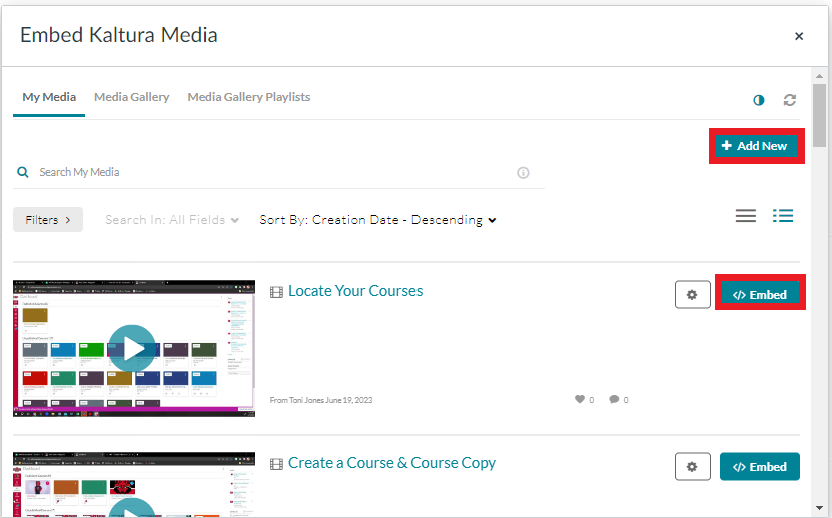
Your video is now embedded! Before you embed, be sure that you have set your video to **Unlisted**. Videos set to **Private** will not be visible to students or instructor(s). Press **Submit** in the lower right corner to submit your video.

You can use the same steps to embed your video in the Discussion Board.

</details>## **Where to Get Help**

Kaltura Learning is a new video portal based on Media Space. Contained on the portal are short "How To” tutorial videos, covering the various workflows present in the Kaltura product.

You can visit the Kaltura Knowledge Center here: [https://knowledge.kaltura.com/help/lms-video-canvas](https://knowledge.kaltura.com/help/lms-video-canvas)

</main>