Outlook
- Set Up the Microsoft Outlook Mobile App
- Adding an Email Account or Shared Mailbox to Outlook
- Create and Send Email in Outlook
- Add/Remove From Address
- Show From/Bcc Fields
- Clear the Auto-Complete Cache
- Manage Your Calendar and Contacts in Outlook
- Force Download a New Copy of the Global Address List (GAL)
- Import Archived Mail from a PST File
- Import/Export Outlook Rules
- How to Open a Resource Calendar
- Troubleshooting
- Plus Addressing in Exchange Online
- Manage an Email Distribution List in Outlook
Set Up the Microsoft Outlook Mobile App
iOS
1. Download Microsoft Outlook from the iOS App Store and then open it.

2. Tap Add Account.
3. Enter your full A-State email address and tap Add Account.

4. Enter your email account password and tap Sign In.

5. Authenticate using Duo Mobile.
Note: If the Push notification doesn't appear, open up the DUO Mobile app and approve the push.
6. If you wish to add another account when prompted, tap Add and follow the prompts.
 7. If you desire notifications, tap Turn On when given the following prompt.
Android
1. Install the Microsoft Outlook app from the Google Play Store and then open it.
2. Tap Get Started if this is your first time.
3. Tap Add Account.

4. Enter your full A-State email address and tap Continue.

5. Enter your email account password and tap Sign In.

6. Authenticate using Duo Mobile.

Note: If the Push notification doesn't appear, open up the DUO Mobile app and approve the push.

8. If you desire notifications, tap Turn On when given the following prompt.

For further assistance, contact the ITS Help Desk at 870-972-3933 or stop by the IT Support Services (itsupportservices@astate.edu). It is located on the bottom floor of the Dean B. Ellis Library, Room 149.
Adding an Email Account or Shared Mailbox to Outlook
Outlook Desktop (2016+) on Windows
- Open Outlook.
- Select File from the top menu bar.

- Press the Add Account button.

- Enter the email address of the mailbox or shared mailbox and press Connect.

- Select the Exchange icon. As soon as you click on the Exchange icon, Outlook will attempt to connect to the mailbox.

- If prompted for a password, select Sign in with another account and enter your A-State username and password.

- Once Outlook successfully connects to the mailbox Press Done


Outlook Desktop on Mac OS
- Open Outlook
-
In the Tools menu, choose Accounts, and select the account that has access to the mailbox.
-
Select Delegation and Sharing
-
Choose Shared With Me tab
-
Choose + to add a shared or delegated mailbox
Notes
- You may need to restart Outlook after adding the new mailbox.
- When adding a shared mailbox, if you are prompted for any credentials enter your A-State credentials.
- If you have permissions to custom folders in the mailbox but not to the top-level mailbox folder, the custom folders will not appear in the folder list. Only default folders that you have permissions to, such as Inbox, Sent Items, Deleted Items, and Calendar, will appear in the folder list without top-level mailbox folder permissions.
Additional Microsoft resources
Create and Send Email in Outlook
Create and send email
-
Choose New Email to start a new message.
-
Enter a name or email address in the To, Cc, or Bcc field.
If you don't see Bcc, see Show, hide, and view the Bcc box.
-
In Subject, type the subject of the email message.
-
Place the cursor in the body of the email message, and then start typing.
-
After typing your message, choose Send.
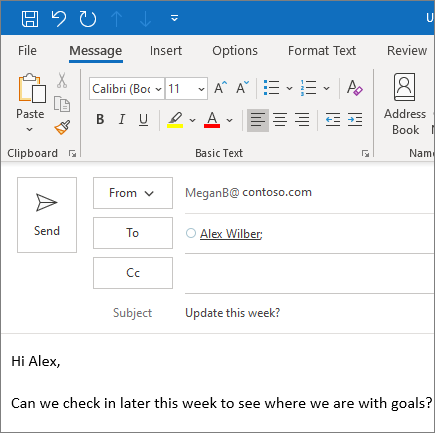
Use @mentions to get someone's attention
-
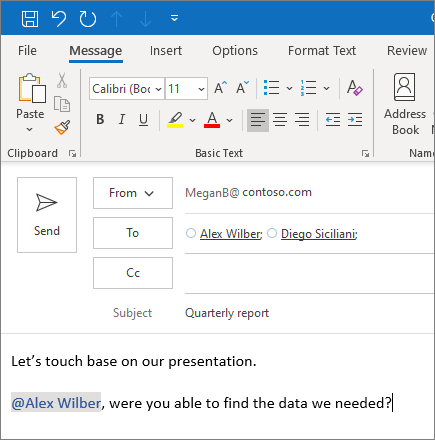
In the body of the email message or calendar invite, enter the @ symbol and the first few letters of the contact's first or last name.
-
When Outlook offers you one or more suggestions, choose the contact you want to mention.
By default, their full name is included. You can delete a portion of the mention, for example, everything other than the person's first name.
-
The mentioned contact is added to the To line of the email or the meeting invite.
Add/Remove From Address
Add new From Address
-
Open a new email message.
-
Select the From button and then click Other Email Address.

-
Enter the new From email address or select the From button and search the Global Catalog for the address.

Note: If you have more than one account added to Outlook, you will see a dialog that also has a Send Using button. Make sure to set this to the account that has permission to 'Send As' or 'Send on Behalf of' for the From address that you are adding.


Remove a From Address
- Open a new email message.
- Select the From button.
- From the list of From addresses, select the X to remove the entry.


Note
You cannot remove addresses for accounts that have been added to Outlook. These accounts will be at the top of the list and will not have a X next to them.
Additional Microsoft resources
Show From/Bcc Fields
- Open a new email message.
- Select Options, then select From or Bcc in the Show Fields group.


Additional Microsoft resources
Clear the Auto-Complete Cache
Clear Individual entries from the Auto-Complete Cache
- Open a new email message.
- Type the first few characters of the address to remove in the To... field.
- When the entry appears in the list of suggestions, move your mouse pointer over the suggestion until it becomes highlighted, but don't select it.
- When the X icon appears next to the highlighted suggestion, select X to remove the entry from the list, or press the Delete key on the keyboard. This will remove it from the AutoComplete cache.


Clear all entries from the Auto-Complete Cache
- Select File from the top menu bar.
file - From the File menu, select Options.

- Under Options, select the Mail tab, scroll down to the Send Messages section and press Empty Auto-Complete List.

- Press Yes in the confirmation box and the Auto-Complete cache will be completely erased.


Additional Microsoft resources
Manage Your Calendar and Contacts in Outlook
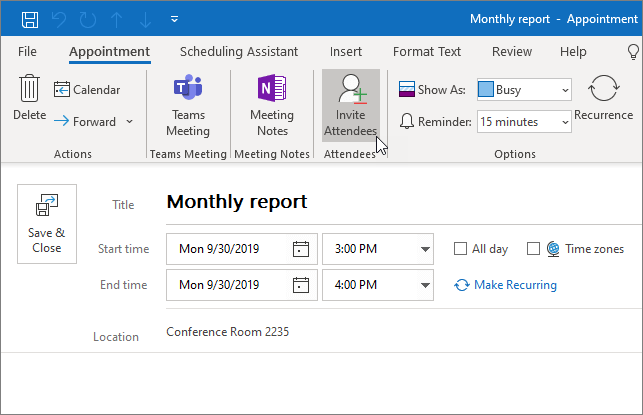
Schedule an appointment
-
In Calendar, select New Appointment.
-
Add a Subject, Location, and the start and end times.
-
Select Invite Attendees to turn the appointment into a meeting.
-
Select Save & Close to finish, or Send if it's a meeting.
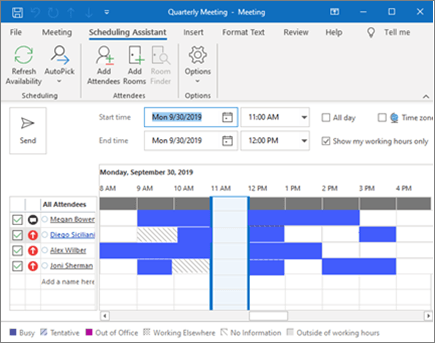
Use the Scheduling Assistant
When you create a meeting, use the Scheduling Assistant to see when attendees and rooms are available.
-
From a new meeting request, select Scheduling Assistant.
-
The shaded area with vertical bars shows the meeting time. Drag the bars to adjust the meeting time.
-
The grid shows when attendees are available. To the right of the meeting request, Outlook shows suggested times and the number of conflicts.
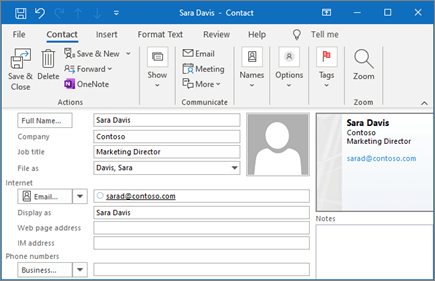
Add a contact
-
Select the People icon.
-
Select New Contact or press Ctrl+N.
-
Enter a name and any other information that you want to include for the contact.
-
Select Save & New to create another contact, or Save & Close if you're done.
Force Download a New Copy of the Global Address List (GAL)
- Open Outlook.
- Select Send / Receive from the top menu bar.

- Select Send/Receive Group.

- Uncheck the box next to Download changes since last Send/Receive, choose either Global Address List or Offline Global Address List and select OK.


A status window will open to indicate that the download is in progress and will close automatically when the download is complete; this can take several minutes.
Additional Microsoft resources
Import Archived Mail from a PST File
You can only import archived mail from the Outlook desktop client. You cannot import for Outlook for the Web.
Locate Your Mail Archive File
- Open Outlook.
- Locate the archive in the list of folders on the left side.

- Right click on the archive folder to open the context menu and select Data File Properties.

- In the data file properties dialog, click on the Advanced button.

- The location of your archive file is listed next to the Filename field. In most cases, this file will be located in your Documents in a folder called Outlook Files. Remember this location. Copy it to a text file if you need to.


Repeat steps 2-5 if you have more than one archive file.
Close the Archive File
- Open Outlook.
- Locate the archive in the list of folders on the left side.
- Right click on the archive folder to open the context menu and select Close "Archive". Archive may be different than what is shown in the image below. It will be whatever the name of the Outlook Data File is. In this case, it is called Arhive. If the name was archive1, then the context menu would show Close "archive1".


Repeat steps 2 and 3 if you have more than one archive file.
Importing you Archived Mail using Outlook.
Now that you have the location of the archive file(s), it is time to import the messages. The following instructions are valid for Outlook 2013, 2016, 2019 and M365.
Note: The Open dialog in Outlook 2013 uses a different set of icons and will looks slightly different than 2016 and 2019. All images below are from Outlook 2019. While the icons may be different the text is identical in all three versions.
You cannot import an archive file that is already loaded in Outlook. It must be closed before you can import it. Please refer to the previous section for instructions on closing the archive file.
- Open Outlook.
- Select File from the top menu bar.
- Select Open & Export then Import/Export.

- On the Import and Export Wizard dialog, select Import from another program or file and clcik on Next.

- On the Import a File dialog, select Outlook Data File (.pst) and click Next.

- Use the Browse button on the Import Outlook Data File dialog to locate the archive file you identified previously. Under the Options section, leave the default selection Replace duplicates with items imported and click on Next.

- To copy all of the messages (including folders) to your A-State M365 inbox:
- Under Select the folder to import from:, click on the top level. This is the default unless you change it.
- Select Include subfolders. This is the default unless you change it.
- Select Import items into the same folder in:. This is the default unless you change it.
- Make sure your email address is select in the dropdown box.
- Click on Finish.


Depending on the size of your archive file, it may take some time to import all the messages.
Repeat steps 2-7 for each additional archive file you want to import.
Additional Microsoft resources
Import/Export Outlook Rules
- Open Outlook.
- On the Home tab, Select Rules then Manage Rules * Alerts.

- Select Options on the Email Rules tab.

- Select Export Rules...

- Using the Save Exported Rules as dialog, browser to where you would like to save the rules and give the file a name.
- After saving the file, click Ok on each dialog window to close them out.


If you need to import your rules, repeat the steps above. On step 4, select Import Rules... and browse to the location of the file previously exported.
Additional Microsoft resources
How to Open a Resource Calendar
To open a Resource Mailbox Room in Outlook for Windows, please follow the instructions below. In order to see newly added Users or Rooms.


From the Calendar pane, select Add Calendar > From Room List under the Manage Calendars group.


Room: Under Address Book, choose All Rooms. (This will list all available Resource Mailbox Rooms.)


You can then either double-click on the Room you want to choose and it will appear in the Rooms at the bottom of the screen, or you can highlight the Room and then select the  Button to add it to the Room field.

Select 

The Resource Mailbox Room you have chosen will appear under Rooms in your Calendar lists.
Additional Microsoft resources
For further assistance, contact the ITS Help Desk at 870-972-3933 or stop by the IT Support Services (itsupportservices@astate.edu). It is located on the bottom floor of the Dean B. Ellis Library, Room 149.
Troubleshooting
Outlook disconnects from your mailbox and you cannot get it to reconnect
Windows:
Solution 1
- First reboot your computer
- Open Outlook and when prompted enter your A-State credentials
Solution 2
- Close Outlook
- Open Windows Credential Manager and remove any credentials that refer to Outlook
- Open Windows Settings and select Accounts and then select Access work or school
- Select your A-State account and click on Disconnect
- If it takes more than a couple of minutes to disconnect your account, please reboot your computer and then attempt to disconnect your account again.
- Open Outlook and when prompted enter your A-State credentials
Solution 3
- Open Outlook and Select File at the top left

- Select Account Settings
- Click your email and then click Remove

- If you receive an error message asking for a Data File to be created, click the Data Files tab, click New, and in the pop-up window, click Ok
- Once removed, click New
- Enter your A-State credentials when prompted
- If you are asked to pick an account type, choose Work or School
- Authenticate with Duo like normal, if prompted
- Once you have signed in, close Outlook and reopen it. It make take several minutes for your content to populate

Checking your version of Office
- Click File
- Click Office Account
- Look for Product Information. This should include the year of the version installed.
- If the version installed is 2013 or earlier, you can submit a work order ticket by signing in to my.astate and selecting Help Desk Ticket
Mac:
- Click Outlook at the top left of your screen. This is by the Apple logo.
- Click Preferences
- Click Accounts
- Make sure your A-State account is selected, and click the minus sign (-) in the bottom left
- Once removed, click the plus sign (+)
- You may have to click New Account
- Enter your A-State credentials
- If you are asked to pick an account type, choose Work or School
- Authenticate with Duo like normal if prompted
- Click Done
Checking your version of Office
- Click Outlook at the top left of your screen. This is by the Apple logo.
- Click About Outlook
- If the version installed is 2013 or earlier, you can submit a work order ticket by signing in to my.astate and selecting Help Desk Ticket
Plus Addressing in Exchange Online
What is plus addressing
Plus addressing, also known as sub-addressing, allows you to create variations of a normal email address that will still be delivered to your institutional email account.
An email address uses the basic syntax: <local-part>@<domain>. For example, bsomeone@astate.edu.
Plus addressing uses the syntax: <local-part>+<tag>@<domain>. For example, bsomeone+newsletter@astate.edu.
The original email address must be valid. The +tag value that you add is arbitrary, but it cannot contain spaces.
Plus addressing can be used in any email client that sends emails and you can receive emails addressed to you using plus addresses as you would normal emails.
Using plus addressing
To use this feature, append a + sign and desired descriptor after your account name and before the @ symbol (e.g., bsomeone+prtcommittee@astate.edu).
You cannot send from a plus address.
Some web forms don't support plus signs in email addresses.
As plus addresses are not aliases that are configured on the mailbox, they don't resolve to a user's name in Outlook clients. This limitation results in plus addresses being easily identifiable in the To or CC fields of messages. However, there might be scenarios where you can't use a plus address for a Microsoft service that needs to be associated with your mailbox.
To automatically identify and filter messages that are sent to plus addresses, use Inbox rules to act on those messages. Using the condition Recipient address includes, you can specify an action for messages sent to a particular plus address. For example, you can move messages sent to a plus address to a folder.
Plus addressing may be used on user, distribution group and M365 group email addresses.
Why Use Plus Email Addressing?
The full address, including the extra information, can act as a label and can be useful for managing email and site registrations. Here are two examples:
-
Use plus addressing when you sign up for different newsletters or community lists to easily filter or create rules for them, which can help you organize, search, and file the messages you receive from those senders.
-
Plus addressing is useful for creating disposable addresses that can prevent spam from coming to your mailbox. If you need to enter your email address in a form, you can enter a variant address in that form. After you get the required email, you can set up a block to never receive an email at that address again.
Manage an Email Distribution List in Outlook
Note: Only a specific type of Distribution List can be managed in Outlook, contact ITS_SYSTEMS@astate.edu if you're unsure if your Distribution List qualifies.
- Open Microsoft Outlook and then open the Address Book.

- Check that you are using the Global Address List as the Address Book instead of the Offline Global Address List.
- Type in the full or partial name of the distribution list you want to modify.
- Double click on the distribution list in the list to open it.

- Click Modify Members.

- To add a member to the distribution list, click Add...
- Alternatively, to remove members, select the names you wish to remove from the left pane. Click Remove on the right to remove them from the distribution list, then click OK to save your changes.

- Type the name of the person you want to add.
- Double click the person’s name in the list.
- The name will appear in the Add section at the bottom of the window.
- Once you’ve added all desired members, click OK(Email ITS_SYSTEMS@astate.edu if adding a large amount of members).

- Click OK on all open windows to save your changes, and you’re done!