Microsoft 365
Microsoft 365 (formerly Office 365 or O365) support articles
- Microsoft Office In-App Purchases
- Announcements
- System Requirements / Eligibility
- How to Check Microsoft 365 Subscription
- How to Install Microsoft 365
- Microsoft 365 Training
- Outlook
- Set Up the Microsoft Outlook Mobile App
- Adding an Email Account or Shared Mailbox to Outlook
- Create and Send Email in Outlook
- Add/Remove From Address
- Show From/Bcc Fields
- Clear the Auto-Complete Cache
- Manage Your Calendar and Contacts in Outlook
- Force Download a New Copy of the Global Address List (GAL)
- Import Archived Mail from a PST File
- Import/Export Outlook Rules
- How to Open a Resource Calendar
- Troubleshooting
- Plus Addressing in Exchange Online
- Manage an Email Distribution List in Outlook
- Entra ID Join Procedure - Remote Assets
- BitLocker Recovery Guide
- OneDrive
- Limitations and Restrictions
- Set Up the OneDrive Sync App
- Important PC Folders (Auto Backup)
- Manage Files and Folders in OneDrive
- Upload and Save Files and Folders to OneDrive
- Collaborate in OneDrive
- Work on the Go with OneDrive
- Sharing File and Folders in OneDrive
- Teams
- Microsoft 365 Groups
- What are Microsoft 365 Groups?
- Group Expiration Policy
- Guest Access to Microsoft 365 Groups
- Changing Group Settings
- Accessing Group Files
- FAQ
- Shared A-State Email Addresses
- Student Email Shifting to Microsoft on Aug. 11 2024
- Upcoming change to Microsoft MFA
- First time user account activation
- View Bitlocker Keys
- Update Microsoft Verification Method
- E-Mail Sending Limits
Microsoft Office In-App Purchases
Purchases and Free downloads of apps/add-ins from the Microsoft Store, Office Store or Teams Store:
All purchase of apps/add-ins (free or paid) from the Microsoft Store, Office Store or Teams Store are non-transferable and are permanently tied to your A-State account.
All purchases must follow the standard university procurement procedure.
If you leave the university, you will lose access to any app/add-in that you purchased (whether with university or personal funds).
Support for purchased apps/add-ins:
ITS does not provide support for any app/add-in (purchased or free) from the Microsoft Store, Office Store or Teams Store.
Announcements
Office 2013 end of support
New Features and Services
Online / In-Place Archives for email are now available to users upon request. More Details
Major Change Updates
Outlook for Android will require Android 8.0 or above starting May 23, 2022
Beginning May 23, 2022, Outlook for Android will no longer support Android 7.1 or below. Users will need to upgrade their Android operating system to Android 8.0.
Ensure Outlook for Windows client are updated accordingly
As of November 1, 2021 the following versions of Outlook for Windows, as part of Office and Microsoft 365 Apps, will not be able to connect with Office 365 and Microsoft 365 services.
- Outlook for Windows Version
- Office 2013 versions prior to 15.0.4971.1000 of Office 2013 (Service Pack 1 with the October 2017 Update)
- Office 2016 versions prior to 16.0.4600.1000 of Office 2016 (With the November 2017 Update, KB 4051890)
- Microsoft 365 Apps for enterprise (formerly Office 365 ProPlus) versions 1705 and older
- Microsoft 365 Apps for business (formerly Office 365 Business) versions 1705 and older
Please make sure to install all Office updates on your computers before November 1, 2021 to ensure there are no connectivity issues with Exchange Online.
Retirement of Direct Link option while creating a Sharing link in the OneDrive
Beginning September 25, 2021 Microsoft will start retiring the Direct Link option while using the ‘Create sharing link’ action in the OneDrive for Business connector. In order to create a long-lived Sharing Link as intended, please select "View" or "Edit" as the Link Type rather than "Direct".
Microsoft 365 apps and services support for IE11 has ended
As of August 17, 2021, Microsoft 365 apps and services no longer support Internet Explorer 11 (IE11) and users may have a degraded experience, or be unable to connect to, those apps and services from IE11.
System Requirements / Eligibility
Microsoft 365 is collection of Microsoft productivity tools, available to use online and (in some cases) to download and install. Your A-State affiliation determines which apps and services are available to you.
System Requirements
Before installing M365 apps, please review the system requirements to ensure your computer or mobile device is supported.
Support for Internet Explorer 11 has ended.
The compliance policy for personal devices may require additional security configuration on your personal device to protect university data.
Licenses
A-State currently provides the following licenses.
- Microsoft 365 A5 for faculty
- Exchange Online
- Office for the web
- The latest desktop version of Office (Microsoft 365 Apps)
- To-Do
- Microsoft Forms
- Microsoft Planner
- Microsoft Teams
- Power BI
- Office 365 A1 for faculty
- Exchange Online
- Microsoft 365 A5 for students
- Office for the web
- The latest desktop version of Office (Microsoft 365 Apps)
- To-Do
- Microsoft Forms
- Microsoft Planner
- Microsoft Teams
- Power BI
Eligibility
Faculty/Staff
- Current full-time Faculty and Staff are assigned the license Microsoft 365 A5 for faculty and have access to all apps and services that A-State has enabled.
Sponsored Accounts
The following A-State accounts are assigned the license Office 365 A1 for faculty and have access to Exchange Online but will not have access to other apps or services.
-
- A-State NYIT accounts
- A-State Queretaro accounts
Sponsored A-State accounts that do not fall under the above categories, will have access to the following additional apps and services.
-
- Office for the web
- Microsoft Teams
Students
- All currently enrolled students are assigned the license Microsoft 365 A5 for students and have access to all apps and services that A-State has enabled.
The following steps will show you what licenses are currently assigned to your A-State account.
- Go to https://www.office.com
- On the Sign in screen, enter (or choose) your @astate.edu email address
- If prompted to choose a Work or school account or a Personal account, always pick the Work or school account.
- Click Next
- Enter your A-State password
- Click Sign in
- Decide whether to stay signed in (if you are on a public computer, choose No)
- If prompted, complete the Microsoft Authentication
- In the upper Left hand corner click the waffle icon (Square made of dots)
- In the drop down menu click on More apps
- In the upper right hand corner, click Install apps. You will be presented with three options, choose Microsoft 365 apps. This will redirect you to the Apps & devices page.
- On the Apps and devices page, from the list on the left select Subscriptions.


How to Check Microsoft 365 Subscription
The following steps will show you what licenses are currently assigned to your A-State account.
- Go to https://www.office.com
- On the Sign in screen, enter (or choose) your @astate.edu email address
- If prompted to choose a Work or school account or a Personal account, always pick the Work or school account.
- Click Next
- Enter your A-State password
- Click Sign in
- Decide whether to stay signed in (if you are on a public computer, choose No)
- If prompted, complete the Microsoft Authentication
- In the upper Left hand corner click the waffle icon (Square made of dots)
- In the drop down menu click on More apps
- In the upper right hand corner, click Install apps. You will be presented with three options, choose Microsoft 365 apps. This will redirect you to the Apps & devices page.
- On the Apps and devices page, from the list on the left select Subscriptions.
How to Install Microsoft 365
Included programs:
|
|
Uninstall any existing versions of Office
Do you already have Office installed? Before install the Microsoft 365 apps, please uninstall the old version (Mac or PC).
Uninstalling Office will not remove any files, documents, or workbooks you created using the apps.
Download the installer
- Go to https://www.office.com
- On the Sign in screen, enter (or choose) your @astate.edu or @smail.astate.edu email address
- If prompted to choose a Work or school account or a Personal account, always pick the Work or school account.
- Click Next
- Enter your A-State password
- Click Sign in
- Decide whether to stay signed in (if you are on a public computer, choose No)
- If prompted, complete the Microsoft Authentication
- In the upper Left hand corner click the waffle icon (Square made of dots)
- In the drop down menu click on More apps
- In the upper right hand corner, click Install apps. You will be presented with three options, choose Microsoft 365 apps. This will redirect you to the Apps & devices page where you can download the M365 apps installer.
- Click on the Install Office button to download the installer to your computer.
Begin installation
- Double-click the downloaded installation file
- Follow the onscreen prompts and sign in with your A-State email address and password when asked.
- If prompted to choose a Work or school account or a Personal account, always pick the Work or school account.
Windows: Install from the Command Line
- Open the Windows Command Prompt or Windows PowerShell.
- Enter the following command:
winget install --id Microsoft.Office
Note: Choose "No" if prompted to link your school account to your personal account, as this may change or disable certain security policies assigned to your device by default.
Microsoft 365 Training
Get up and running quickly with the basic info you need to be productive right away.
What is Microsoft 365 for business?
With Microsoft 365 for business, connect employees to the people, information, and content they need to do their best work, from any device.
Depending on your subscription plan, the benefits of your Microsoft 365 for business subscription may include:
-
The latest versions of Office apps like Word, Excel, and PowerPoint.
-
Email and calendars using Outlook and Exchange.
-
1 TB of OneDrive storage.
-
Frequent updates and upgrades not available anywhere else.
Microsoft 365 help and training
Set up Office apps and email on a mobile device
What is Microsoft 365 for business?
Microsoft 365 Resources
Microsoft 365 provides a suite of cloud-based applications that complements educational and business environments. Many of the products are free of charge and similar to other no-cost product offerings. These products do not replace existing offerings but provide additional flexible, tools that are available online.
All products are available in the Microsoft portal at https://www.office.com.
To sign in:
- Go to https://www.office.com.
-
To log in, enter your full A-State email address. (username@astate.edu or username@smail.astate.edu) Click Next
- If prompted to choose a Work or school account or a Personal account, always pick the Work or school account.
- You will be directed to authenticate with your University credentials. Enter your password and click Sign in or press ENTER.
Products can generally be accessed 24x7 using a computer, tablet, smartphone or other device with an Internet connection.
Resources
Word
- Quick Start Guide
- Word for Windows Training
- Word Help
- Keyboard shortcuts for Word
- Word for Mac Help
- Download PDF: Word Quick Start Guide
Excel
- Quick Start Guide
- Excel for Windows Training
- Excel for Mac Help
- Download PDF: Excel Quick Start Guide
Outlook
PowerPoint
- Quick Start Guide
- PowerPoint Training
- PowerPoint Help
- PowerPoint for Mac Help
- Download PDF: PowerPoint Quick Start Guide
OneDrive
- Quick Start Guide
- OneDrive Training
- OneDrive Restrictions and Limitations
- OneDrive Help
- Download PDF: OneDrive Quick Start Guide
OneNote
- Quick Start Guide
- OneNote for Windows 10 Training
- OneNote Help Center (all versions)
- Download PDF: OneNote Quick Start
To Do
Teams
Office Cheatsheets
Cheat sheets are quick reference guides, giving you keyboard shortcuts to complete MS Office actions and functions easily and efficiently as well as small how-to sections for crucial features.
Office Cheat sheets are available from Microsoft for both Windows and Mac OS.
What are keyboard shortcuts?
Shortcuts use a combination of keys to perform an action or function.
For example: to save a document in Windows, hold down the Control key and S.
What are the benefits of using shortcuts?
Shortcuts cut down the time it takes to complete a function or action. They can speed up processes from data entry to formatting a presentation.
Keyboard shortcuts can be faster than using the mouse. As you gradually replace the the mouse with keyboard shortcuts, you can save time on the regular actions. If you add up these little time-savings, they can make a big difference to your efficiency at work.
Outlook
Set Up the Microsoft Outlook Mobile App
iOS
1. Download Microsoft Outlook from the iOS App Store and then open it.

2. Tap Add Account.
3. Enter your full A-State email address and tap Add Account.

4. Enter your email account password and tap Sign In.

5. Authenticate using Duo Mobile.
Note: If the Push notification doesn't appear, open up the DUO Mobile app and approve the push.
6. If you wish to add another account when prompted, tap Add and follow the prompts.
 7. If you desire notifications, tap Turn On when given the following prompt.

Android
1. Install the Microsoft Outlook app from the Google Play Store and then open it.
2. Tap Get Started if this is your first time.
3. Tap Add Account.

4. Enter your full A-State email address and tap Continue.

5. Enter your email account password and tap Sign In.

6. Authenticate using Duo Mobile.

Note: If the Push notification doesn't appear, open up the DUO Mobile app and approve the push.

8. If you desire notifications, tap Turn On when given the following prompt.

For further assistance, contact the ITS Help Desk at 870-972-3933 or stop by the IT Support Services (itsupportservices@astate.edu). It is located on the bottom floor of the Dean B. Ellis Library, Room 149.
Adding an Email Account or Shared Mailbox to Outlook
Outlook Desktop (2016+) on Windows
- Open Outlook.
- Select File from the top menu bar.

- Press the Add Account button.

- Enter the email address of the mailbox or shared mailbox and press Connect.

- Select the Exchange icon. As soon as you click on the Exchange icon, Outlook will attempt to connect to the mailbox.

- If prompted for a password, select Sign in with another account and enter your A-State username and password.

- Once Outlook successfully connects to the mailbox Press Done


Outlook Desktop on Mac OS
- Open Outlook
-
In the Tools menu, choose Accounts, and select the account that has access to the mailbox.
-
Select Delegation and Sharing
-
Choose Shared With Me tab
-
Choose + to add a shared or delegated mailbox
Notes
- You may need to restart Outlook after adding the new mailbox.
- When adding a shared mailbox, if you are prompted for any credentials enter your A-State credentials.
- If you have permissions to custom folders in the mailbox but not to the top-level mailbox folder, the custom folders will not appear in the folder list. Only default folders that you have permissions to, such as Inbox, Sent Items, Deleted Items, and Calendar, will appear in the folder list without top-level mailbox folder permissions.
Additional Microsoft resources
Create and Send Email in Outlook
Create and send email
-
Choose New Email to start a new message.
-
Enter a name or email address in the To, Cc, or Bcc field.
If you don't see Bcc, see Show, hide, and view the Bcc box.
-
In Subject, type the subject of the email message.
-
Place the cursor in the body of the email message, and then start typing.
-
After typing your message, choose Send.
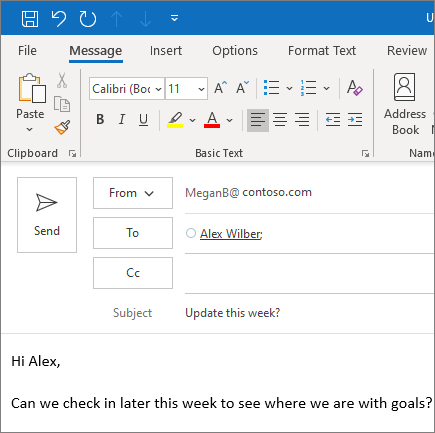
Use @mentions to get someone's attention
-
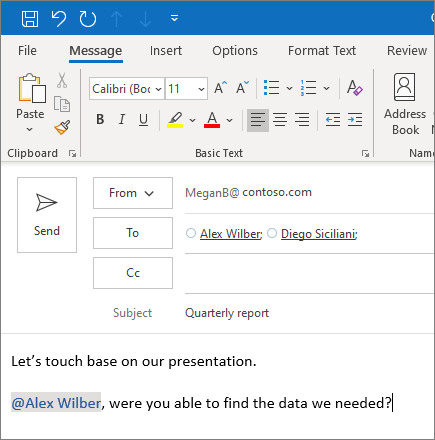
In the body of the email message or calendar invite, enter the @ symbol and the first few letters of the contact's first or last name.
-
When Outlook offers you one or more suggestions, choose the contact you want to mention.
By default, their full name is included. You can delete a portion of the mention, for example, everything other than the person's first name.
-
The mentioned contact is added to the To line of the email or the meeting invite.
Add/Remove From Address
Add new From Address
-
Open a new email message.
-
Select the From button and then click Other Email Address.

-
Enter the new From email address or select the From button and search the Global Catalog for the address.

Note: If you have more than one account added to Outlook, you will see a dialog that also has a Send Using button. Make sure to set this to the account that has permission to 'Send As' or 'Send on Behalf of' for the From address that you are adding.


Remove a From Address
- Open a new email message.
- Select the From button.
- From the list of From addresses, select the X to remove the entry.


Note
You cannot remove addresses for accounts that have been added to Outlook. These accounts will be at the top of the list and will not have a X next to them.
Additional Microsoft resources
Show From/Bcc Fields
- Open a new email message.
- Select Options, then select From or Bcc in the Show Fields group.


Additional Microsoft resources
Clear the Auto-Complete Cache
Clear Individual entries from the Auto-Complete Cache
- Open a new email message.
- Type the first few characters of the address to remove in the To... field.
- When the entry appears in the list of suggestions, move your mouse pointer over the suggestion until it becomes highlighted, but don't select it.
- When the X icon appears next to the highlighted suggestion, select X to remove the entry from the list, or press the Delete key on the keyboard. This will remove it from the AutoComplete cache.


Clear all entries from the Auto-Complete Cache
- Select File from the top menu bar.
file - From the File menu, select Options.

- Under Options, select the Mail tab, scroll down to the Send Messages section and press Empty Auto-Complete List.

- Press Yes in the confirmation box and the Auto-Complete cache will be completely erased.


Additional Microsoft resources
Manage Your Calendar and Contacts in Outlook
Schedule an appointment
-
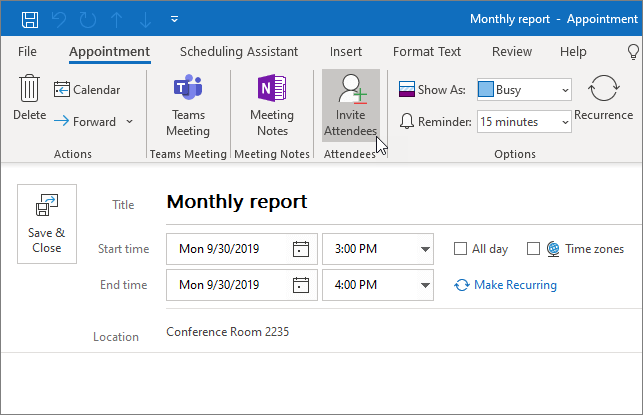
In Calendar, select New Appointment.
-
Add a Subject, Location, and the start and end times.
-
Select Invite Attendees to turn the appointment into a meeting.
-
Select Save & Close to finish, or Send if it's a meeting.
Use the Scheduling Assistant
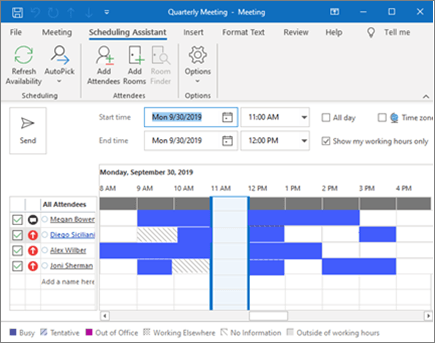
When you create a meeting, use the Scheduling Assistant to see when attendees and rooms are available.
-
From a new meeting request, select Scheduling Assistant.
-
The shaded area with vertical bars shows the meeting time. Drag the bars to adjust the meeting time.
-
The grid shows when attendees are available. To the right of the meeting request, Outlook shows suggested times and the number of conflicts.
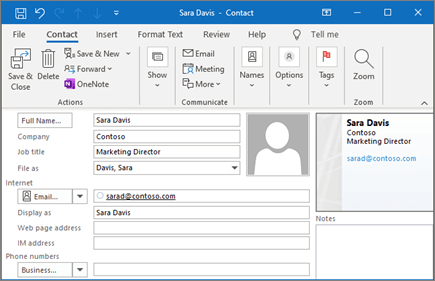
Add a contact
-
Select the People icon.
-
Select New Contact or press Ctrl+N.
-
Enter a name and any other information that you want to include for the contact.
-
Select Save & New to create another contact, or Save & Close if you're done.
Force Download a New Copy of the Global Address List (GAL)
- Open Outlook.
- Select Send / Receive from the top menu bar.

- Select Send/Receive Group.

- Uncheck the box next to Download changes since last Send/Receive, choose either Global Address List or Offline Global Address List and select OK.


A status window will open to indicate that the download is in progress and will close automatically when the download is complete; this can take several minutes.
Additional Microsoft resources
Import Archived Mail from a PST File
You can only import archived mail from the Outlook desktop client. You cannot import for Outlook for the Web.
Locate Your Mail Archive File
- Open Outlook.
- Locate the archive in the list of folders on the left side.

- Right click on the archive folder to open the context menu and select Data File Properties.

- In the data file properties dialog, click on the Advanced button.

- The location of your archive file is listed next to the Filename field. In most cases, this file will be located in your Documents in a folder called Outlook Files. Remember this location. Copy it to a text file if you need to.


Repeat steps 2-5 if you have more than one archive file.
Close the Archive File
- Open Outlook.
- Locate the archive in the list of folders on the left side.
- Right click on the archive folder to open the context menu and select Close "Archive". Archive may be different than what is shown in the image below. It will be whatever the name of the Outlook Data File is. In this case, it is called Arhive. If the name was archive1, then the context menu would show Close "archive1".


Repeat steps 2 and 3 if you have more than one archive file.
Importing you Archived Mail using Outlook.
Now that you have the location of the archive file(s), it is time to import the messages. The following instructions are valid for Outlook 2013, 2016, 2019 and M365.
Note: The Open dialog in Outlook 2013 uses a different set of icons and will looks slightly different than 2016 and 2019. All images below are from Outlook 2019. While the icons may be different the text is identical in all three versions.
You cannot import an archive file that is already loaded in Outlook. It must be closed before you can import it. Please refer to the previous section for instructions on closing the archive file.
- Open Outlook.
- Select File from the top menu bar.
- Select Open & Export then Import/Export.

- On the Import and Export Wizard dialog, select Import from another program or file and clcik on Next.

- On the Import a File dialog, select Outlook Data File (.pst) and click Next.

- Use the Browse button on the Import Outlook Data File dialog to locate the archive file you identified previously. Under the Options section, leave the default selection Replace duplicates with items imported and click on Next.

- To copy all of the messages (including folders) to your A-State M365 inbox:
- Under Select the folder to import from:, click on the top level. This is the default unless you change it.
- Select Include subfolders. This is the default unless you change it.
- Select Import items into the same folder in:. This is the default unless you change it.
- Make sure your email address is select in the dropdown box.
- Click on Finish.


Depending on the size of your archive file, it may take some time to import all the messages.
Repeat steps 2-7 for each additional archive file you want to import.
Additional Microsoft resources
Import/Export Outlook Rules
- Open Outlook.
- On the Home tab, Select Rules then Manage Rules * Alerts.

- Select Options on the Email Rules tab.

- Select Export Rules...

- Using the Save Exported Rules as dialog, browser to where you would like to save the rules and give the file a name.
- After saving the file, click Ok on each dialog window to close them out.


If you need to import your rules, repeat the steps above. On step 4, select Import Rules... and browse to the location of the file previously exported.
Additional Microsoft resources
How to Open a Resource Calendar
To open a Resource Mailbox Room in Outlook for Windows, please follow the instructions below. In order to see newly added Users or Rooms.


From the Calendar pane, select Add Calendar > From Room List under the Manage Calendars group.


Room: Under Address Book, choose All Rooms. (This will list all available Resource Mailbox Rooms.)


You can then either double-click on the Room you want to choose and it will appear in the Rooms at the bottom of the screen, or you can highlight the Room and then select the  Button to add it to the Room field.

Select 

The Resource Mailbox Room you have chosen will appear under Rooms in your Calendar lists.
Additional Microsoft resources
For further assistance, contact the ITS Help Desk at 870-972-3933 or stop by the IT Support Services (itsupportservices@astate.edu). It is located on the bottom floor of the Dean B. Ellis Library, Room 149.
Troubleshooting
Outlook disconnects from your mailbox and you cannot get it to reconnect
Windows:
Solution 1
- First reboot your computer
- Open Outlook and when prompted enter your A-State credentials
Solution 2
- Close Outlook
- Open Windows Credential Manager and remove any credentials that refer to Outlook
- Open Windows Settings and select Accounts and then select Access work or school
- Select your A-State account and click on Disconnect
- If it takes more than a couple of minutes to disconnect your account, please reboot your computer and then attempt to disconnect your account again.
- Open Outlook and when prompted enter your A-State credentials
Solution 3
- Open Outlook and Select File at the top left

- Select Account Settings
- Click your email and then click Remove

- If you receive an error message asking for a Data File to be created, click the Data Files tab, click New, and in the pop-up window, click Ok
- Once removed, click New
- Enter your A-State credentials when prompted
- If you are asked to pick an account type, choose Work or School
- Authenticate with Duo like normal, if prompted
- Once you have signed in, close Outlook and reopen it. It make take several minutes for your content to populate

Checking your version of Office
- Click File
- Click Office Account
- Look for Product Information. This should include the year of the version installed.
- If the version installed is 2013 or earlier, you can submit a work order ticket by signing in to my.astate and selecting Help Desk Ticket
Mac:
- Click Outlook at the top left of your screen. This is by the Apple logo.
- Click Preferences
- Click Accounts
- Make sure your A-State account is selected, and click the minus sign (-) in the bottom left
- Once removed, click the plus sign (+)
- You may have to click New Account
- Enter your A-State credentials
- If you are asked to pick an account type, choose Work or School
- Authenticate with Duo like normal if prompted
- Click Done
Checking your version of Office
- Click Outlook at the top left of your screen. This is by the Apple logo.
- Click About Outlook
- If the version installed is 2013 or earlier, you can submit a work order ticket by signing in to my.astate and selecting Help Desk Ticket
Plus Addressing in Exchange Online
What is plus addressing
Plus addressing, also known as sub-addressing, allows you to create variations of a normal email address that will still be delivered to your institutional email account.
An email address uses the basic syntax: <local-part>@<domain>. For example, bsomeone@astate.edu.
Plus addressing uses the syntax: <local-part>+<tag>@<domain>. For example, bsomeone+newsletter@astate.edu.
The original email address must be valid. The +tag value that you add is arbitrary, but it cannot contain spaces.
Plus addressing can be used in any email client that sends emails and you can receive emails addressed to you using plus addresses as you would normal emails.
Using plus addressing
To use this feature, append a + sign and desired descriptor after your account name and before the @ symbol (e.g., bsomeone+prtcommittee@astate.edu).
You cannot send from a plus address.
Some web forms don't support plus signs in email addresses.
As plus addresses are not aliases that are configured on the mailbox, they don't resolve to a user's name in Outlook clients. This limitation results in plus addresses being easily identifiable in the To or CC fields of messages. However, there might be scenarios where you can't use a plus address for a Microsoft service that needs to be associated with your mailbox.
To automatically identify and filter messages that are sent to plus addresses, use Inbox rules to act on those messages. Using the condition Recipient address includes, you can specify an action for messages sent to a particular plus address. For example, you can move messages sent to a plus address to a folder.
Plus addressing may be used on user, distribution group and M365 group email addresses.
Why Use Plus Email Addressing?
The full address, including the extra information, can act as a label and can be useful for managing email and site registrations. Here are two examples:
-
Use plus addressing when you sign up for different newsletters or community lists to easily filter or create rules for them, which can help you organize, search, and file the messages you receive from those senders.
-
Plus addressing is useful for creating disposable addresses that can prevent spam from coming to your mailbox. If you need to enter your email address in a form, you can enter a variant address in that form. After you get the required email, you can set up a block to never receive an email at that address again.
Manage an Email Distribution List in Outlook
Note: Only a specific type of Distribution List can be managed in Outlook, contact ITS_SYSTEMS@astate.edu if you're unsure if your Distribution List qualifies.
- Open Microsoft Outlook and then open the Address Book.

- Check that you are using the Global Address List as the Address Book instead of the Offline Global Address List.
- Type in the full or partial name of the distribution list you want to modify.
- Double click on the distribution list in the list to open it.

- Click Modify Members.

- To add a member to the distribution list, click Add...
- Alternatively, to remove members, select the names you wish to remove from the left pane. Click Remove on the right to remove them from the distribution list, then click OK to save your changes.

- Type the name of the person you want to add.
- Double click the person’s name in the list.
- The name will appear in the Add section at the bottom of the window.
- Once you’ve added all desired members, click OK(Email ITS_SYSTEMS@astate.edu if adding a large amount of members).

- Click OK on all open windows to save your changes, and you’re done!
Entra ID Join Procedure - Remote Assets
Before completing the steps in this document be sure that you have backed up all files from your current local profile to OneDrive. At the end of this joining process you will no longer be accessing the managed asset using a local account. For additional information on OneDrive, please see the following KB Articles: https://kb.astate.edu/books/microsoft-365/chapter/onedrive
1. Purpose
This procedure establishes the necessary steps for an institutionally owned and managed asset to be joined to A-State’s Microsoft Entra ID tenant. To ensure compliance with university standards and a consistent experience for users, all technology resources shall be configured to meet a minimum standard. Remote devices that are not joined to the on-premise domain must be manually joined to Entra ID to ensure compliance with these standards.
2. Scope
This standard applies to all Arkansas State University (A-State) owned technology resources and users of those resources.
3. Definitions
Entra ID – Entra ID is Microsoft’s cloud-based identity and access management (IAM) service, parallel to on-premise Active Directory.
4. Responsibilities
IT Security Team – Responsible for the technical configuration of device join settings in Entra ID, including the permissions of who is able to join devices.
ITS Endpoint Technician – Responsible for assisting users in their area of support with the Entra join process.
User – Responsible for enrolling their remote assets into Entra ID and ensuring all necessary files are backed up prior to this enrollment.
5. Entra ID Join Steps
Need assistance with these steps? You can request support with this process from your assigned zone technician in completing these steps. https://kb.astate.edu/books/endpoint-technicians-team/page/its-zone-structure
- On your A-State owned asset, sign in and go to system settings.
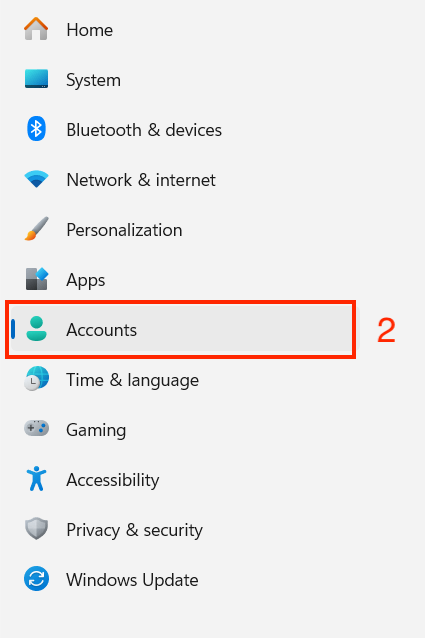
- On the left, select “Accounts”.

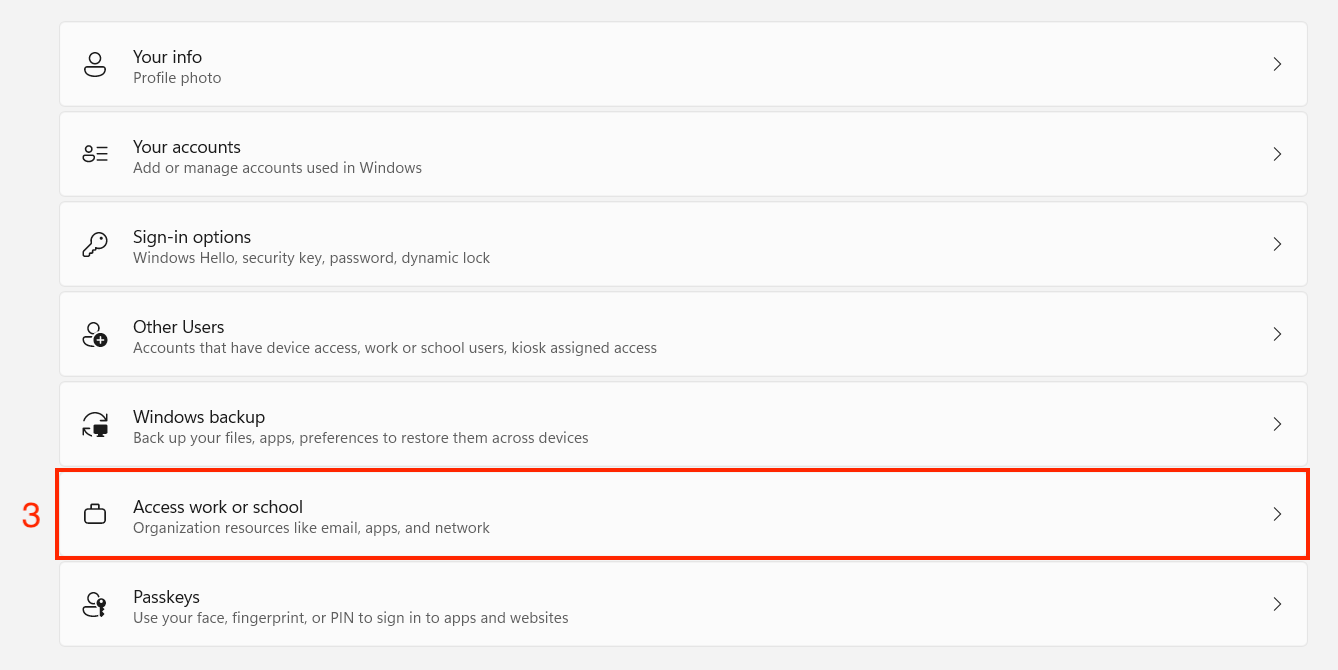
- Find and select “Access work or school”.

- In the “Add a work or school account” section, click “Connect”.

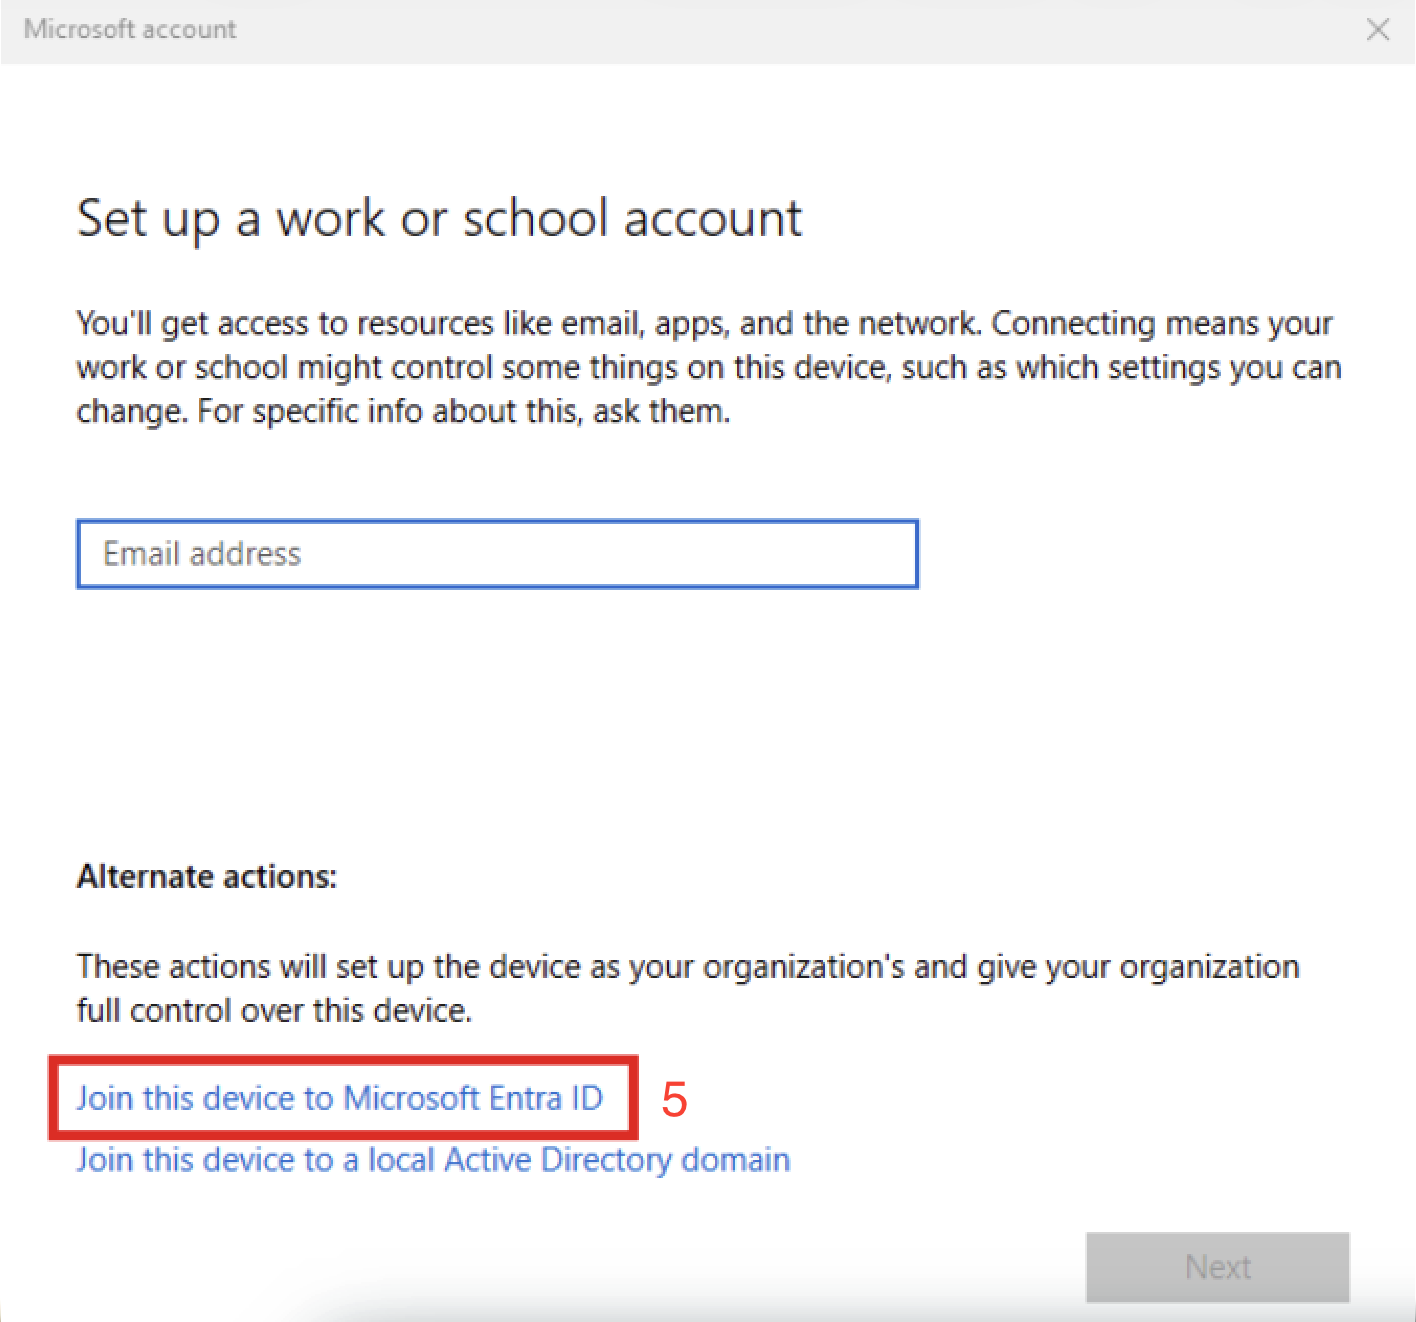
- At the bottom of the window, there is text that says, “Join this device to Microsoft Entra ID”. Click on that text.

- A Microsoft credential window will pop-up, enter your A-State email and password.
- A window should pop up asking you to accept, and/or a confirmation window asking you to “Make sure this is your organization”. Hit Accept/Join.
- You should receive a message stating that your device has been connected to A-State.


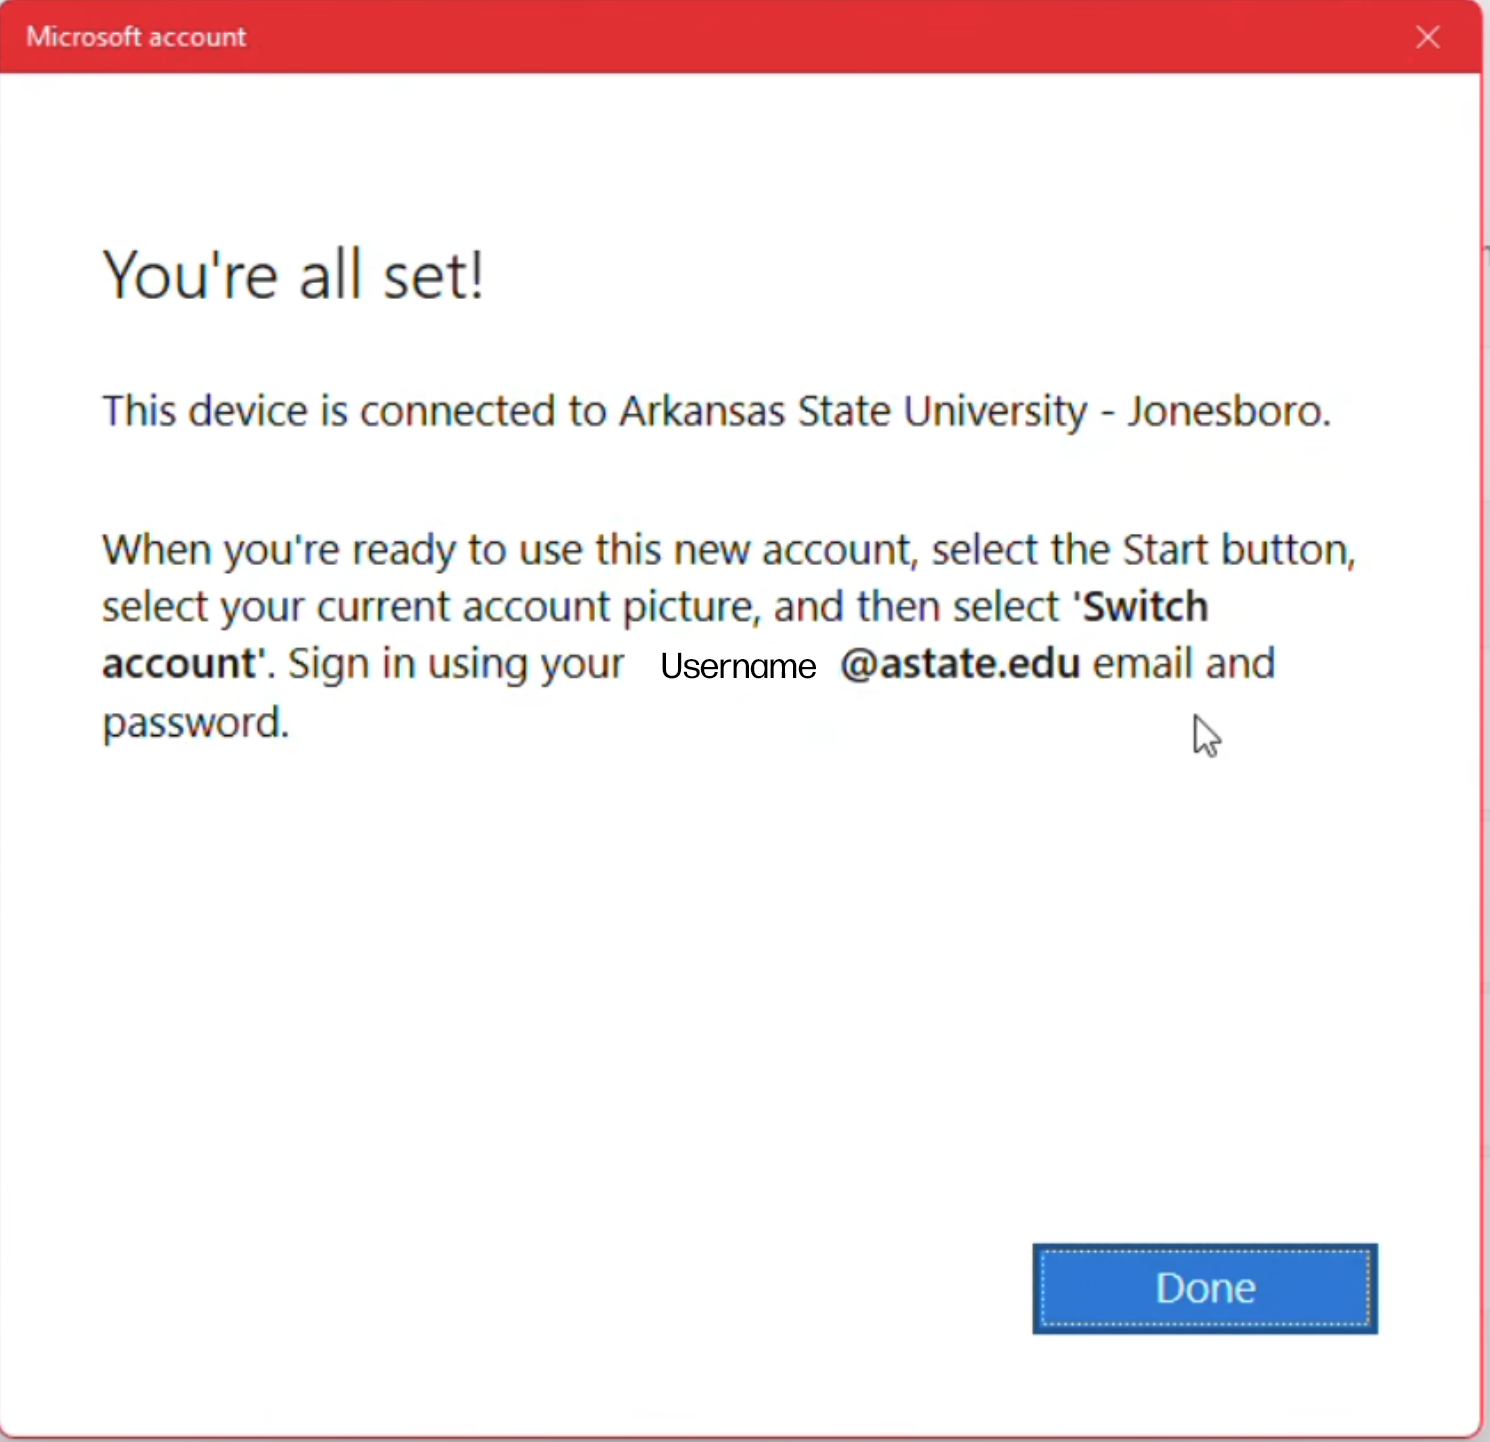
6. Next Steps
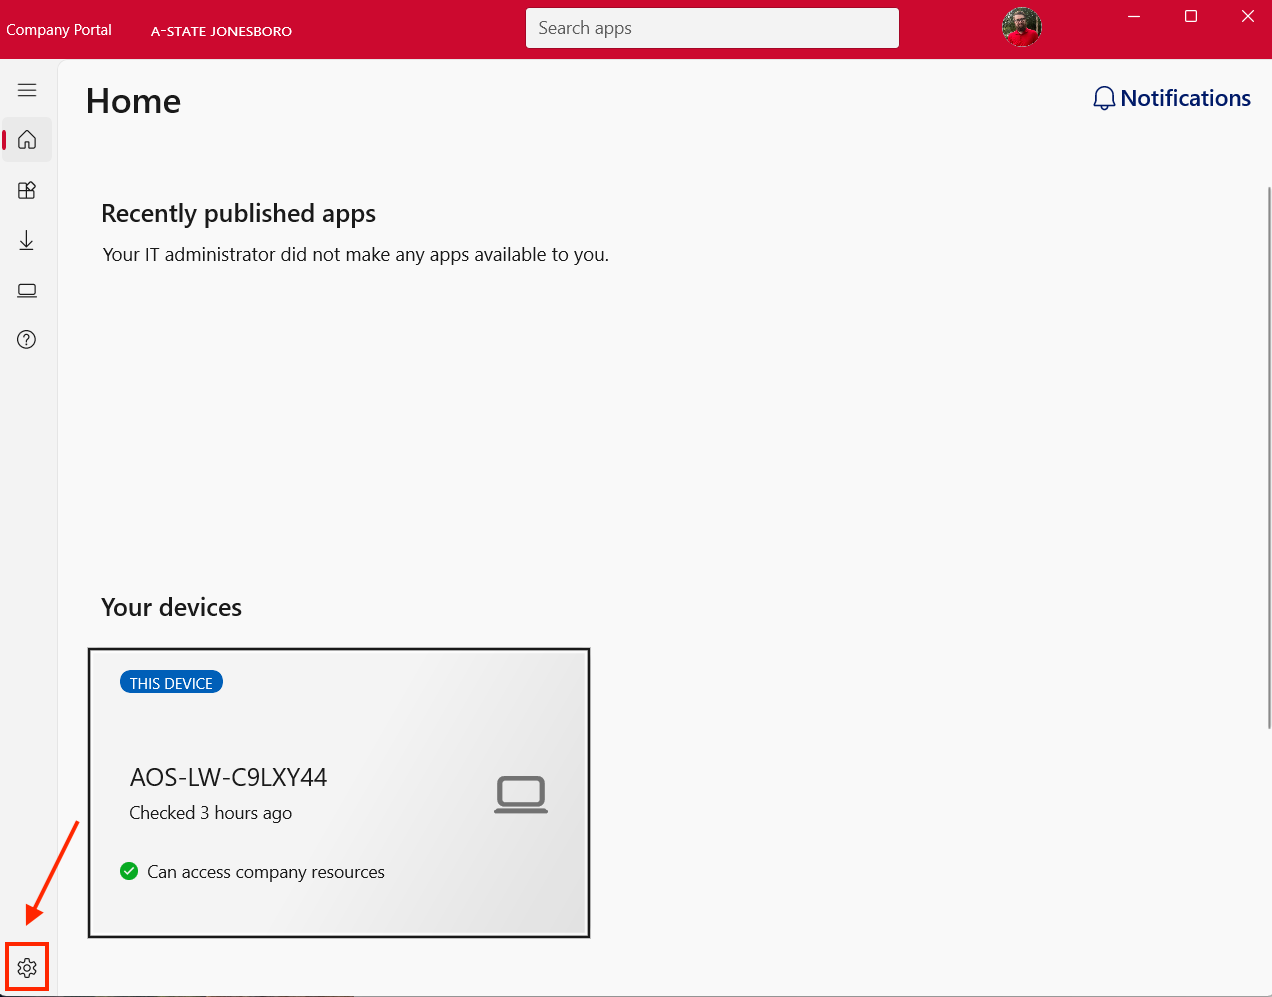
To speed up the Intune sync process you can manually start a sync using the Company Portal application on your device. To do this you can do the following:
- Press the Windows key and type "Company Portal"
- If no application shows up, you may have to wait for the application to be automatically installed.
- Sign in using your work credentials.
- On the home page select the settings icon in the bottom left corner.

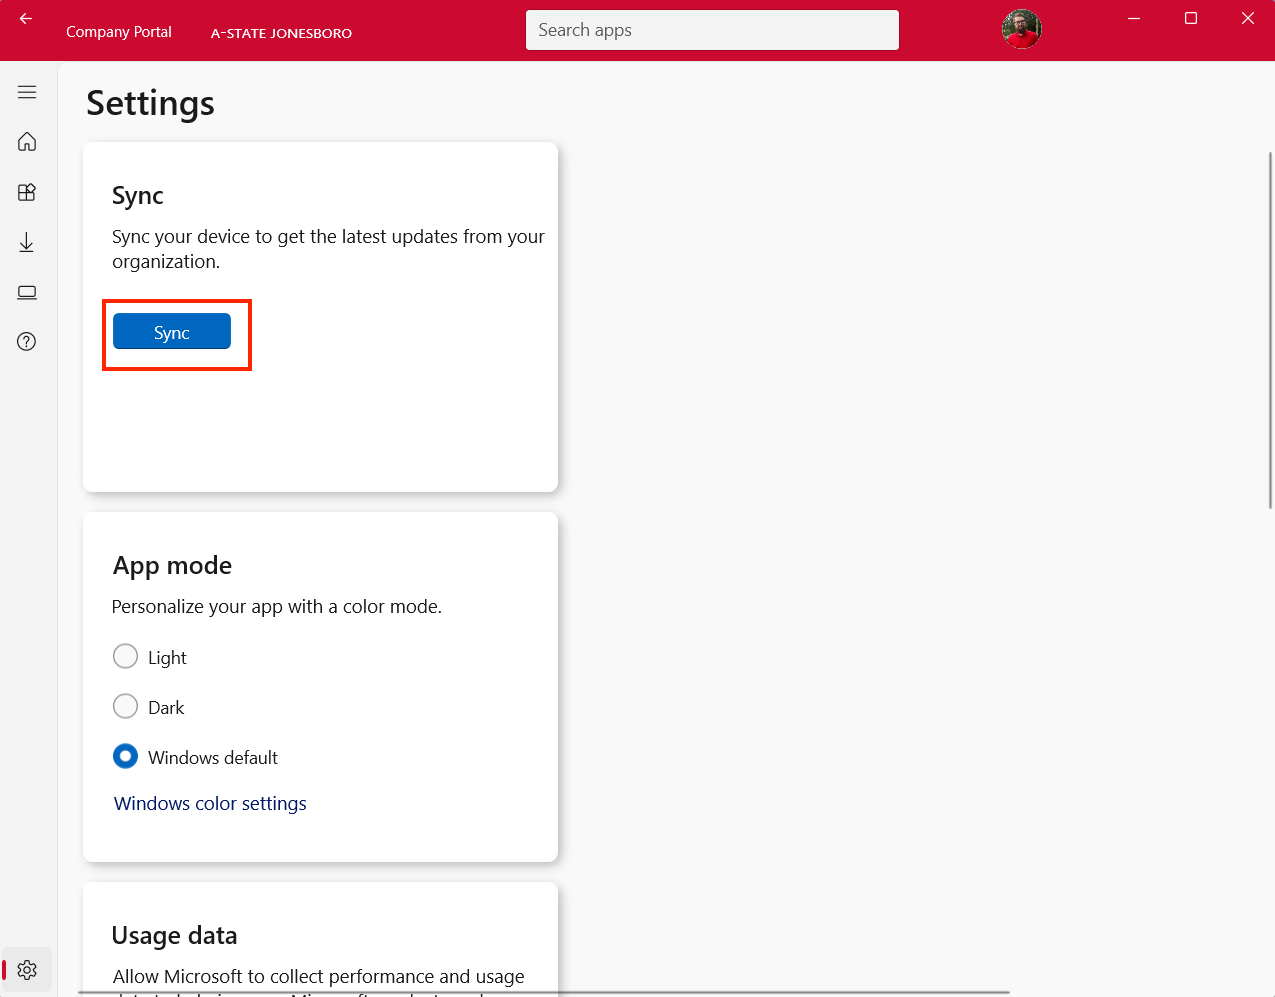
- In settings select the "sync" button.

- Sync times may vary, so please allow 5-30 minutes for this to complete.
- Once this is completed you will need to restart your device.
Before restarting your device be sure that you have backed up all files from your current local profile to OneDrive. At the end of this joining process you will no longer be accessing the managed asset using a local account. For additional information on OneDrive, please see the following KB Articles: https://kb.astate.edu/books/microsoft-365/chapter/onedrive
BitLocker Recovery Guide
Before completing the steps in this document be sure that you have not modified any internal components or peripherals of the impacted device (hard drive, motherboard, network interface card, external storage drive etc.) and that you have attempted to restart the device prior to troubleshooting. If your devices hardware has been modified, removing it and restarting may resolve your issue.
1. What is BitLocker?
BitLocker is Microsoft’s full-disk encryption feature built into supported editions of Windows that helps protect data by encrypting the entire drive. BitLocker safeguards information on desktops, laptops, and removable drives from unauthorized access if a device is lost, stolen, or improperly accessed. It commonly uses a Trusted Platform Module (TPM) to securely store encryption keys and verify system integrity during startup, helping prevent attackers from accessing data by removing the drive or bypassing the operating system. When configured, BitLocker provides strong data protection with minimal impact on the user experience and is widely used by organizations to support security, compliance, and data protection requirements.
2. Why Does A-State Use BitLocker?
The Information and Technology Resource Security Policy requires A-State to encrypt the full disk of every institutionally owned asset. This encryption is not optional and is enforced using our campus mobile device management (MDM) platform Intune.
3. The BitLocker Recovery Screen
If your computer displays the BitLocker Recovery screen after powering on, BitLocker has detected a change that requires verification before it can unlock the encrypted drive. This screen looks similar to the following:
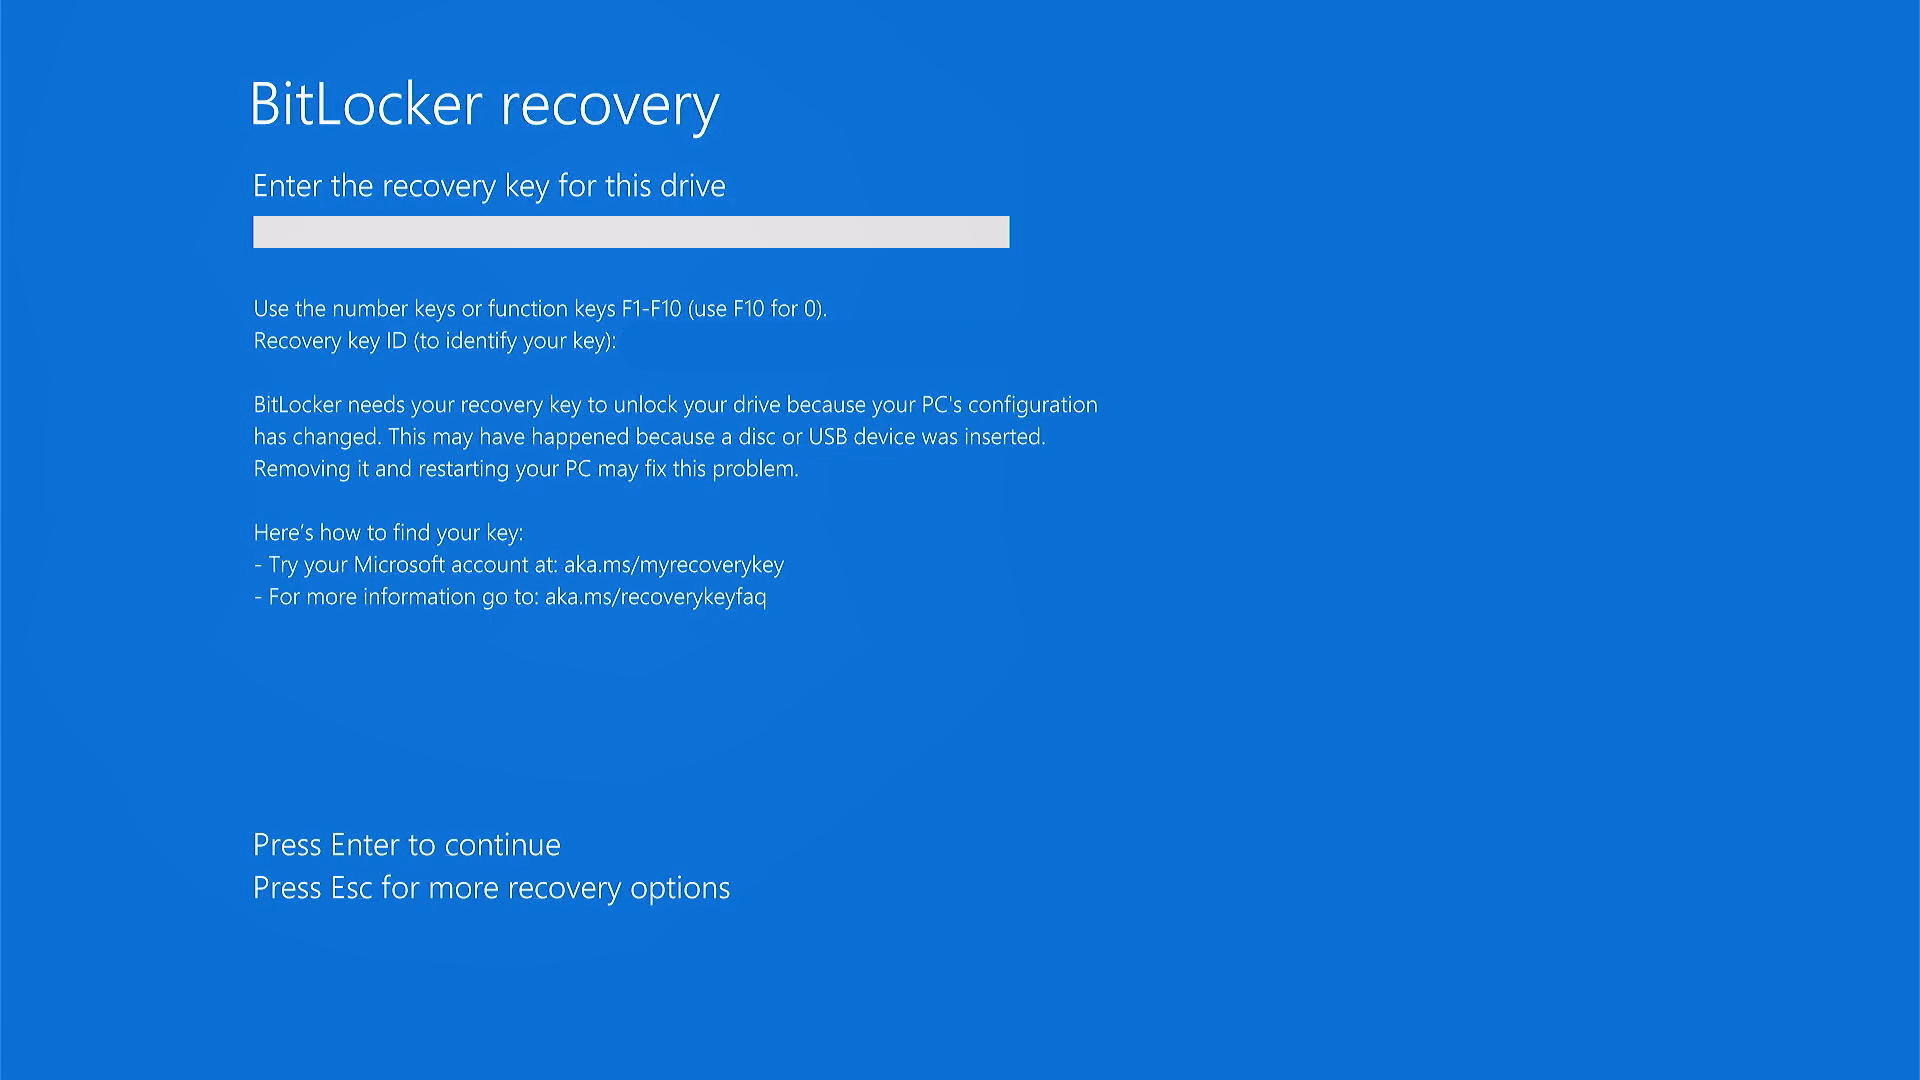
This can occur after hardware changes, BIOS/UEFI updates, firmware updates, security setting changes, TPM issues, or other events that affect the system's startup integrity checks. To regain access to the device, a user can enter the 48-digit BitLocker recovery key when prompted. Recovery keys are stored in two locations for domain joined devices and must be provided to you by your zone technician if an initial restart does not resolve your issue.
Need assistance? You can request support through the TDX Client Portal.
OneDrive
Wondering how to use OneDrive? Checkout this chapter for an overview.
Limitations and Restrictions
Restrictions
When sharing files or folders you must explicitly list each user or group you would like to share with. The share option 'Anyone with the link can...' is disabled. This does not restrict whom you can share with. You can still share files and folders with users outside of the A-State organization, however, you have to explicitly list the user or group you would like to share with.
Limitations
Syncing between OneDrive Business accounts and OneDrive Personal accounts is not supported by Microsoft at this time. You can still share with users that only have Personal OneDrive accounts (accounts that are not tied to an organization), however, the user will only be able to access the shared file or folder from a web browser.
Additional Microsoft resources
- Quick Start Guide
- OneDrive Training
- OneDrive Restrictions and Limitations
- OneDrive Help
- Download PDF: OneDrive Quick Start Guide
Set Up the OneDrive Sync App
Set up the OneDrive sync app in Windows
-
If you don't have Windows 10, Microsoft 365, Office 2016 or Office 2019, install the new OneDrive sync app for Windows. If you use the latest software, you already have the OneDrive sync app and you can skip to step 2.
-
Select the Start button, search for OneDrive, and then open it.
-
When OneDrive Setup starts, enter your work or school account, and then select Sign in.
- If prompted to choose a Work or school account or a Personal account, always pick the Work or school account.

Note: If you already had an account signed in to OneDrive and you want to add another account, select the OneDrive cloud icon in the Windows taskbar notification area, select More > Settings. In Settings, select Account, select Add an account, and then sign in.
For more info, see Sync files with OneDrive in Windows.
Set up the OneDrive sync app on Mac
-
Important: If you're using the OneDrive Mac Store app, uninstall it before installing the latest build of the sync app.
-
Start OneDrive by pressing cmd + Space to launch a Spotlight query and type OneDrive. This starts OneDrive Setup.
-
Enter your work or school account and then select Sign in.
- If prompted to choose a Work or school account or a Personal account, always pick the Work or school account.

For more info, see Sync files with OneDrive on Mac OS X.
Additional Microsoft resources
- Quick Start Guide
- OneDrive Training
- OneDrive Restrictions and Limitations
- OneDrive Help
- Download PDF: OneDrive Quick Start Guide
Important PC Folders (Auto Backup)
You can backup important computer files on OneDrive like your Desktop, Documents, and Pictures files.
-
Select the OneDrive cloud icon in the notification area (right side of the Windows Taskbar just before the clock).
-
Select Help & Settings > Settings.
-
On the Backup tab, under Important PC Folders, select Manage backup and follow the instructions.

- In the Back up your folders dialog, make sure the folders that you want to back up are selected.


Additional Microsoft resources
- Quick Start Guide
- OneDrive Training
- OneDrive Restrictions and Limitations
- OneDrive Help
- Download PDF: OneDrive Quick Start Guide
Manage Files and Folders in OneDrive
Select what to do with a file
-
In OneDrive, right click the file.
-
Select a command.

-
Select New > Folder.
-
Type a name for the folder.
-
Select Create.

Search for files
Looking for an older doc? Search is a powerful tool to find all your online docs.
-
Type a word or phrase in the Search box.
-
Select a file, or press Enter.

Additional Microsoft resources
- Quick Start Guide
- OneDrive Training
- OneDrive Restrictions and Limitations
- OneDrive Help
- Download PDF: OneDrive Quick Start Guide
Upload and Save Files and Folders to OneDrive
Use OneDrive in your browser
-
Sign in to office.com, then select the app launcher
 > OneDrive.
-
Pick a file or folder by selecting the circle to the left of the item, and then select a command at the top of the page.
Note: The circle does not show until you mouse over the item.


You can store over 300 types of files on OneDrive. From a web browser:
-
Select Upload > Files or Upload > Folder.
-
Select the files or folder you want to upload.
-
Select Upload, Open or Select Folder.

Use OneDrive on your desktop
If you use Windows 10, OneDrive may have already asked you to sign in to sync your files.
If OneDrive isn't installed on our computer or setup, please refer to the following KB Article:
Windows 10
In File Explorer, select: OneDrive - Arkansas State University - Jonesboro.

Save and open files in your Office apps
-
Select File > Save as > OneDrive - Arkansas State University - Jonesboro to save a work file to OneDrive.
-
Select File > Open and then select OneDrive, to open a file saved to OneDrive.
Note: Requires Microsoft 365, Office 2019, or Office 2016.

Additional Microsoft resources
- Quick Start Guide
- OneDrive Training
- OneDrive Restrictions and Limitations
- OneDrive Help
- Download PDF: OneDrive Quick Start Guide
Collaborate in OneDrive
Default Settings
File and folder links
- The default type of link that is selected when sharing files or folders is Specific people
- The default permission level is View
Limitations and Restrictions
Please refer to the Limitations and Restrictions page.
Share OneDrive files from your Office apps
To share a file from within Word, Excel, PowerPoint, or another Office app:
-
Select
 Share on the ribbon (generally located on the right side of the ribbon).
Or, select File > Share.
Note: If your file is not already saved to OneDrive, you'll be prompted to upload your file to OneDrive to share it.
-
Select who you want to share with from the drop-down, or enter a name or email address.
-
Add a message (optional) and select Send.


Share files from OneDrive on the web
-
Right click the file and select Share.
Or, select a file and select
Share on the toolbar. -
Select who you want to share with from the drop-down, or enter a name or email address.
-
Add a message (optional) and select Send.

Change views
The left pane lets you filter your view of items in OneDrive.
-
My Files - See all of your OneDrive files and folders.
-
Recent - See which Office documents you've opened most recently, whether you've modified them or not.
-
Shared - See items that you've shared with other people and that other people have shared with you.
-
Recycle bin - See items and folders that you've deleted.

Stop or change sharing
If you are the file owner, or have edit permissions, you can stop or change the sharing permissions.
-
Select the file or folder you want to stop sharing or change.
-
Right click on the file and select Manage access.
Or, select Information icon in the upper-right corner to open the Details pane.
Under the Has access section, select Manage access. - To remove or change the sharing permissions
- To completely stop sharing the item, select Stop sharing at the top of the Manage Access pane.
- To remove a link or change the permissions, click the three dots next to the link to open the Link settings pane.
- To delete the link, select the X next to the link.
- To change the link permissions, select the dropdown arrow under Link settings and choose the appropriate permission setting (Can Edit or Can View).
- To remove a user's access to the link, select the X next to the account you want to remove.
- To allow additional users access to the link, under the section This link works for, select Specify people for this link and type in the user's name or email address


Copy link
-
Select a file and select
 Copy link.
-
Or, right click a file and select Copy link.


Additional Microsoft resources
Work on the Go with OneDrive
Share a file from your mobile device
-
Open the OneDrive app on your mobile device.
-
Select a file or folder - press and hold until the checkmark appears next to it.
-
Tap the
 Share icon.

Open a file in an Office app
-
Open an Office app like Word, Excel, or PowerPoint on your device.
-
Tap Open, then tap OneDrive - Arkansas State University - Jonesboro.
-
Browser to the file and open it.
- If you would like to share the file, tap the Share icon.
Open your files on your mobile device
- Open the OneDrive app on your mobile device.
-
Tap a file to preview it.
- Tap the More icon (three vertical dots) in the upper right corner.
- For Office files, tap Open to open the file in the default Office app.
- For other files types, select Open in another app
Additional Microsoft resources
- Quick Start Guide
- OneDrive Training
- OneDrive Restrictions and Limitations
- OneDrive Help
- Download PDF: OneDrive Quick Start Guide
Sharing File and Folders in OneDrive
Overview
By default, the files in your OneDrive are private. You control access by sharing them. Shared folders with Edit permissions can be added to another user’s OneDrive, allowing them to sync and work on the files offline.
Caution: When sharing folders with Edit permissions, recipients can see all contents of the folder. Be mindful of what you share.
Note: Recipients can only add folders to their OneDrive—not individual files. If you want to share only specific files, place them in a folder first.
Sharing Options
When sharing in OneDrive, you have two main choices:
-
Copy link – Creates a link that can be shared broadly (social media, email, etc.). Anyone with the link can view or edit (based on permissions you choose).
-
Specific people – Grants access only to the individuals or groups you select.
Tip: You can also right-click a file/folder in the OneDrive desktop app and select Share a OneDrive link. By default, this link allows editing. To adjust permissions, use the steps below.
How to Share Files and Folders
-
Go to the OneDrive website and sign in with your A-state account.
-
Select the file(s) or folder(s) you want to share.
-
List view – click the circle to the left of the item.
-
Tiles view – click the circle in the top-right of the item.
-
-
At the top of the page, click Share.
-
Choose one of the following link types:
-
People in [Your Organization] – Anyone in your organization with the link can access.
-
People with existing access – Sends a link without changing permissions.
-
Specific people – Only individuals you enter will have access.
-
-
(Optional) Under Other settings, adjust:
-
Allow editing (default ON) – Lets recipients modify or delete items. Turn off to make the link view-only.
-
Block download – Prevents downloads; users can only view online.
-
Expiration date – Set a date when the link stops working (Microsoft 365 only).
-
Password – Require a password to open the link (Microsoft 365 only).
-
Open in review mode only – For Word files, restricts recipients to comments/suggestions.
-
-
Click Apply.
-
Select Copy link (or Send) and share it via email, chat, or post.
-
Links will appear as https://1drv.ms/ shortened URLs.
-
Troubleshooting Sharing Links
-
If a link stops working, it may be because:
-
The file/folder was moved or renamed.
-
The owner stopped sharing it.
-
-
If you move new files into a shared folder, you may need to share them again.
-
To fix a broken link you created, simply generate a new sharing link.
For further assistance, contact the ITS Help Desk at 870-972-3933 or stop by IT Support Services (itsupportservices@astate.edu). It is located on the bottom floor of the Dean B. Ellis Library, Room 149.
Teams
Troubleshooting Teams for Mac OS
-
Ensure you have the latest Mac OS device
-
Open System Settings from the Apple menu (top left corner of screen)
-
Select General
-
Click Software Update
-
-
Uninstall Teams. Quit Teams by right clicking the Teams app in the dock, then holding down Option and clicking Force Quit. Open the Application Folder, select Microsoft Teams, and move it to the Trash
-
Clear the Teams Cache
-
Try rebooting your device and reinstall Teams from the Microsoft website
For further assistance, contact the ITS Help Desk at 870-972-3933 or stop by IT Support Services (itsupportservices@astate.edu). It is located on the bottom floor of the Dean B. Ellis Library, Room 149.
Troubleshooting Teams for Windows
-
Ensure you have the latest Windows update
-
Go to Settings
-
Windows Update
-
Check for Updates
-
-
Uninstall Teams. Quit Teams by right clicking the Teams app in the dock, then holding down Option and clicking Force Quit. Open the Application Folder, select Microsoft Teams, and move it to the Trash
-
Clear the Teams Cache.
-
Quit Teams
-
Open the Run dialog box by pressing the Windows logo key+R
-
In the Run dialog box, enter the following path, and then select OK: %appdata%\Microsoft\Teams
-
Delete all files and folders in the directory
-
Restart Teams
-
-
Try rebooting your device and reinstall Teams from the Microsoft website
For further assistance, contact the ITS Help Desk at 870-972-3933 or stop by IT Support Services (itsupportservices@astate.edu). It is located on the bottom floor of the Dean B. Ellis Library, Room 149.
Microsoft 365 Groups
Microsoft 365 Groups is a service that works with the Microsoft 365 tools you use already so you can collaborate with your teammates when writing documents, creating spreadsheets, working on project plans, scheduling meetings, or sending email.
What are Microsoft 365 Groups?
Groups in Microsoft 365 let you choose a set of people that you wish to collaborate with and easily set up a collection of resources for those people to share. Resources such as a shared Outlook inbox, shared calendar or a document library for collaborating on files.
You don’t have to worry about manually assigning permissions to all those resources because adding members to the group automatically gives them the permissions they need to the tools your group provides. Additionally, groups are the new and improved experience for what we used to use distribution lists or shared mailboxes to do.
Owners, Members and Guests
Group owners are the moderators of the group. They can add or remove members and have unique permissions like the ability to delete conversations from the shared inbox or change different settings about the group.
We recommend that each group have at least two owners.
Group members are the regular users in your organization who use the group to collaborate. They can access everything in the group but can't change group settings or delete conversations from the shared inbox.
Guests are like group members, but they are outside your organization.
Group Resources
You can access these resources through the Microsoft Outlook desktop client (2016 or newer), via Outlook on the web, via Outlook 2016 for Mac (shared inbox only), or via Outlook mobile. You'll find your Microsoft 365 Groups in the navigation pane on the left in Outlook desktop or on the Web.
Default Group Settings
- Groups are created as Private. This means that only group members can view group content.
- Email sent to the group address is not delivered to members' inboxes. Members have to visit the group workspace to view the conversations and events.
- People outside the A-State organization cannot send email to the group.
- Group address is visible in the Global Address Book.
Limitations
Group Expiration Policy
Microsoft 365 groups are set to expire after 180 days of inactivity. The expiration period begins when the group is created, or on the date it was last renewed.
When a group expires, all of its associated services (the mailbox, Planner, SharePoint site, team, etc.) are also deleted.
When a group expires it is "soft-deleted" which means it can still be recovered for up to 30 days.
Groups that are actively in use are renewed automatically. Any of the following actions will auto renew a group:
How and when a group owner learns if their groups are about to expire
Group owners will only be notified via email.
30 days before the group expires, the group owners will receive an email allowing them to easily renew the group. If they don't renew it, they'll receive another renewal email 15 days before expiration. If they still haven't renewed it, they will receive one more email notification the day before expiration.
If for some reason none of the owners renew the group before it expires, the ITS Systems team can still restore the group for up to 30 days after expiration.
Guest Access to Microsoft 365 Groups
Guest access in Microsoft 365 Groups lets you and your team collaborate with people from outside A-State by granting them access to group conversations, files, calendar invitations, and the group notebook. Access can be granted to a guest—for example, a partner, vendor, supplier, or consultant—by any group owner.
How it works
People using Microsoft 365 Groups can use Outlook on the web or Outlook for Windows to add and manage guests in their Microsoft 365 groups. Guests can have any email address, and their email account can be a work, personal, or school account.
When sharing OneDrive folders/files, syncing between OneDrive Business accounts and OneDrive Personal accounts is not supported by Microsoft at this time. You can still share with guests that only have Personal OneDrive accounts (accounts that are not tied to an organization), however, the user will only be able to access the shared file or folder from a web browser.
- A group owner adds a guest to the group.
- The group owner is informed of which content and resources the guest can access within the group. A combination of text and icons gives all group members a clear indication of guest participation.
- The guest receives a welcome email and can participate in group conversations, receive and respond to calendar invitations, and access the group files.
- Guests can leave the group at any time via a link in the footer of all group email messages and calendar invitations.
When a guest is invited to join a group, they receive a welcome email message that includes a little information about the group and what they can expect now that they're a member. The message also includes a set of links to help them get started and connect to group resources.
All of the guest member's interactions occur through their email inbox. They can't access the group site but can receive calendar invitations, participate in email conversations, and, if the admin has turned on the setting, they can open shared files using a link or attachment.
All group email messages and calendar invitations the guest receives will include a reminder to use Reply all in responses to the group, along with links to view group files and leave the group.
The following table summarizes what guests can and can't do.
Changing Group Settings
Group settings can be updated from several different M365 apps. Below are instructions for the Outlook desktop app.
Only group owners can change group settings.
- Open the Outlook desktop app.
- In the navigation pane, under Groups, select the group you want to change the settings for.

- On the ribbon, select Home > Group Settings > Edit Group.


The following group settings can be updates from the Edit Group dialog.
- Group name
- Description
- Privacy
- Private - private groups aren't open for everyone to join them and the group owners are the only ones that can add members. Only group members can access group content.
- Public - public groups can be joined by everyone without approval from a group owner. Anyone can access group content.
- Add/remove members
- Delete the group
- Let people outside of the organization email the group
- This setting allows people outside of A-State to send an email to the group. This option should be carefully considered as it will expose the group to possible SPAM messages.
- Subscribe new members so they receive group emails in their inbox
- If enabled, anything sent to the group appears in user inboxes, including invitations to Teams meetings.
- When you change this setting, the user preferences for all members of the group will automatically be updated.
- Promote member to owner
- Demote owner to a member
You cannot change the group email address or add aliases.
Accessing Group Files
Depending on how you prefer to work, you can access group files from several different locations.
Web applications
From any web browser, go to https://office.com and sign in using your A-State account.
You can easily switch among Microsoft apps by selecting the app launcher  from the upper left corner of the page and click an app icon.
You can access group files from the Outlook, OneDrive, Teams or SharePoint apps.
Outlook for the web
Expand the Groups list in the left navigation pane and select the group you want to access.

Once you select the group, you will see the group inbox and some icons at the top. To access the group files, click on the File icon to load the group files.

OneDrive for the web
|
|

Microsoft Teams for the web
Accessing group files from the web version of Teams is identical to the desktop version. Please refer to the Microsoft Teams instructions below.
Desktop applications
Please make sure you have the latest version of Microsoft 365 apps installed. Please refer to this KB for instructions on installing Microsoft 365 apps.
Outlook
Expand the Groups list in the left navigation pane and select the group you want to access.

Once you select the group, you will see the group inbox and the Home ribbon will now have a section specific to the group. Select the Files icon to view the group files. This will open the group SharePoint document library in your default web browser.

To add a shortcut to the group files to your OneDrive, after the SharePoint document library opens in your web browser, click on Add shortcut to OneDrive.

If you do not see the option to add the shortcut, click on the three dots to show the additional menu items.
Microsoft Teams
Select the Teams icon in the left navigation pane.

Select the Team that you would like to access the files for. The General channel for the team is where the group files are located, so select it and then click on Files.

To add a shortcut to the group files to your OneDrive, click on Add shortcut to OneDrive. If you do not see the option to add the shortcut, click on the three dots to show the additional menu items.

FAQ
Get a copy of group email messages you send
By default, when you send an email message to an Outlook group that you're a member of, you don't receive a copy of that message in your Inbox. You can change this setting.
-
Sign into your mailbox by using Outlook on the web, and then select Settings > view all Outlook settings.
-
Select Mail > Groups.
- Select the Send me a copy of email I send to a group check box.
How to add or remove group members
Any member of a group can invite others to the group, but only the group owner can add or remove them.
Please refer to Add and remove group members in Outlook for the latest Microsoft instructions.
How to join a group
When you join a group, you gain access to the group mailbox, calendar, OneNote notebook, and team site. Permissions are taken care of automatically so you don't need to worry about missing any meetings or conversations.
Please refer to Join a group in Outlook for the latest Microsoft instructions.
How to leave a group
When you leave a group, you give up your access to the group inbox, calendar, OneNote notebook, and library. The only way to regain access is to rejoin the group.
Please refer to Leave a group in Outlook for the latest Microsoft instructions.
How to schedule a meeting on a group calendar
Each group has a shared calendar where you and every member of your group can schedule, edit, and see upcoming events.
Please refer to Schedule a meeting on a group calendar in Outlook for the latest Microsoft instructions.
How to share group files
A Microsoft 365 group makes sharing files easy by including a dedicated library, which is the primary place for storing all your group files.
Please refer to Share group files in Outlook for the latest Microsoft instructions.
How do I delete email from the group shared mailbox
Only group owners can delete messages from the group shared mailbox. Members can delete the group messages that have been delivered to their inboxes but not from the group inbox.
How do I add subfolders to a group shared mailbox
- Sign into your mailbox by using Outlook on the web, and then expand the group in the left side navigation so you can see the group's Inbox folder.
- Right click on the Inbox to open the context menu and select Create new subfolder.
How do I add mail rules to a group shared mailbox
You cannot view/modify rules from Outlook mobile apps.
Mail rules are very limited for group shared mailboxes. You can only create rules to move, copy, delete or forward.
- Sign into your mailbox by using Outlook on the web and select the group in the left side navigation.
- Click on the three horizontal dots from the menu ribbon and select Rules > Manage rules.
- To create a new rule, select Add new rule.
Shared A-State Email Addresses
Need a @astate.edu email address for your college, department or program? We have several options available with Microsoft 365.
- Microsoft 365 Groups are used for collaboration between users, both inside and outside of A-State.
- Distribution groups are used for sending email notifications to a group of people.
- Shared mailboxes are used when multiple people need access to the same mailbox, such as college or department information email addresses.
Microsoft 365 Groups
Microsoft 365 Groups are used for collaboration between users, both inside and outside A-State. With each Microsoft 365 Group, members get a group email and shared workspace for conversations (shared inbox), files, calendar events, and a Planner.
Only group owners can delete messages from the shared inbox associated with the group.
You can add people from outside of A-State to the group and allow external senders to send email to the group email address.
Microsoft 365 Groups can be accessed through the Outlook mobile app (iOS and Android), Outlook for the web, and the Outlook desktop application (Windows or MacOS).
Microsoft 365 Groups are accessible from Outlook apps only.
For more information on Microsoft 365 Groups, please refer to What are Microsoft 365 Groups article.
Distribution groups
Distribution groups are used for sending notifications to a group of people. They can receive external email if requested.
All messages sent to the group address will be forwarded to each member of the group. There is no mailbox associated with the email address and group members do not need to configure anything in their mail clients.
Shared mailboxes
- Full Access group - members of this group can open the shared mailbox and act as the owner of that mailbox. After accessing the shared mailbox, a user can create calendar items; read, view, delete, and change email messages; create tasks and calendar contacts. However, a user with Full Access permission can't send email from the shared mailbox unless they are a member of the Send As group.
- Send As group - members of this group can impersonate the shared mailbox when sending mail (send email using the shared mailbox address).
Student Email Shifting to Microsoft on Aug. 11 2024
Student Email Shifting to Microsoft on Aug.11 2024
Arkansas State is transitioning our student email client from Gmail to Microsoft. This transition will unify the campus email system and offer several benefits to everyone.
When will the migration happen?
The migration is scheduled for Sunday, August 11 2024. Once it has occurred, all new incoming mail will be delivered to your corresponding Microsoft account. Your student email address will not change.
Will my current email and folders be migrated automatically?
Existing items will not be migrated, but students can use the Google Takeout service to export their email, documents, etc. Instructions for exporting from Gmail can be found in the A-State Knowledge Base.
If you currently use your student Gmail address as your Apple ID or Android ID, you should switch to a personal email address before the migration.
How will I access my new inbox?
Student inboxes can be accessed through the web at https://outlook.office.com/mail/, linked to your smartphone through the native email client or the Outlook mobile app. You will also be able to access through the my.AState portal and the Outlook app on your laptop or desktop.
Additional questions?
For more information about the migration, reach out to the ITS Helpdesk.
Upcoming change to Microsoft MFA
A-State will soon be moving away from Cisco Duo and will be moving fully to Microsoft Authenticator
- You can follow this link for help setting up the new Authenticator:
https://kb.astate.edu/books/student-email-setup/page/adding-microsoft-authenticator-to-outlook-account
What is changing
On August 15, Microsoft announced that they will begin rolling out mandatory multifactor authentication (MFA) sign-in for Azure (also known as Microsoft Entra ID) resources in October 2024.
What to expect
As an A-State user, you will not need to change or update anything. On September 30, 2024, you will start to see a new prompt when logging in to any of the M365 apps or services provided by A-State. Some applications may require you to re-authenticate.
When authentication, you will now be prompted to select which authentication method to use for MFA. Select the Cisco Duo method to begin Duo authentication. If you have multiple Entra ID authentication methods enabled, you may need to click Other options to see the Duo authentication method.

You'll be redirected to the Duo Prompt Completing Duo authentication returns you to Entra ID to complete your application login.
First time user account activation
Welcome to Arkansas State University!
Now that you have received your welcome letter with your A-State email address, you can activate your account by setting the password and completing the setup of Microsoft Authenticator.
Password Setup
First, let's get your password setup.
You will need both a computer/tablet and a mobile phone for this process
- From a web browser, visit www.outlook.com and select Sign in.

-
On the sign in page, enter your A State email address.

-
On the password screen, select Forgot my password.

-
Enter your full A-State email address and verify the characters that are shown in the captcha and then click Next.

-
On the verification page, your personal email address on file with A-State has been setup as your alternate email address. Click on Email to have a verification code sent to your personal email address. You can change this address after activating your account.

-
Enter the verification code that you received and select Next.

-
Enter your new password, confirm it and select Finish.

The A-State password requirements must contain:
• At least 15 characters and one capital letter, one lowercase letter, one number, and one special character
• It also must NOT contain any part of your name or anything too closely related to A-State
• It can also be set up as a passphrase - Once your password is set, you can sign in and start using your account. Select the click here link to sign in.

- Enter your A-State email address and select Next.

- Enter the password for your A-State account and select Sign in.


Please keep your password secure, A-State will never ask you for your password
Microsoft Authenticator
- After signing in with your password, you will be prompted to set up Microsoft Authenticator
- On the "Let's keep your account secure" screen, click Next

-
- Download the Microsoft Authenticator app to your phone by either scanning the QR code below or by going to the App Store (iPhone/iOS) or the Play Store (Android)


-
-
- After you download the Microsoft Authenticator app on your phone click Next on the computer
-

-
- Open the app and make sure you allow notifications on your phone and then click Next on the computer

-
- A unique QR code will generate on the next screen
- Be sure to scan the code by using the Microsoft Authenticator app on your phone (select Scan QR code)
- A unique QR code will generate on the next screen


-
- Once you scan the QR code, click Next on the computer
- Microsoft will then generate a random number on the computer, go to your the Authenticator app and enter the number you see on screen

-
- After you enter the number in the app, your A-State account will be successfully linked to your Microsoft Authenticator app, Click Done

-
- The next page will show you have successfully added Microsoft Authenticator as a verification method, along with your personal email. Click Done and continue to your Outlook inbox

- You have now completed the setup for your A-State user account and finished securing your account with the Microsoft Authenticator.
OPTIONAL
- If you are not redirected back to the Microsoft portal or you receive an error message when you are redirected, just close your web browser and reopen it. Then go to myaccount.microsoft.com and sign in. You will not have to repeat the setup process.
- Once you have completed the sign in process, if you are not prompted to setup the Microsoft Authenticator, select My Account and then Security Info

- Then you should be prompted to set up the Microsoft Authenticator. If not, The Security info page will show all the authentication methods currently configured for your account. From here, you can change or delete existing methods or add new ones.
To change an existing method, select the Change option next to the method you would like to change. Selecting Delete will remove it from your account.
- To add new methods to your account, select the Add sign-in methods.

- Select Microsoft Authenticator and follow the prompts to complete the setup. (Phone is no longer an authentication method)

For further assistance, contact the ITS Help Desk at 870-972-3933 or stop by IT Support Services (itsupportservices@astate.edu). It is located on the bottom floor of the Dean B. Ellis Library, Room 149


View Bitlocker Keys
If your device has been locked and requires a Bitlocker due to being connected with your university Microsoft account, below is how you can retrieve the Bitlocker key.
1. Go to myaccount.microsoft.com
2. Sign in using your full A-State email address and A-State password.
3. It will then ask if you want to stay signed in and you can do this if you are on a personal computer but if you are on a public computer, it is not recommended.
4. You should then see an option for Devices on the left hand side

5. Once you select the Devices option, it should show devices that you have connected to your A-State account. Select the drop down arrow to the left of the device to then see if a Bitlocker key is assigned.


For further assistance, contact the ITS Help Desk at 870-972-3933 or stop by IT Support Services (itsupportservices@astate.edu). It is located on the bottom floor of the Dean B. Ellis Library, Room 149.
Update Microsoft Verification Method
- To add or update your Security information, select Update Info on the Security info tile.

- The Security info page will show all the authentication methods currently configured for your account. From here, you can change or delete existing methods or add new ones.
To change an existing method, select the Change option next to the method you would like to change. Selecting Delete will remove it from your account. - To add new methods to your account, select the Add sign-in methods.
- Select the method you would like to add to your account and follow the prompts to complete the setup.

E-Mail Sending Limits
Arkansas State University applies email sending limits to help protect university accounts, university data, and A-State email systems from phishing, credential compromise, spam, and unauthorized mass email activity.
Overview
Microsoft has announced upcoming enforcement of additional Exchange Online sending limits, including external recipient rate limits. In addition to Microsoft Office 365 service-level limits, A-State may apply role-based sending limits to certain account types.
At this time, A-State is implementing sending limits for student accounts only. Employee-specific limits for faculty and staff accounts may be implemented in a future phase.
Current A-State Sending Limits
| Account Type | Internal Recipients Per Hour | External Recipients Per Hour | Total Recipients Per 24 Hours | Status |
|---|---|---|---|---|
| Students | 250 | 250 | 500 | Effective 6/29/26 |
| Employees (Faculty & Staff) | 250 | 250 | 500 | Effective 6/29/26 |
Why are these limits in place?
These limits help reduce the impact and spread of phishing, credential harvesting, spam, and other malicious email activity. They also help protect A-State accounts and preserve the reputation of university email systems.
What happens if I exceed one of the limits?
If an email would cause an account to exceed one of the sending limits, the message may fail to deliver to recipients. The account may also be restricted from sending additional email until the activity is reviewed.
- The email may fail to deliver to all recipients.
- The account may be restricted from sending mail.
- An alert may be generated for IT Security review.
- Account access may be temporarily blocked if the activity appears malicious or indicates account compromise.
Will I receive an error message?
In many cases, the sender may receive a delivery failure notice for messages sent after the account has been restricted.
The error may include wording such as:
- Sending email address not recognized as a valid sender
- 550 5.1.8 Access denied, bad outbound sender
What should I do if my account is restricted?
If your account has been restricted from sending email, contact the ITS Help Desk for assistance.
ITS Help Desk
Email: itshelpdesk@astate.edu
Phone: 870-972-3933
What if I need to send email to a large group?
Student email accounts are not intended for mass email distribution. If you need to send messages to a large group, you should work with the appropriate university department, faculty member, advisor, or administrative office to determine the appropriate communication method.
- Departmental communication channels
- Approved university email distribution lists
- Canvas announcements or course communications
- Other approved university communication platforms
Can an exception be granted?
Exceptions to student sending limits are not routinely granted. Any request for an exception must have a valid university business or academic purpose and must be sponsored by an appropriate A-State department or administrative office.
Microsoft Office 365 service-level sending limits still apply and cannot be overridden by A-State.
Related Information
Microsoft Exchange Online sending limits are available in Microsoft’s official documentation: Exchange Online limits