VPN
A VPN (virtual private network) is used to connect to the A-State network when you are not physically on campus. Global Protect VPN is only available on Windows and Mac devices; it is not available on iOS or Android devices. Fortigate VPN is available on Windows and iOS devices.
This is beneficial for people who need access to things like Banner 9 Admin Pages, Banner Workflow, Fileshare and Remote Desktop when you are away from campus.
You do not need to use a VPN in order to access the A-State Portal, A-State email, Self-Service Banner, Canvas or Touchnet when you're away from campus because these things are always accessible, no matter what location, as long as you have Wi-Fi access.
- Global Protect Download and Installation Instructions
- How to Use Global Protect VPN
- How to Download and Use FortiClient for iPad
- How to Request VPN Access
- How to Request International VPN Access
- How To Approve VPN Access for Managers
Global Protect Download and Installation Instructions
Installing Global Protect on Mac
1. Go to https://globalprotect.astate.edu.
2. Enter your full A-State email address and password and click Login.
3. Authenticate using Microsoft Authenticator.


4. Click Download Mac 32/64 bit GlobalProtect agent.

5. Run the installer (images below include the steps you will go through in order to install the application).
6. Make sure the Open with Installer (default) option is selected and click OK.

7. Click Continue.

8. Make sure the Macintosh HD disk is selected and click Continue.

9. Make sure the Global Protect option is selected and click Continue.

10. Click Install.

11. Once you go through these steps and the installation is complete, Global Protect will be successfully installed on your device.
12. Click Close. 
13. A window like the image below will pop up, you can click Move to Trash.

Installing Global Protect On Windows
1. Go to https://globalprotect.astate.edu/.
2. Enter your full A-State email address and password and click Login.

3. Authenticate using Microsoft Authenticator.
4. Click Download Windows 64 bit GlobalProtect agent.

5. Run the installer and then click Next.

6. Click Next.

7. A window will pop up and ask if you want to allow this app to make changes to your computer; click Yes.
8. Click Close to complete the installation when finished.
For further assistance, contact the ITS Help Desk at 870-972-3933 or stop by IT Support Services (itsupportservices@astate.edu). It is located on the bottom floor of the Dean B. Ellis Library, Room 149.
How to Use Global Protect VPN
Using Global Protect
1. Login using your full A-State email address and password at login.asusystem.edu

2. Authenticate using Microsoft Authenticator
3. Once logged in at login.asusystem.edu, open Global Protect.
Mac: Open Global Protect by clicking on the globe icon at the top right of your desktop.

Windows: Type in Global Protect in your search bar on the bottom left of your screen (or find the application in the Start menu) and click on the application. The icon for the application will match the image below.  4. Enter the portal address globalprotect.astate.edu and click Connect.

5. Open Global Protect and make sure that it says Connected.

6. To stop using Global Protect, click the Disconnect button.
For further assistance, contact the ITS Help Desk at 870-972-3933 or stop by IT Support Services (itsupportservices@astate.edu). It is located on the bottom floor of the Dean B. Ellis Library, Room 149.
How to Download and Use FortiClient for iPad
GlobalProtect cannot be used on mobile devices. A-State has a secondary VPN that can be used on mobile devices. These are instructions for installing FortiClient on iPad.
1. Download FortiClient VPN from the iOS App Store onto your device.

2. Open FortiClient VPN; the icon looks like the image below.

3. FortiClient VPN will prompt you to allow Notifications; tap Allow.

4. FortiClient VPN will prompt you with a message saying that this free app doesn't come with any support; tap I accept.

5. FortiClient VPN will prompt you to allow VPN configurations; tap Allow. It may require you to enter your passcode.
6. Tap Select Connection on the next screen.

7. Tap Add Configuration on the next screen.

8. Enter the following information:
a. Name - Enter a name for the VPN.
b. Host - Enter remote.astate.edu.
c. Add Remote Gateway - Ignore this entry.
d. Port - Leave at default (443).
e. SSO - Tap to select (once selected, several options will disappear).
f. Tap Save in the top right corner (the screen should look like the image below before you tap Save).

9. Tap Done in the top right of the next screen.
10. Tap <VPN in the top left of the next screen.
11. To activate the VPN connection, you will need to tap the VPN button.
12. Enter your full A-State email address and current password and tap Login.

13. Authenticate using Microsoft Authenticator.
14. Once connected to the VPN, your screen should look like the image below.

15. To disconnect from the VPN, tap the VPN button.
For further assistance, contact the ITS Help Desk at 870-972-3933 or stop by the IT Support Services (itsupportservices@astate.edu). It is located on the bottom floor of the Dean B. Ellis Library, Room 149.
How to Request VPN Access

2. Click Login and then enter your full A-State email address and password.
3. Authenticate using Microsoft Authenticator.

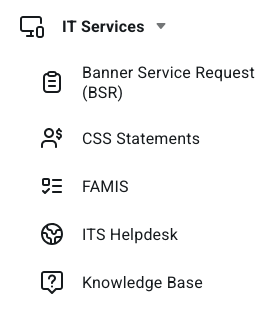
4. Select the Tool option for IT Services and then ITS Helpdesk. This will bring you to the client portal where you can submit tickets. If you are not automatically signed in, please select sign in at the top right corner of the page.
5. Select Get Started and then navigate to the Information Technology Services section. This is where you can locate the A-State VPN Access Request and start filling out the form.

6. Once the form is submitted, this will go to the employee's supervisor for approval/denial. If the suervisor does not approve within 24-48 hours, a notification will be sent to the security team to make an executive review and then approve/deny. If you have been approved, you will be emailed a link within 24-48 hours of approval that should provide you with instructions for how to download and use Global Protect.
For further assistance, contact the ITS Help Desk at 870-972-3933 or stop by IT Support Services (itsupportservices@astate.edu). It is located on the bottom floor of the Dean B. Ellis Library, Room 149.
How to Request International VPN Access
2. Click Login and then enter your full A-State email address and password.
3. Authenticate using Microsoft Authenticator.
4. Select the Tool option for IT Services and then ITS Helpdesk. This will bring you to the client portal where you can submit tickets. If you are not automatically signed in, please select sign in at the top right corner of the page.
5. Select Get Started
9. Click on Accounts & Access.

10. Click International VPN Access Request.

11. Click Request Access.

12. Fill out the form with the requested information and click Submit.

For further assistance, contact the ITS Help Desk at 870-972-3933 or stop by IT Support Services (itsupportservices@astate.edu). It is located on the bottom floor of the Dean B. Ellis Library, Room 149.
How To Approve VPN Access for Managers
1. The Supervisor will get an email stating that they have been assigned the, "Approval from Supervisor" assignment and show some details about how submitted the request for VPN. Click on the link in the email called, "Approval from Supervisor Workflow Step" to go to the approval/rejection screen.

2. The supervisor will then see a screen where you can Approve or Reject the request with the buttons on the right side of the screen.
4. When the supervisor selects either Approve or Reject, they can provide comments as to why it was Approved or Rejected for the Requestor to see. 
5. The next screen should display details about when the request was approved by the supervisor. 
6. Now that the VPN request has been approved by the supervisor, the requestor will receive an email notification telling them to allow 24-48 hours for the access to be added to their account. Once the VPN access is added to the requestors account, they will get an email stating how to intall and connect to Global Protect.

For further assistance, contact the ITS Help Desk at 870-972-3933 or stop by IT Support Services (itsupportservices@astate.edu). It is located on the bottom floor of the Dean B. Ellis Library, Room 149.