
Register for Classes
Registering for Classes
- Go to Register for Classes on the registration menu.
- Select a term and select Continue.
- There are three ways to register for classes.
If you do not know the CRNs of your desired sections
- Open the Find Classes tab.
- Enter the search criteria and select Search.
- Scroll through the search results to find a section.
Closed sections show the status FULL.

Open seats may be reserved for waitlists.

- Select Add to add a section to your summary.
The course will show the status Pending.

You cannot select Add on sections already in your summary.

- To register for pending classes, select Submit.
A successful registration shows the status Registered.

An issue registering shows the status Errors Preventing Registration.
If you do know the CRNs of your desired sections
- Open the Enter CRNs tab.
- Enter one CRN per box.
- Select +Add Another CRN to add more boxes if needed.
- Select Add to Summary.
The course or courses will show the status Pending.


- To register for pending classes, select Submit.
A successful registration shows the status Registered.

An issue registering shows the status Errors Preventing Registration.
Using a Saved Plan
If you have a plan saved for the term, you can open the Plans tab. More information on registering from a plan can be found in the Plan Ahead section of this guide.
Registering for Corequisites
If you are trying to register for a class that has a corequisite, such as a Chemistry lecture and corresponding laboratory course, make sure both classes are pending in your summary before selecting Submit.
You must register for both corequisites at the same time or you will receive a prerequisite and test score error.
Registration Errors
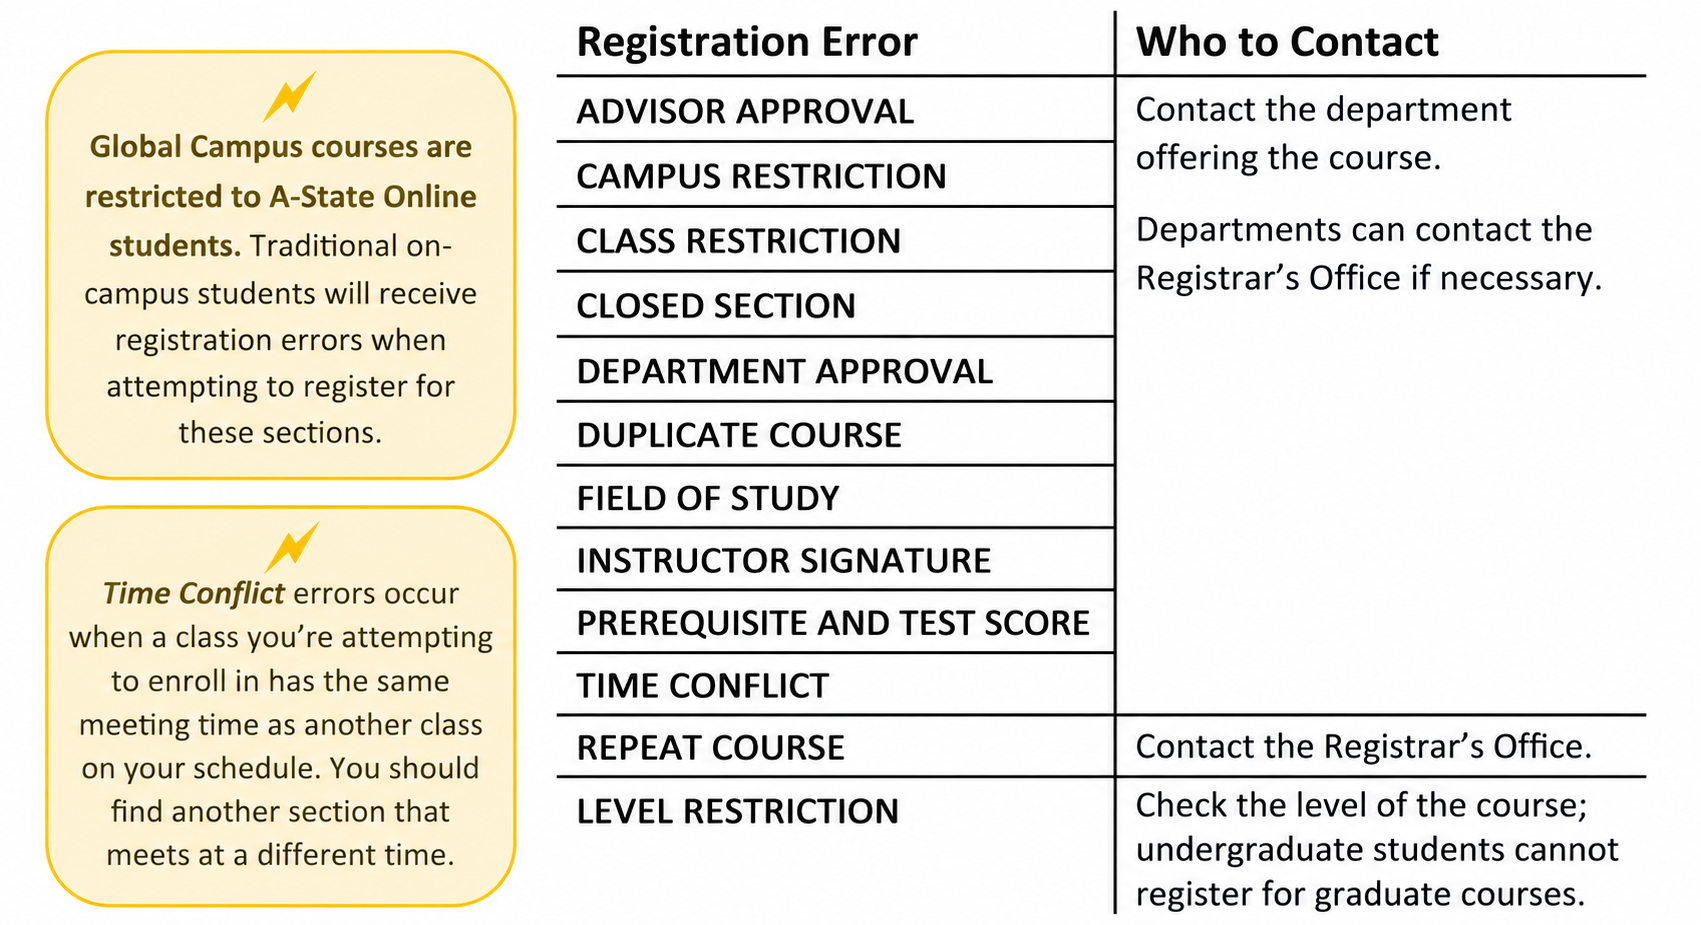
A successful registration will show the status Registered. If an issue occurs, the status will show Errors Preventing Registration. A notification will list the course information and the error that occurred.

The department offering a course and the Registrar’s Office can issue permits to override some registration errors. Not all errors will receive permits.
To request a permit override, send an email to the contact listed below and include your name, ID number, the error type, and CRN. You can view your permits under Registration Status.
Dropping Classes
- Go to Register for Classes on the registration menu.
- Select a term and select Continue.
- Choose Drop Web (DD) from the Action drop-down box for the classes you want to drop.

- Select Submit. A successful drop shows the status Deleted.


Waitlisting
There are two ways to add yourself to the waitlist for a section.
If a class is at maximum capacity but has waitlist seats remaining


- Select Add to add the class to your summary.
- Choose Waitlisted from the Action drop-down box.
- Select Submit to add yourself to the waitlist.
A successful addition to a waitlist shows the status Waitlisted.

If you receive a Closed, Waitlisted registration error

- Choose Waitlisted from the Action drop-down box.
- Select Submit to add yourself to the waitlist.
A successful addition to a waitlist shows the status Waitlisted.

Registering from a Waitlist
If a seat opens in the class, you will receive a Waitlist Notification email to your @smail.astate.edu student email account with a deadline to register for the class.
After receiving the notification, log in to Self Service and register for the class.
- Go to Register for Classes.
- Select a term and select Continue.
- Choose Web Registered from the Action drop-down box for the waitlisted classes with open seats.

- Select Submit to register for the class.
A successful registration shows the status Registered.

