
Simple Syllabus Guide for Instructors
This guide walks instructors through the process of creating and managing syllabi in Simple Syllabus. It provides step-by-step instructions for accessing your syllabus, completing required components, formatting content, and using advanced tools like importing and resetting components. Following these steps ensures your syllabus meets university standards, remains accessible to students, and is properly published in the A-State Syllabus Library. For training, troubleshooting, and downloads, see ➡️ Simple Syllabus Support Overview.
12-Step Guide to Publishing Your SyllabusCopying Courses for Common Course Numbering
Please use the following steps to copy your syllabi from the last terms the courses were offered. After this has been completed, syllabi will begin carrying forward from term to term as usual.
12-Step Guide to Publishing Your Syllabus
1) Access Simple Syllabus
Open Simple Syllabus from one of the following:
Direct Link Pack Portal Canvas (Recommended) astate.simplesyllabus.com Tools → Academics → Simple Syllabus Open your course → Simple Syllabus in Course Navigation.
Missing Simple Syllabus in Course Menu
Canvas has a native tool called Syllabus that can’t be removed. In the School template, it should be disabled, and the Simple Syllabus link should be enabled instead. But if you copy from an older course, the Simple Syllabus link may be disabled.
To Fix: Navigate to your Course Settings → Navigation. Click the three-dot menu next to Syllabus to select Disable. Then find Simple Syllabus and Enable. You can then drag it up to where you would like it to be found in your course menu. Make sure to scroll to the bottom of the page to Save your changes.
Cross-Listed Courses: The Simple Syllabus link in Canvas only works for the main section. To edit a cross-listed section, use Pack Portal or the Direct link.
2) Review Your Dashboard & Start Editing
- After you log in, you’ll see a Tasks list with your courses.
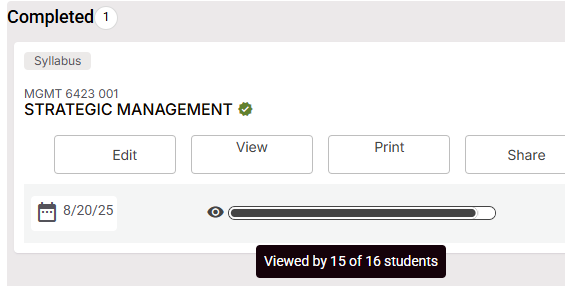
- Find the course and select Edit to open the syllabus editor.
If you’re teaching multiple sections, you’ll see a task for each section that requires a syllabus.
After your syllabus is deployed, it will track how much of it each student has viewed and if they have clicked the Acknowledgement button to verify they have read the syllabus. You can click the viewed progress bar to see a report for each student in the class.
2a) Copy from an Existing Syllabus (Optional)
If you taught this course previously, you can reuse content:
- In the editor, choose Replace with a different Syllabus (if available in your view).
- Select the term and course to copy.
- Continue to step 3 to review & update dates, textbooks, policies, and any time‑sensitive items.
Schedule Sync Note
If the previous syllabus had a manually edited schedule, the Canvas sync may be broken. Use Reset Content → Course Schedule/Outline later in Step 9 to restore sync.Cross-Listed Sections: If you’re editing a cross-listed section, you can copy the syllabus from the main section to get started.
3) Course Information
This section is typically pre‑populated from Banner:
- Course title, subject/number, CRN, section, credit hours
If the University Bulletin or Banner info is incorrect, contact khennings@astate.edu
4) Instructor Information
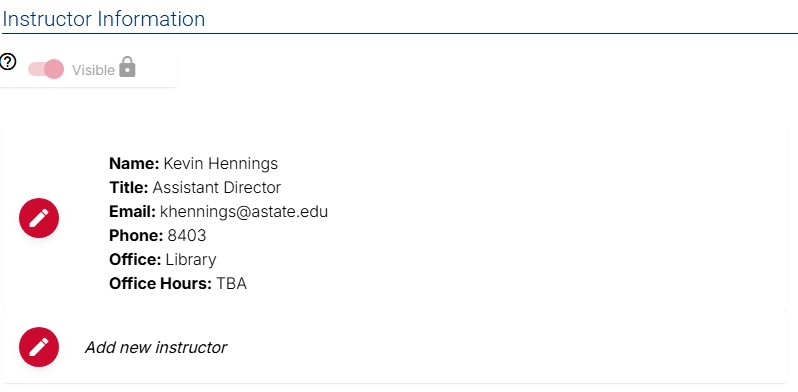
- Select the pencil icon to edit. Required items are highlighted in orange.
- Confirm or update:
- Name, title, department
- Office location, office hours
- Contact info (email, phone)
- (Optional) Add a headshot.
- Save
Co‑Teaching:
If a co‑instructor isn’t listed from Banner, select Add New Instructor. If they still don’t appear, contact the Office of Accreditation & Assessment to associate them with the course.♿ Use plain text for office hours (e.g., “Mon/Wed 2:00–3:30 PM, Library 610”)—screen readers parse it more reliably than tables or images.
5) Course Description
- Review the catalog description (usually pulled from the University Bulletin).
- If the field is editable and you need to add context, keep it brief to preserve the official description.
- Save
♿ Avoid ALL‑CAPS and color‑only emphasis. Use bold for emphasis.
6) Required Textbooks & Materials
- Click the pencil to edit the Required section.
- Use Book Search to auto‑insert title, authors, ISBN, cover image, or type “No textbook required.”
- Add any required materials (e.g., calculator, lab coat). You can include an image.
- Optional Textbooks & Materials (if provided by your template) work the same way.
If you leave this section blank, it won’t display in the published syllabus.
- Save
Provide specific models or links to help students pick the correct item (e.g., “TI‑84 Plus CE”).
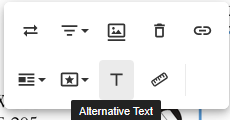
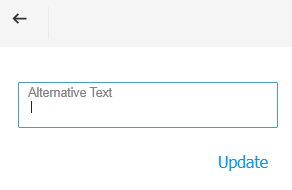
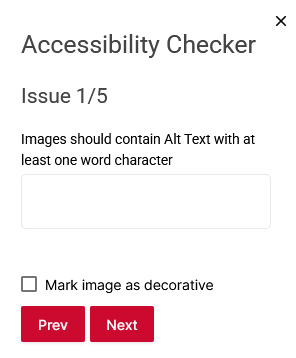
♿ If you insert an image, click on the image to add alt text (e.g., "Logo for Simple Syllabus, a course syllabus management platform").
If the image is only decorative, enter two double quotation marks [""] in the provided field, or check the Mark image as decorative box in the Accessibility Checker.
7) Program & Course Learning Outcomes
7a) Program Learning Outcomes (PLOs)
- Usually maintained by your department/course master and prefilled from the Assessment site.
- ➤ See: The Program Level Student Learning Outcomes (SLOs) for each College
- If your role permits editing, paste text (not tables) or update as instructed by your department.
7b) Course Learning Outcomes (CLOs)
- Select the pencil and add each outcome as a separate item.
- (Optional) Indicate the module/week when each outcome will be addressed.
- Save
Use measurable verbs (e.g., analyze, apply, evaluate). Keep outcomes concise (1–2 lines each).
♿ If you include a curriculum map, use the editor’s Insert Table tool—do not paste tables from Word (pasted tables can break screen‑reader reading order).
8) Assessments & Evaluation Procedures
- Describe how students are assessed (e.g., quizzes, projects, labs, exams).
- Summarize weighting or point totals as text or a native table added via Insert Table.
- Save
- ♿ If you use a table, add a header row and keep it simple (no merged cells).
- ♿ Provide text equivalents for any icons or images that convey meaning.
9) Course Schedule / Outline (Canvas Sync)
If you use Canvas assignments, Simple Syllabus can sync:
- Open the Course Schedule / Outline component.
- Ensure your Canvas assignments have names, due dates, and points set.
- The schedule will auto‑populate from Canvas and update when you change due dates in Canvas. Students are notified when the syllabus updates.
If you need to add items manually (e.g., non‑graded milestones):
- Add them here—but note that typing in this component breaks the Canvas link.
- Important – Sync Integrity
- Manual edits in this component break the Canvas connection.
- To restore sync, select Reset Content → Course Schedule/Outline → Next → Reset.
Cross‑Listed Sections
Simple Syllabus will only auto-populate to the main section. For cross‑listed sections, copy the syllabus from the main section. For the Schedule/Outline, add the note: “See Canvas for dates.”
10) Add Custom Syllabus Section(s)
If you want to add content that isn’t already in your template, create a new component.
To add a new section (component):
- Select the “Add” button (➕) in the top left menu, or
- Scroll to the very bottom and choose Add new component.
Your new section appears at the bottom.
The ability to reorder components is disabled.
Seamless Blend
To make the new content look like part of an existing section, hide the heading of the new component before you add content.♿ Use built‑in heading styles (H2/H3) only if the title is visible; avoid “fake headings” using bold/size.
♿ Avoid pasting formatted tables or content from Word; paste as plain text, then format with the editor.
11) Policies (University & Department)
- University Policies (e.g., Academic Integrity, Title IX, Accessibility, Inclement Weather) are auto‑inserted into the template and updated centrally.
- Add department/program/course‑specific policies in the designated component (e.g., Lab Safety, Clinical Policies, Technology Use).
Online Identity Verification (BioSig ID)
If your course uses BioSig ID, paste the standard statement into the SIG‑ID component (if present in your template).
12) Preview, Submit & Publish
- Select Preview to check layout and links.
- Complete any remaining orange (required) fields—the Submit button stays grayed out until all required items are complete.
When all required items are complete, the Submit button will be red and can be clicked.- Select Submit. You’ll see ? confirmation and receive two links:
- Syllabus (Library View) – public view in the A‑State Syllabus Library
- PDF Download – printable version (often 9+ pages even with minimal content)
♿ Before submitting, run the Accessibility Checker in Simple Syllabus to fix issues like missing alt text or heading errors.
After publishing, open the Library View and verify that headings, links, and the schedule display as expected.
The official version of the syllabus is the one in the Simple Syllabus / A‑State Syllabus Library.
Student Features (What Students See)
- Section Navigation: Students can jump to any section via the left navigation menu.
- Acknowledgment (if enabled by the department): A progress bar and “I have read this syllabus” Acknowledgment button can document student review.
- Access: Students view syllabi in Canvas → Simple Syllabus or the public A‑State Syllabus Library.
Related Pages
- Simple Syllabus Support Overview — training video, troubleshooting, downloadable guide
- Managing Course Navigation Links in Canvas — enable Simple Syllabus, disable Canvas Syllabus (KB link)
- Canvas for Educators — Canvas assignment setup & date management (for clean schedule sync) (KB link)


![[Screenshot: Simple Syllabus instructor dashboard with task list]](https://kb.astate.edu/uploads/images/gallery/2025-09/simple-syllabus-task-list.jpg)

![[Screenshot: Replace with a different Syllabus option]](https://kb.astate.edu/uploads/images/gallery/2025-09/simple-syllabus-replace-with-a-different-syllabus.jpg)



![[Screenshot: Add Optional Materials]](https://kb.astate.edu/uploads/images/gallery/2025-09/simple-syllabus-optional-materials.jpg)
![[Screenshot: image alt text entry field]](https://kb.astate.edu/uploads/images/gallery/2025-09/scaled-1680-/simple-syllabus-image-alt-text-accessibility-checker.png)
![[Screenshot: Course Learning Outcomes editor with Week/Module tag]](https://kb.astate.edu/uploads/images/gallery/2025-09/simple-syllabus-clos.jpg)
![[Screenshot: Rich text editor with Insert Table menu open]](https://kb.astate.edu/uploads/images/gallery/2025-09/image-1758742429218.jpg)
![[Screenshot: Schedule showing Canvas-synced items with due dates]](https://kb.astate.edu/uploads/images/gallery/2025-09/simple-syllabus-course-schedule.jpg)
![[Screenshot: Add (+) button in top menu]](https://kb.astate.edu/uploads/images/gallery/2025-09/simple-syllabus-plus-sign.jpg)
![[Screenshot: Add new component button at bottom of page]](https://kb.astate.edu/uploads/images/gallery/2025-09/simple-syllabus-add-new-component.jpg)
![[Screenshot: Component heading area with “display name” checkbox]](https://kb.astate.edu/uploads/images/gallery/2025-09/simple-syllabus-hide-heading.jpg)
![[Screenshot: department/program/course-specific policies menu]](https://kb.astate.edu/uploads/images/gallery/2025-09/simple-syllabus-course-policies.jpg)
![[Screenshot: SID-ID menu]](https://kb.astate.edu/uploads/images/gallery/2025-09/simple-syllabus-sig-id.jpg)
![[Screenshot: Preview screen with left side navigation]](https://kb.astate.edu/uploads/images/gallery/2025-09/simple-syllabus-preview.jpg)
![[Screenshot: Grayed out Submit button]](https://kb.astate.edu/uploads/images/gallery/2025-09/simple-syllabus-gray-submit.jpg)
![[Screenshot: Red Submit button shown when all required items are complete]](https://kb.astate.edu/uploads/images/gallery/2025-09/simple-syllabus-red-submit.jpg)
![[Screenshot: confirmation menu with two links]](https://kb.astate.edu/uploads/images/gallery/2025-09/simple-syllabus-confirmation-links.jpg)
![[Screenshot: Accessibility Checker showing Issue 1 of 2, Table needs a header]](https://kb.astate.edu/uploads/images/gallery/2025-09/simple-syllabus-accessibility-checker.jpg)
![[Screenshot: Simple Syllabus Student Acknowledgement and Review Progress]](https://kb.astate.edu/uploads/images/gallery/2025-09/simple-syllabus-student-acknowledgement-and-review-progress.png)